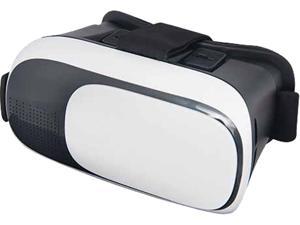
 If you haven't seen Google Cardboard, you absolutely HAVE to check it out! Virtual Reality is still relatively new in education; however, the implications for its use are staggering. Imagine being able to take a class of students to the top of Mount Everest, to the Parthenon, to the nesting grounds of emperor penguins... it's incredible! With a pair of VR Googles, students can use a phone to visit these locations and thousands more. Not a social studies teacher? Neither was the MATH teacher who told me about this cool activity she had in mind for her students... she was teaching the Pythagorean Theorem. Here's a refresher in case you haven't had middle school math for a while: 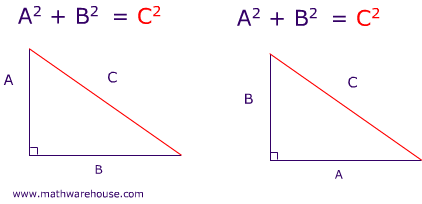 The activity had the kids taking a pretend flight on "Pythag Air" to famous world landmarks and using them to calculate the missing side(s) of the triangles using the Pythagorean Theorem. They had an airline ticket to record their answers: 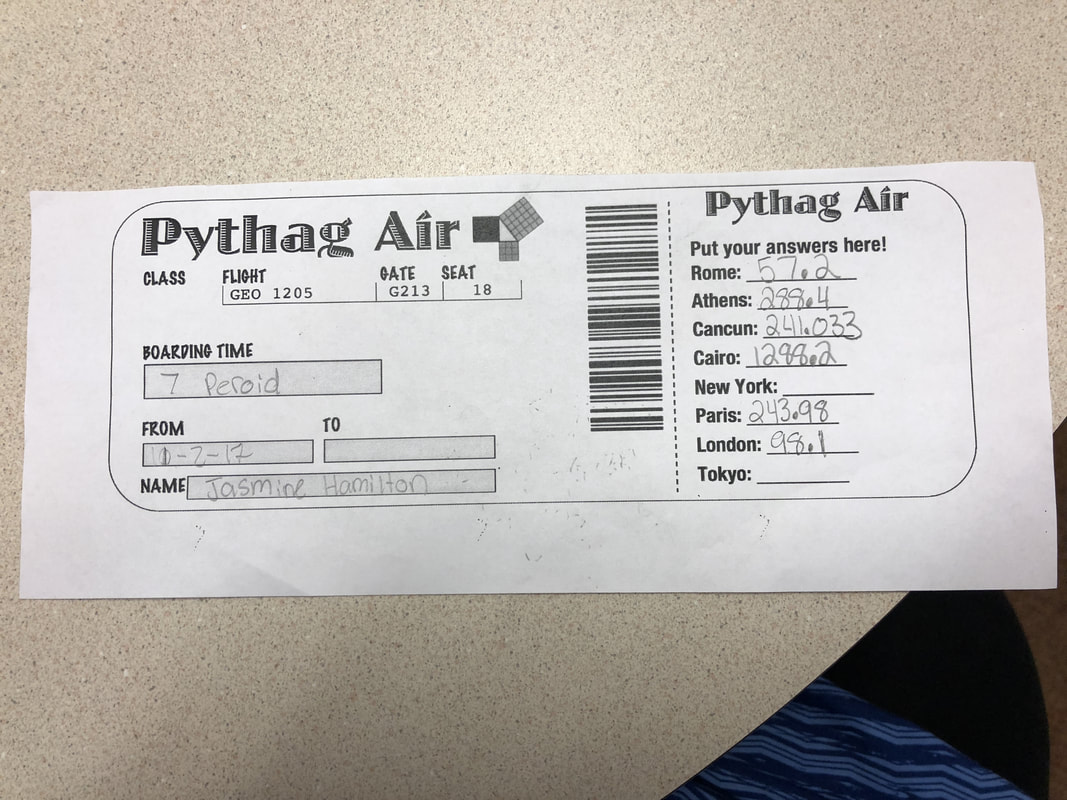 Here are two examples of the activity. You can view the rest of them HERE at the TeachersPayTeachers activity: So creative and fun, RIGHT?? Way better than just solving a bunch of problems on a whiteboard! As the teacher was describing the activity, I saw the perfect opportunity to use our VR headsets... the kids could go on a virtual field trip to the locations that they studied! Needless to say, it was a hit. The kids were floored by how awesome the places looked in the headsets! For this particular group of high-needs learners, any new an exciting way to engage them helps. Kudos to Mrs. Rhodes for her great idea! Are you ready to take your kids on a virtual field trip, too? You'll need:
Where will YOU go with your class? Comment below!
0 Comments
 Capstone Interactive eBooks are an awesome resource available in our library for both students and staff! These engaging, interactive texts do double duty as an audiobook, too! Students can elect to have the books read aloud and/or highlight the words as it reads. The best part about these amazing titles is that they have an unlimited number of simultaneous users! This means a single user, a small group, an entire class, or even the whole school can be reading the same book at the same time! It's amazing! Here's a short video I created to show you the easiest way to access our Capstone Interactive collection... as of today, there are 270 titles available for you at SPMS to check out! Enjoy! What's your favorite Capstone Interactive title? Comment below and tell me!
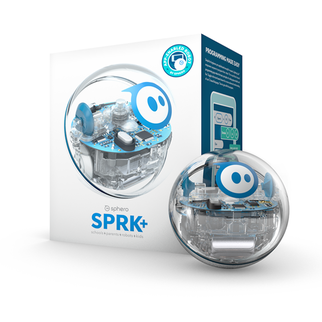 Summer school is a great opportunity to try out some unconventional projects - the kids need extra motivation to continue to show up and work when it should be summer vacation. One of the most popular items in our Makerspace are the Sphero SPRK+ Robots. These small, easy-to-use robots are constantly skittering around underfoot in the library during the school year. They are sealed, so they are waterproof, too! I'd heard about using the Spheros to paint on Pinterest a few months ago, and I just KNEW we had to try it! However, the idea of having a classroom full of middle schoolers driving paint-covered robots around my carpeted library made me twitchy. I knew it would have to be a small group setting when other students would not be walking into the library... summer school seemed like the perfect opportunity to try out this fun way to create some abstract artwork! We used 9'x12' plastic painting tarps on the floor, the SPRK+ Sphero robots, the SpheroEdu app, washable tempera paints, 8.5"x11" cardstock, and one iPad per Sphero: I was really impressed with their completed work! We discovered a few tips: 1. LESS IS MORE. Paint, that is... use less paint than you think you need. It spreads! 2. SLOW DOWN. Turn the drive speed down on the Spheros - otherwise you'll end up driving paint-covered robots on the carpet. Not that we did that or anything... 3. MODEL. I know that shouldn't need to be said, but model the expected behaviors first so the kids understand what they are to do (and NOT to do). I modeled everything and the kids were very careful and responsible with the robots and the paint. What could have been a huge mess was a really fun art project! If I were to do this during a regular school year, I would add a coding component too - the students did some limited coding with this project, but mostly drove the robots over their paper. I would use larger sheets of paper and require the kids code their robot to drive a pattern or path! My summer school sessions were time-limited, so for this project they were driving the robots manually. Check out some pictures of the students' work below, and don't forget to comment on how you might use Spheros to make art! 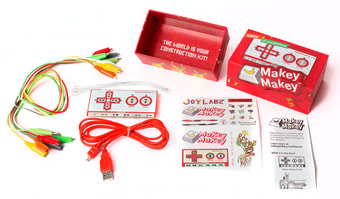 Teaching summer school can be a challenge - many kids are loathe to give up their summer fun to come in to school and work. I knew in order to keep the kids engaged that we were going to have to do some really fun activities... enter Makey Makey! Makey Makey kits are super popular in our Makerspace! If you have never heard of these, check out this video... you'll fall in love, just like we have! PRO TIP: Makey Makey kits are available through the Scholastic Resource catalog if you have book fair money to spend! The students were challenged to design and build a video game controller. We followed the engineering and design process, outlined below: 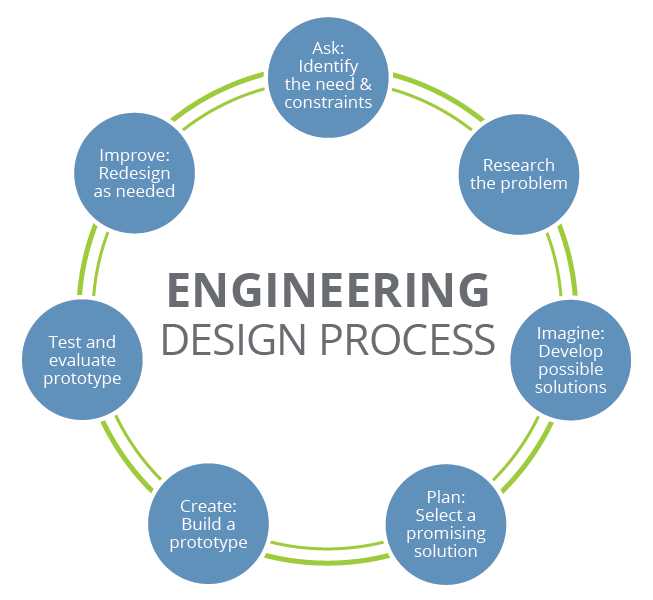 I started by giving them a brief tutorial on how the Makey Makey kits work, and we reviewed the basics of electrical circuits in the process. I supplied them with the kits and other materials to use to make the "buttons" on their controllers: water, playdough, aluminum foil, water (in petri dishes), and of course they had each other to use as well. You can also use fruit - pretty much anything that conducts a mild current! The kids used the Makey Makey App website as well as some flash-based old school video games (Super Mario, Super Mario 3, Tetris, etc.) More advanced coders can use Scratch to create their own games to work with the kits, too! Here are some of their creations... I'm so proud of them! Do you think you could use Makey Makey kits in your classroom? Comment below with how - I'd love to hear your thoughts!
 Stop Motion animation is an amazing creative tool used to make really cool movies... think Nightmare Before Christmas, Wallace and Grommit, the Lego Movie, Coraline, Rudolph the Red Nosed Reindeer, and Shaun the Sheep. It used to be a time-intensive, tedious process that was nearly impossible for students to complete. To complete a stop-motion movie required extensive backgrounds, complex models of characters, and super expensive equipment.... NO LONGER! Using the app Stop Motion Studio (a FREE app!), students are able to easily create really awesome movies using the principles of stop motion animation! Stop Motion Studio allows the students to take photographs and adjust the frame rate of how fast they play. FUN FACT : Most stop motion animation movies are filmed at 24 frames per second (fps)... that means for every one second of movie, there are 24 pictures taken! CRAZY, right??? Watch how easy this is... and check out how I use the "onion skin" feature to see through to the last picture I took. It really helps with aligning the photos and keeping the animation steady: And here is the finished movie... Pretty neat, right? Just WAIT until you see what the students did with it... we gave them the instructions and they ran with it. I want to give you some tips that we learned through trial and error. 1. Use the "onion skin" featureOne of our 6th grade science teachers came to the library to have her kids animate the rock cycle. It was our first attempt at stop motion animation and we didn't know what we didn't know... but we went into it with a "we can totally ROCK this" (see what I did there? HA HA!) attitude. Their movies came out okay, but we both realized that had we known about the onion skin feature that they would have been even better. The backgrounds jumped around some, and the kids had a hard time remembering from class to class where they left off the previous day. Here is a sample so you can see what I mean: 2. Use an iPad stabilizerIf you use some chairs or a book stand to stabilize your iPad, it will cut down on the backgrounds jumping around and overall improve the quality of the video. 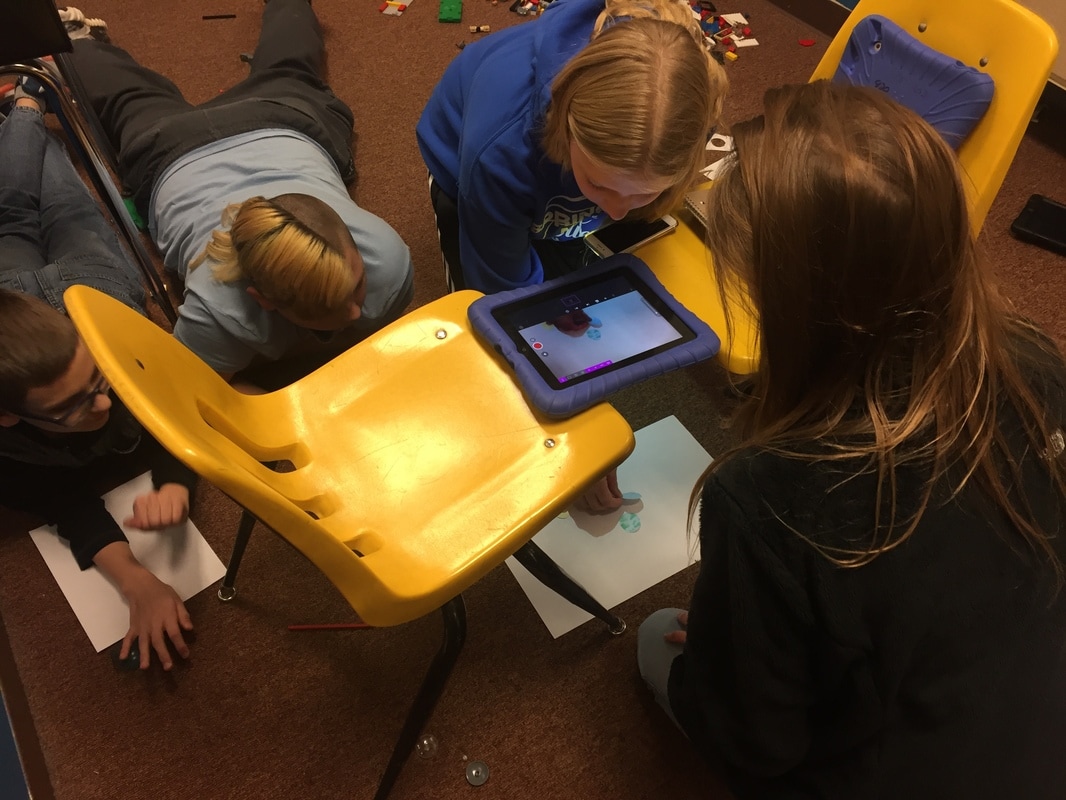 You could even build your own iPad stand out of K'NEX, like this creative student! 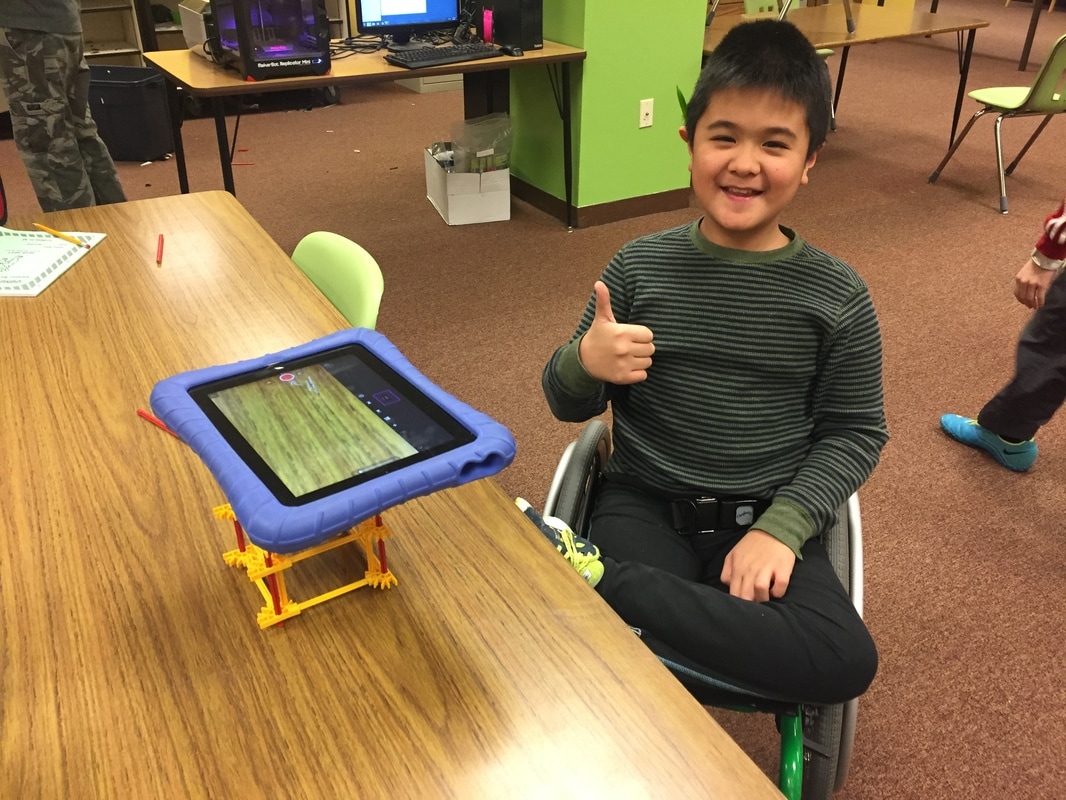 3. Take it to the next level!When the movie is finished, have your students take it to the next level by exporting it to their camera roll and then importing it into iMovie. They can add titles, sound effects, and maybe even use GarageBand to make a custom soundtrack, like these kids! We had students create models of the rock cycle; how the digestive system processes food; and moon phases, seasons, and solar eclipses. While my students' stop-motion movies are all science content based, you certainly could have students create and tell stories, illustrate a historical event, or document the creation of an art project. The possibilities are endless and are only limited by your creativity!
How will YOU use stop motion with your students? Comment below and share your idea! The social committee of Springfield Middle School is hosting a holiday door decoration contest, much to my horror. I am not a crafty person (unless the idea comes from Pinterest - with step by step directions, I can create anything!). I had a brainstorm of inspiration one night though, while staring at some old equipment that needs to go to recycling.... wait for it...  Very punny, right?? Whomp whomp whoommmppp... I'm sure I saw it on a commerical somewhere. I have very few original ideas, let's be honest. This idea of "Tech The Halls" was going to include a Christmas tree with some decorations that were old CDs and mice that I had laying around. When my enrichment coding class heard that I was going to "just" put some paper and CDs on my door, they took it upon themselves to build the most epic door ever. Behold: TECH THE HALLS! 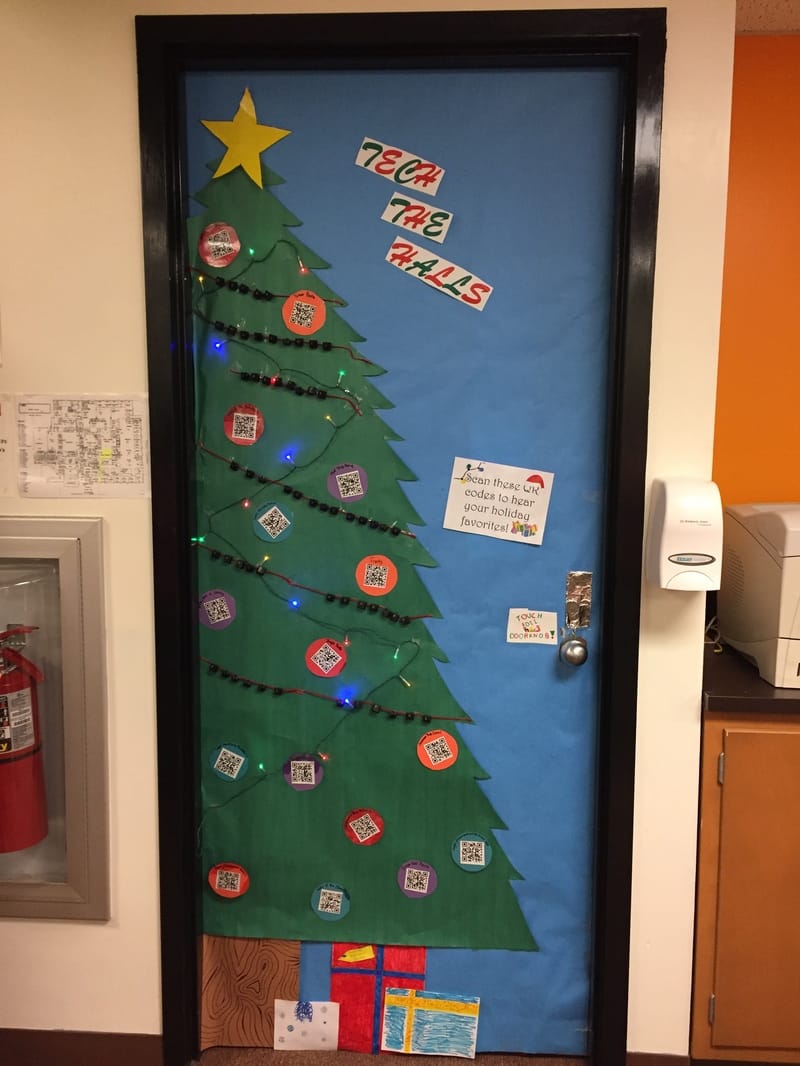 It's awesome, right? I know, it's a little overwhelming. Let me show you up close how fabulous this door really is... 1. QR CODES 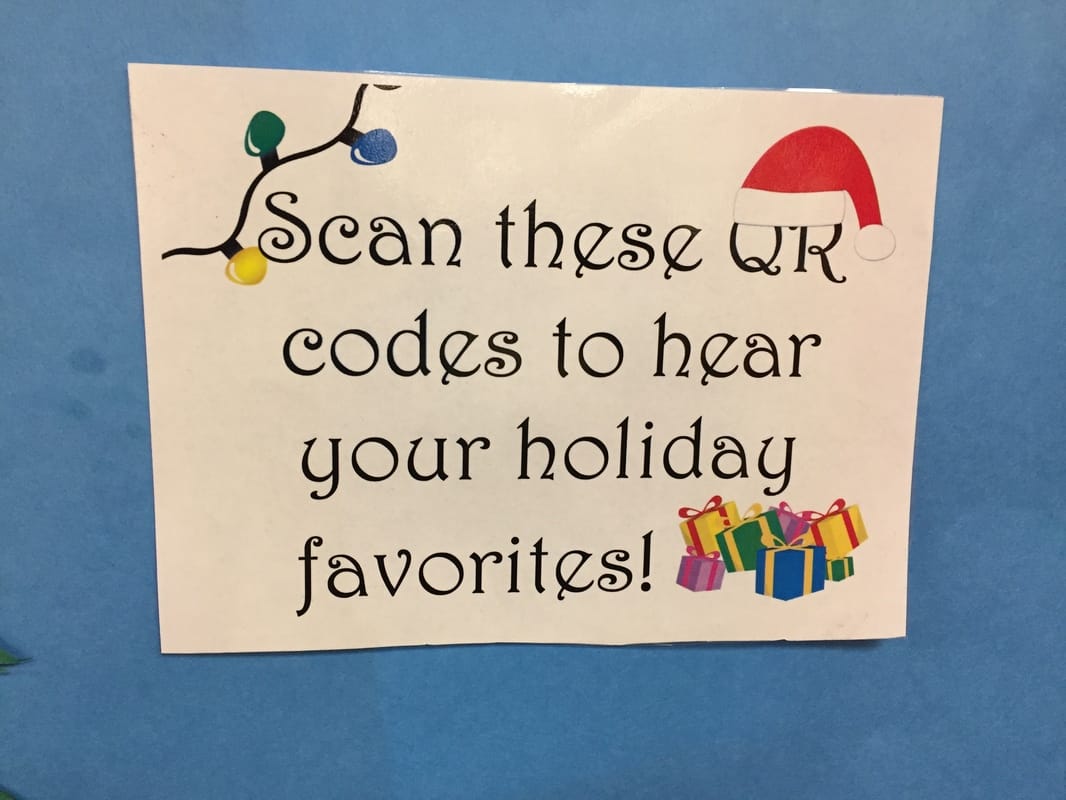 The Christmas balls that you see on the tree each contain a QR code. Each code leads the viewer to a YouTube video of a different holiday song. There are 16 total... LOOK! 2. UPCYCLED KEYBOARD KEYS 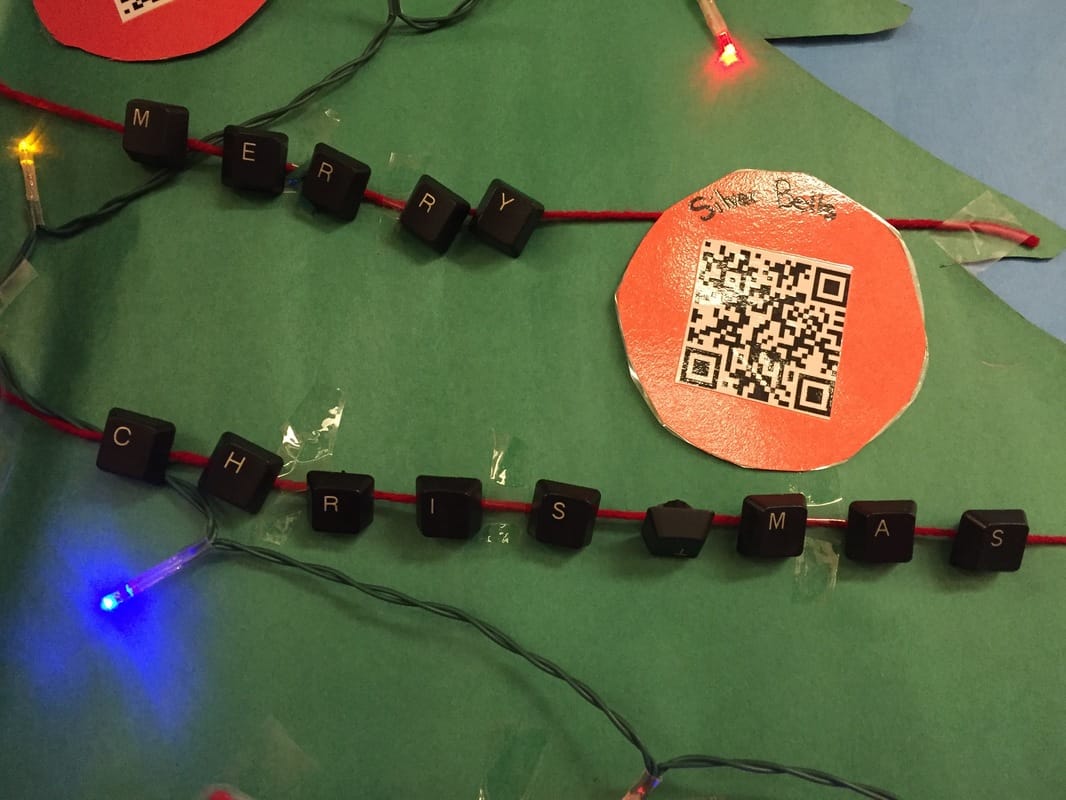 The garland on the tree is made out of old keyboard keys that I let the kids rip up and hot glue to string - and they even decided to spell out holiday words! They included: Merry Christmas, Rudolph, Santa, Joy to the World, Giving, Presents, and more! 3. INTERACTIVITY My students, being the budding programmers that they are, decided that they HAD to make the door interactive. They grabbed our Makey Makey kits (click here for a previous blog post about them) and coded a program in Scratch that allows the user to touch the doorknob and the foil above it to make the door SING. That's right... the door actually SINGS! These very creative kids ran the wires behind the door so that the user completes the circuit by touching both the doorknob and the foil above it: 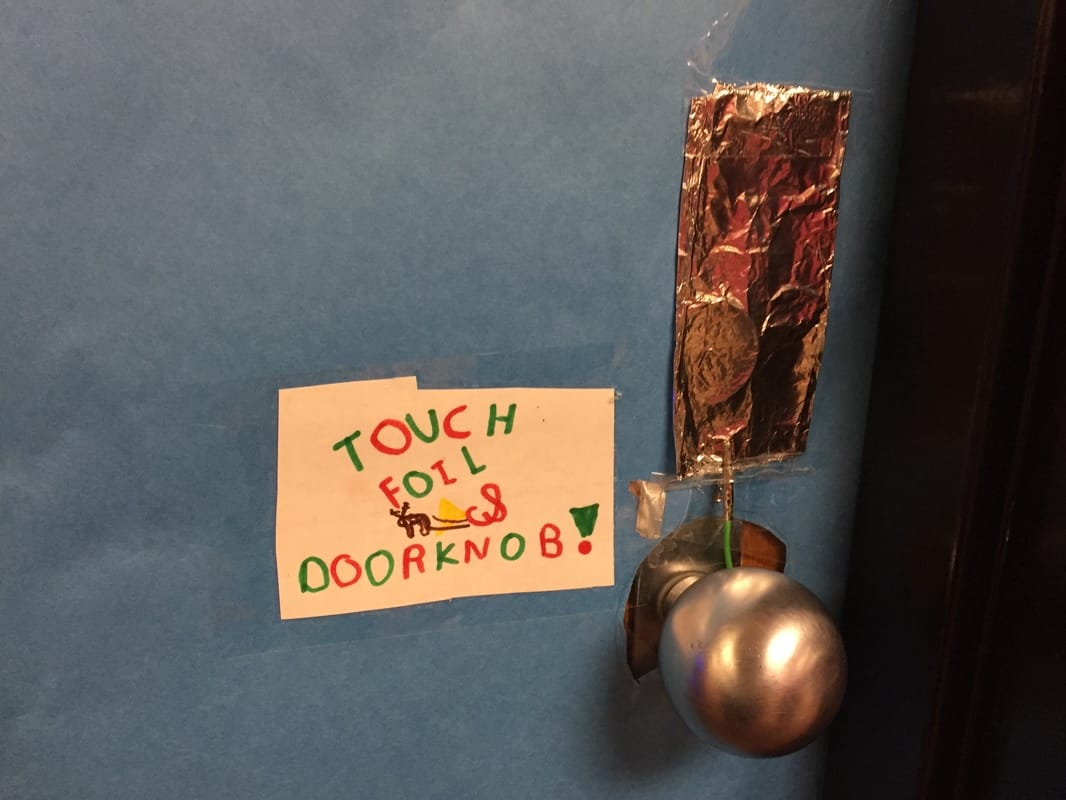 Here is a picture of the magic that runs the show (and the magicians behind it!): 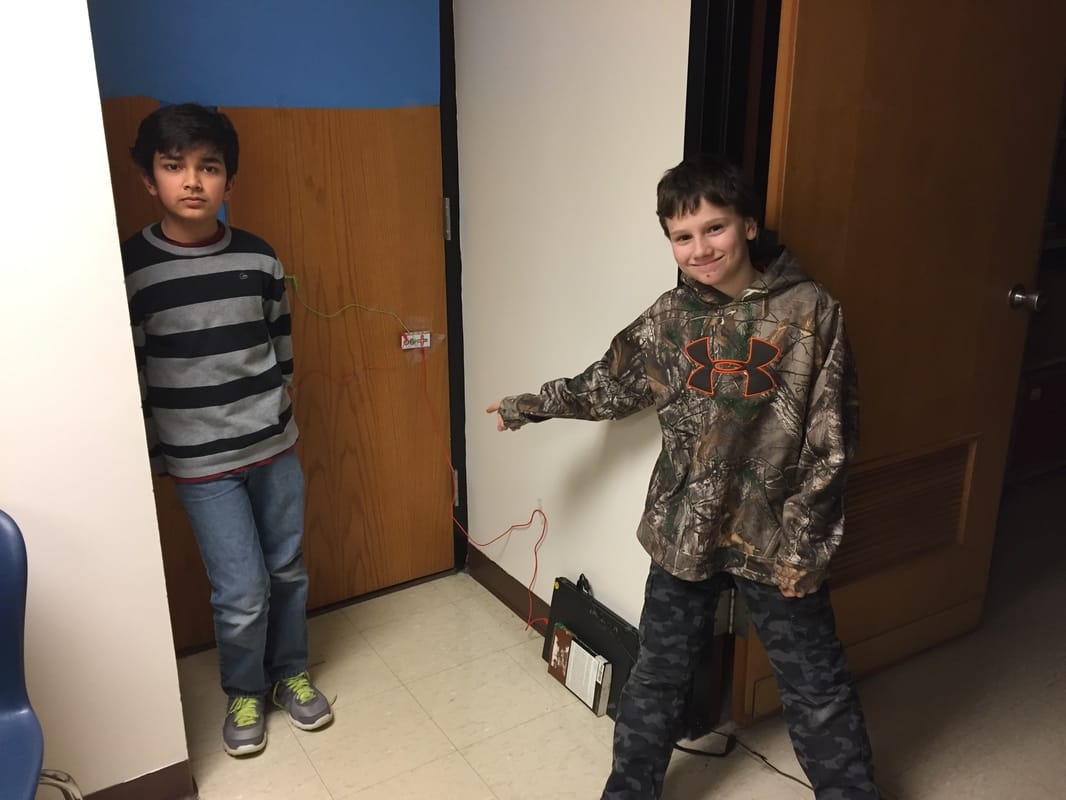 You can see the wiring on the door attached to the Makey Makey. The kids set up the laptop to not go to sleep when the lid is shut, then wrote the program to play one of three random versions of Deck the Halls when the circuit is completed: 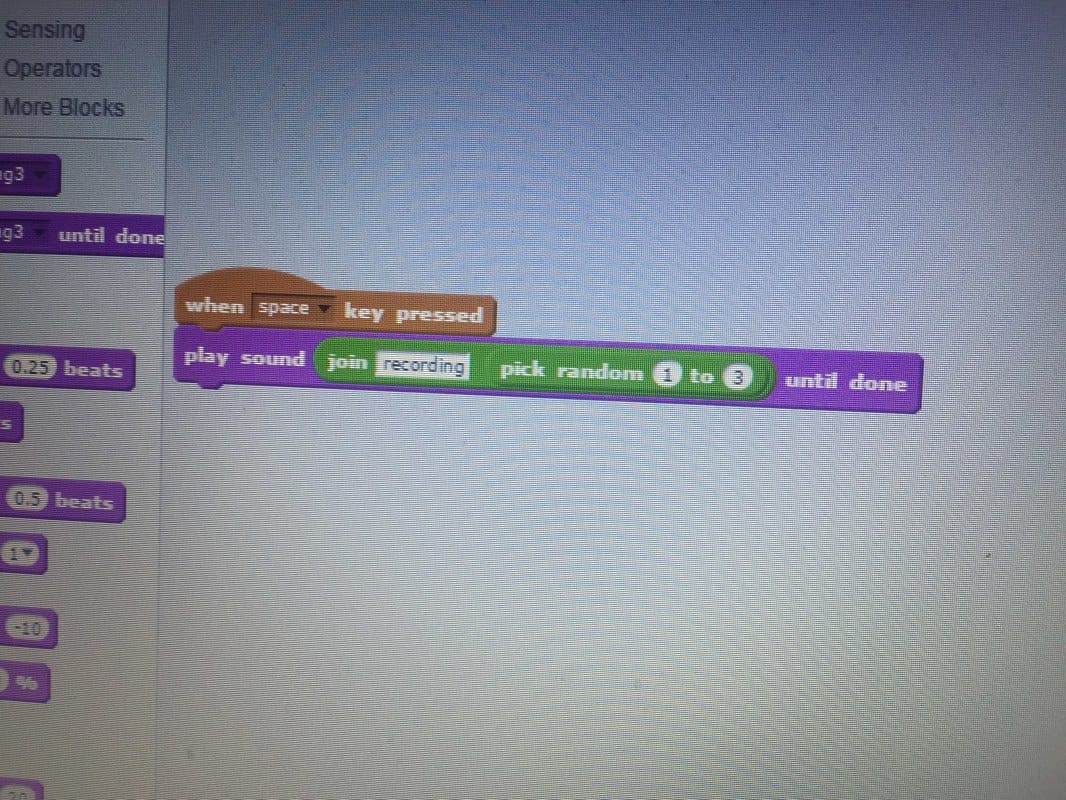 Genius, I know! I take no credit for any of this work, it was totally designed and implemented by students. Bravo to these intrepid engineers!
Interested in getting some Makey Makeys for your classroom or library? Check out their website for all kinds of ideas on how to implement them into the curriculum! Comment below on how you could use these fun tools with your students!  In an ongoing effort to put books in the hands of kids, I decided to run a FaceSwap contest during the month of December. Face-swapping is an option in Snapchat, and there are several apps out there that allow users to swap faces. The challenge for the library was to FaceSwap with a book! Biographies are easiest of course, but there are several Fiction and Everybody books that made for some great FaceSwaps. To encourage entries, I am giving away a SweetFrog gift card for each winner. There are contests for 6th grade, 7th grade, 8th grade, and teachers/staff! Here are some of our hilarious entries below... once you're done laughing, go make one of your own!  I have the honor and privilege of teaching in a county that is very forward-thinking in terms of technology integration. This academic year (2016-17) we are going 1:1 with iPads for grades 3-12 countywide... we are one of very few districts across the state to embrace a 1:1 program on such a large scale. Apple has a new program called Apple Teacher. It's a series of tips, tricks, and information to help you become adept at using Apple products in your instruction, and it's FREE! You can sign up here: www.apple.com/education/teachers/ Once you are signed up, you will have access to a series of instructional videos and resources that will help you expand your knowledge base. There are 8 areas of expertise for Mac and 8 areas of expertise for iPad. After you have reviewed the content, you can take a quiz related to the material. Each quiz contains 5 questions, so there are 80 questions total to earn Apple Teacher status. You'll need to pass each quiz with an 80% (or a 4 out of 5). You CAN retake the quizzes if needed. Each quiz passed earns a badge. To become certified, you'll need to earn all 16 badges. My badges look like this: 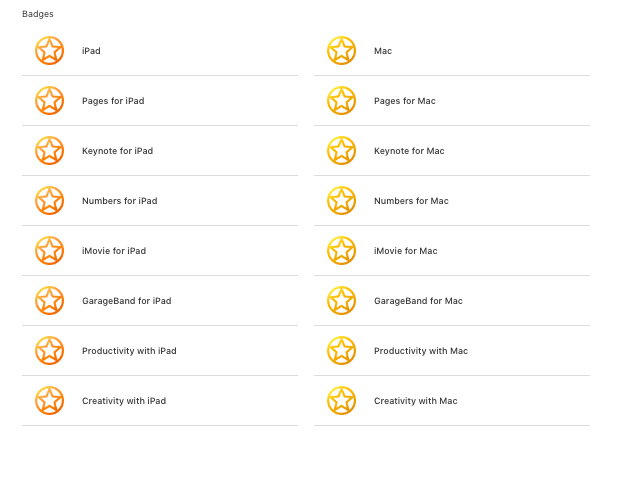 After you have earned your badges, you'll get a congratulatory email celebrating your success! YAY, GO YOU!!! You also will have directions to download and add Apple Teacher logo to your email signature, website, blog, wiki, or other online resource. I found the experience to be enlightening, and I've been teaching with iPads and Macs for more than 5 years. I hope you will sign up to become an Apple Teacher this year, too!  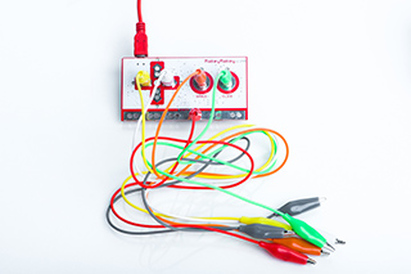 I seriously love Donor's Choose!! Generous donors funded another grant for our media center - this time for four Makey Makey kits! What is a Makey Makey? Watch this video to find out: Now that you've seen that, you REALLY want one, right?? Because they are so much FUN! It's an invention kit that allows kids to make basic gadgets and gizmos using simple alligator clips and an interface. There are tons of programs out there, including Super Mario Brothers, Pac Man, a piano program, bongos, and much more! The best part is that you can use Scratch to program your own ideas, too! We have just scratched the surface of using the Makey Makey kits, but check out some of the fun things my kids created within just a few minutes of busting the kits out: 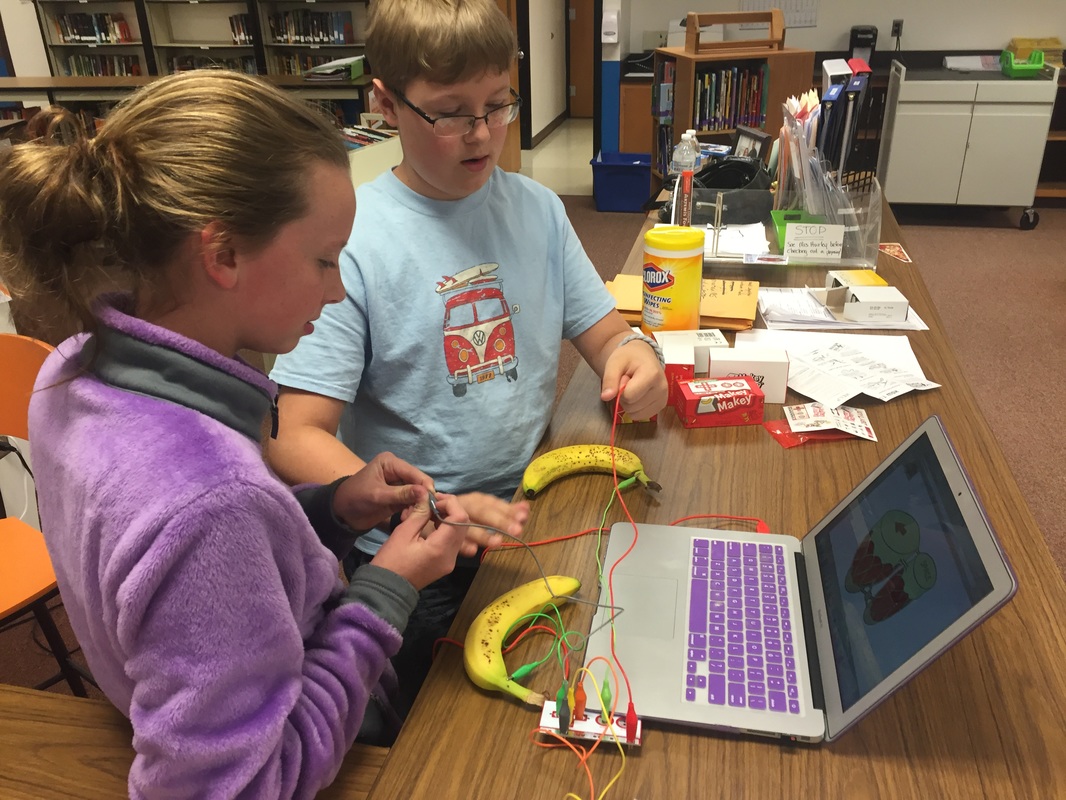 Banana bongos. For real. 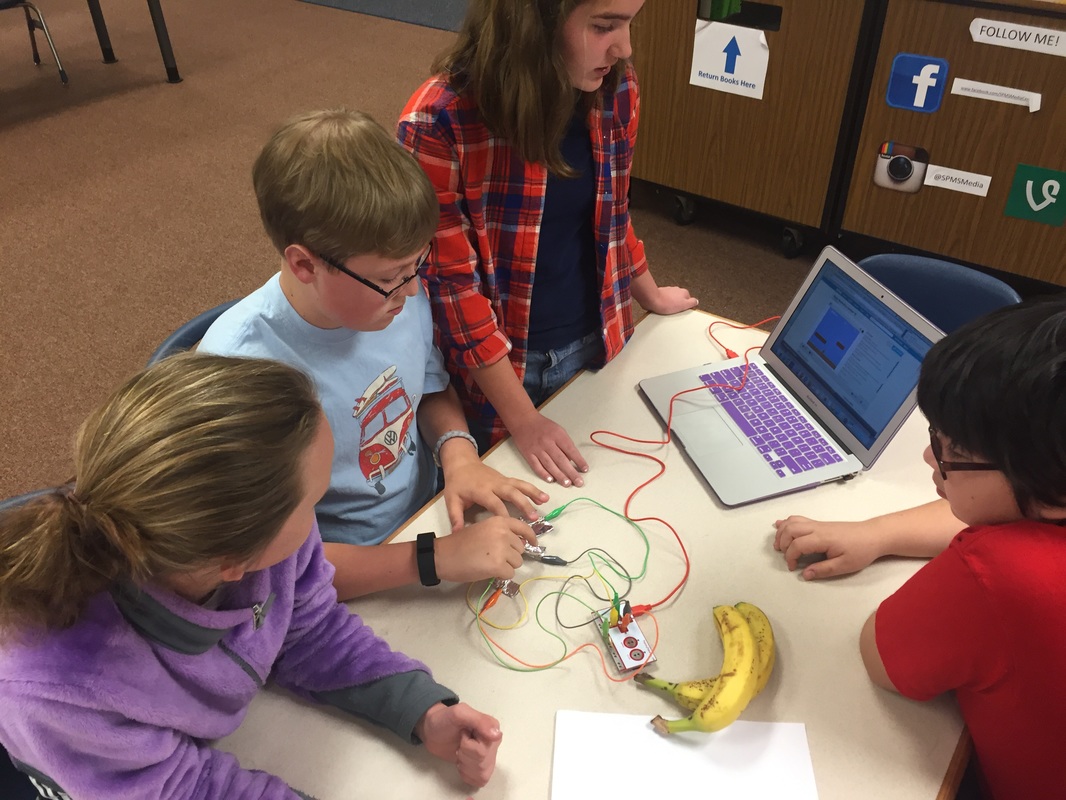 It's hard to see, but this is a remote control to play Super Mario Brothers - made out of aluminum foil! 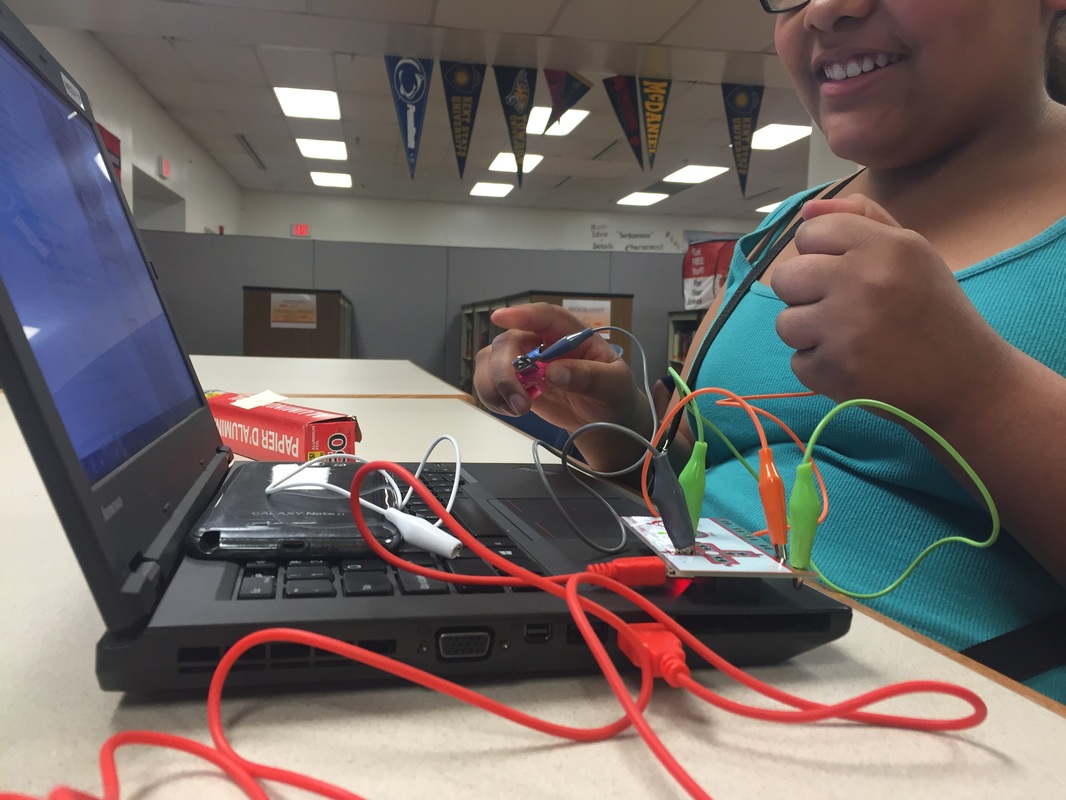 These girls were using themselves as a human synthesizer! Being the nerd that I am, I got in on the fun too - I made a water piano using some petri dishes, water, and the Makey Makey kit!
We have since experimented with playdough, other fruit, and office supplies. Pretty much anything that conducts a low-level electrical current can be used... the possibities are endless! What would YOU make-y with a Makey Makey kit? Comment below! 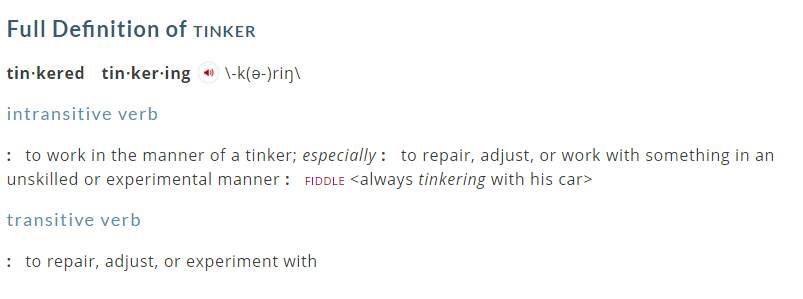 Webster's Dictionary defines tinkering as "to repair, adjust, or work with something in an unskilled or experimental manner". I love to tinker! Even as a kid I used to tear things apart just to see the insides, and sometimes to put them back together. The idea behind a Makerspace is to allow kids to make and explore... I had found some ideas on Pinterest about putting in a TinkerSpace in the Makerspace. The idea is to take old electronics that are headed for recycling and let the students explore them. But where would I get old equipment? Turns out one of our awesome 8th grade teachers was planning on recycling her personal computer from her house. She asked me to take the hard drive out of it, and where she could recycle it. I asked her if I could keep it for the students, and she said YES! Woohoo! The Tinkerspace was born! I set it out on the table with a box of tools (screwdrivers, wrenches, pliers) - it wasn't long before a couple of students asked me what the computer was for. When I told them, they dove right in! Within minutes they had the box opened up and were removing pieces. The best part is that they also grabbed another working laptop and were researching what the parts were called and what their functions were. It was a completely student-directed learning experience. YES. Now that the Tinkerspace is up and running, I am full of other ideas... how about old radios? Flashlights? Speakers? YES! Let's tinker!
What would YOU pull apart if you had the chance? Comment below! |
About the AuthorHi! Welcome to my blog! My name is Christine Hurley. This is my 17th year of teaching - I've taught Kindergarten, 4th grade, elementary media, and now I am in my 6th year of teaching middle school media! Archives
September 2020
Categories
All
|
 RSS Feed
Proudly powered by Weebly