 Do you want to take your class on a field trip but don't have the funds? There is a solution - Google Expeditions! Our friends at Google have developed a wonderful tool for education that allows you to travel anywhere in the world via virtual reality. Are you ready to travel?? What You'll Need:
Let's begin! First, you'll need to sign into the app with your Google credentials. Then you'll be asked to select "Be a Guide" or "Be an Explorer". Teachers should be guides, students should be explorers.  NOTE: Students can "be a guide" on their own time and explore all the awesome expeditions that are available! Guides, or teachers, will select which Expedition that they want to lead the Explorers on. For this class, the teacher selected an expedition to Mount Everest. The students had been studying Everest in her 7th grade social studies class. Students can "Join" the expedition from their devices. Once they have joined, the teacher can begin the expedition. Each expedition has a series of scenes to show students. The scenes are 360 degree photographs. Students can swipe the screen or physically turn themselves and their devices to view it. Below is the teacher screen. In this image, the teacher is showing and discussing with students the circled image. She can see that the students are looking - each smiley face represents one explorer! The teacher can even circle, highlight, and draw on the pictures to capture students' attention and highlight important details that they may miss. 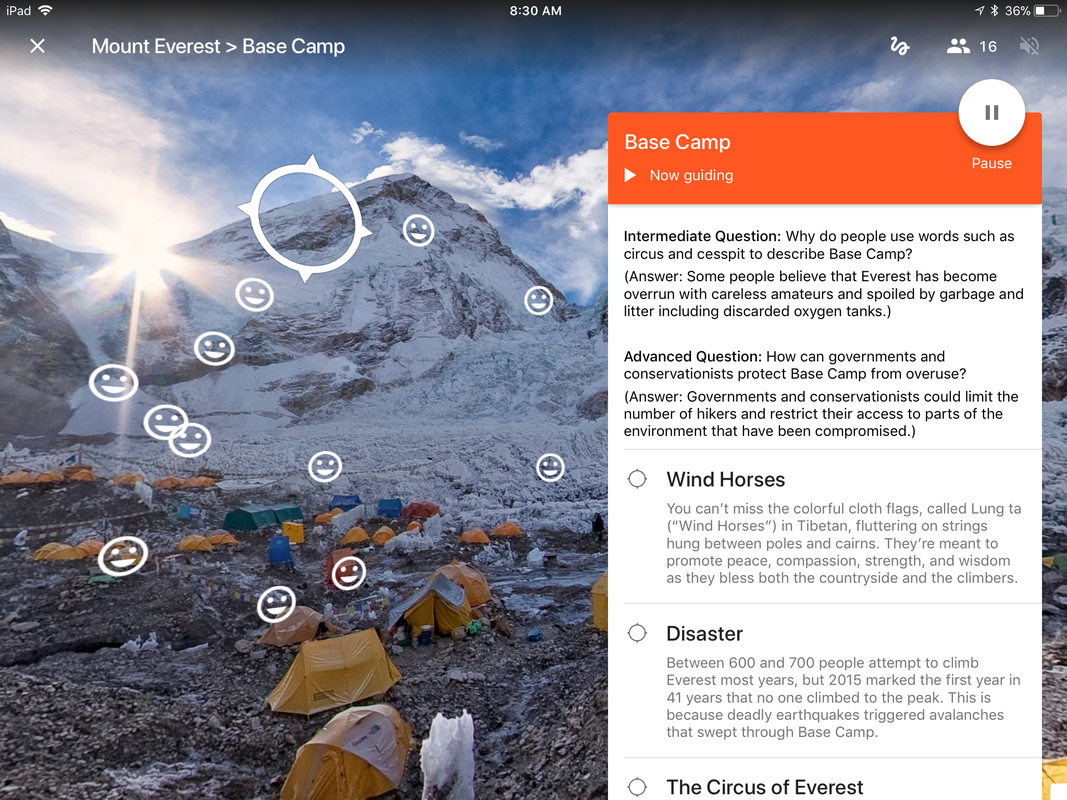 Each scene includes background information, several objects to point out, and even differentiated questions to prompt discussion among students! It's amazing! Check out this video that I took while the teacher was leading the lesson. It shows you how the iPad moves and what the students saw during the lesson on Everest. Google expeditions gave our students a whole new viewpoint on Everest. We frequently overheard "WOW!" and "This is so cool!" while the students were exploring Mount Everest. Here are a few photos of our students enjoying Google Expeditions! Expeditions isn't just for social studies... there are expeditions for almost any subject! Science, the arts, famous people... just search within the app and see what you find! Tour the International Space Station, check out a coral reef... examine a human body, view Mount Rushmore, walk among ancient ruins! The possibilities are endless!
How will you use Google Expeditions with your students? Comment below and let me know!
0 Comments
 Capstone Interactive eBooks are an awesome resource available in our library for both students and staff! These engaging, interactive texts do double duty as an audiobook, too! Students can elect to have the books read aloud and/or highlight the words as it reads. The best part about these amazing titles is that they have an unlimited number of simultaneous users! This means a single user, a small group, an entire class, or even the whole school can be reading the same book at the same time! It's amazing! Here's a short video I created to show you the easiest way to access our Capstone Interactive collection... as of today, there are 270 titles available for you at SPMS to check out! Enjoy! What's your favorite Capstone Interactive title? Comment below and tell me!
 Stop Motion animation is an amazing creative tool used to make really cool movies... think Nightmare Before Christmas, Wallace and Grommit, the Lego Movie, Coraline, Rudolph the Red Nosed Reindeer, and Shaun the Sheep. It used to be a time-intensive, tedious process that was nearly impossible for students to complete. To complete a stop-motion movie required extensive backgrounds, complex models of characters, and super expensive equipment.... NO LONGER! Using the app Stop Motion Studio (a FREE app!), students are able to easily create really awesome movies using the principles of stop motion animation! Stop Motion Studio allows the students to take photographs and adjust the frame rate of how fast they play. FUN FACT : Most stop motion animation movies are filmed at 24 frames per second (fps)... that means for every one second of movie, there are 24 pictures taken! CRAZY, right??? Watch how easy this is... and check out how I use the "onion skin" feature to see through to the last picture I took. It really helps with aligning the photos and keeping the animation steady: And here is the finished movie... Pretty neat, right? Just WAIT until you see what the students did with it... we gave them the instructions and they ran with it. I want to give you some tips that we learned through trial and error. 1. Use the "onion skin" featureOne of our 6th grade science teachers came to the library to have her kids animate the rock cycle. It was our first attempt at stop motion animation and we didn't know what we didn't know... but we went into it with a "we can totally ROCK this" (see what I did there? HA HA!) attitude. Their movies came out okay, but we both realized that had we known about the onion skin feature that they would have been even better. The backgrounds jumped around some, and the kids had a hard time remembering from class to class where they left off the previous day. Here is a sample so you can see what I mean: 2. Use an iPad stabilizerIf you use some chairs or a book stand to stabilize your iPad, it will cut down on the backgrounds jumping around and overall improve the quality of the video. 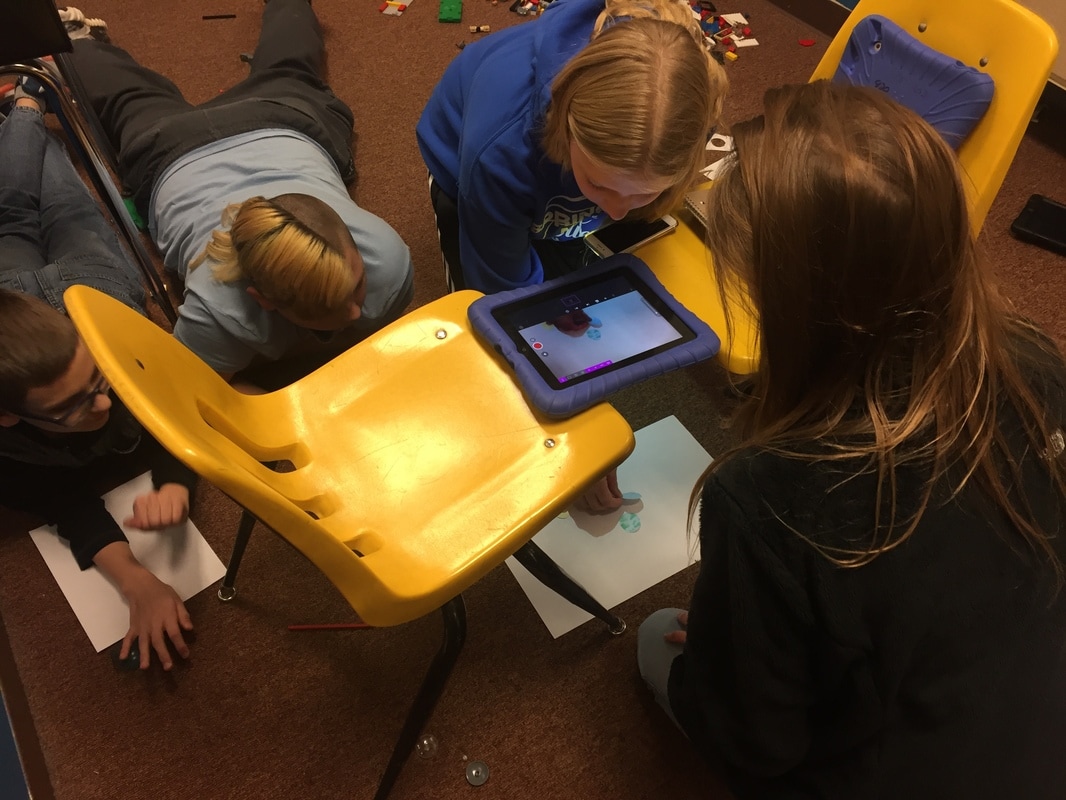 You could even build your own iPad stand out of K'NEX, like this creative student! 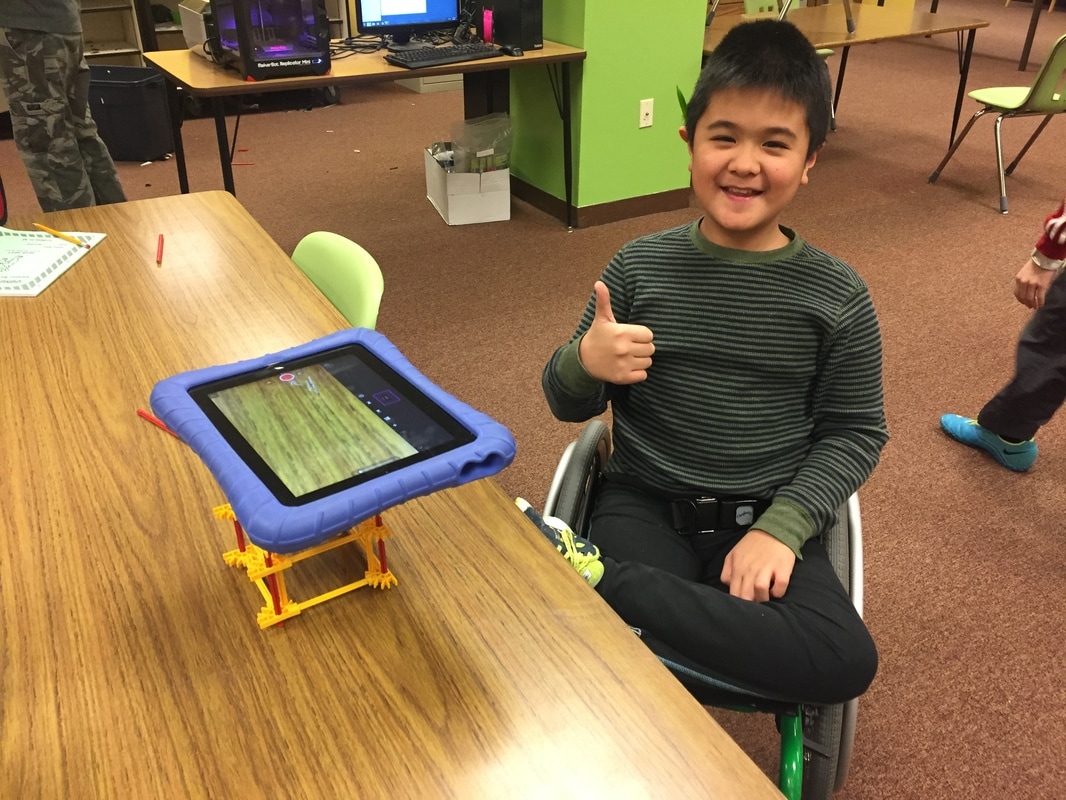 3. Take it to the next level!When the movie is finished, have your students take it to the next level by exporting it to their camera roll and then importing it into iMovie. They can add titles, sound effects, and maybe even use GarageBand to make a custom soundtrack, like these kids! We had students create models of the rock cycle; how the digestive system processes food; and moon phases, seasons, and solar eclipses. While my students' stop-motion movies are all science content based, you certainly could have students create and tell stories, illustrate a historical event, or document the creation of an art project. The possibilities are endless and are only limited by your creativity!
How will YOU use stop motion with your students? Comment below and share your idea! The social committee of Springfield Middle School is hosting a holiday door decoration contest, much to my horror. I am not a crafty person (unless the idea comes from Pinterest - with step by step directions, I can create anything!). I had a brainstorm of inspiration one night though, while staring at some old equipment that needs to go to recycling.... wait for it...  Very punny, right?? Whomp whomp whoommmppp... I'm sure I saw it on a commerical somewhere. I have very few original ideas, let's be honest. This idea of "Tech The Halls" was going to include a Christmas tree with some decorations that were old CDs and mice that I had laying around. When my enrichment coding class heard that I was going to "just" put some paper and CDs on my door, they took it upon themselves to build the most epic door ever. Behold: TECH THE HALLS! 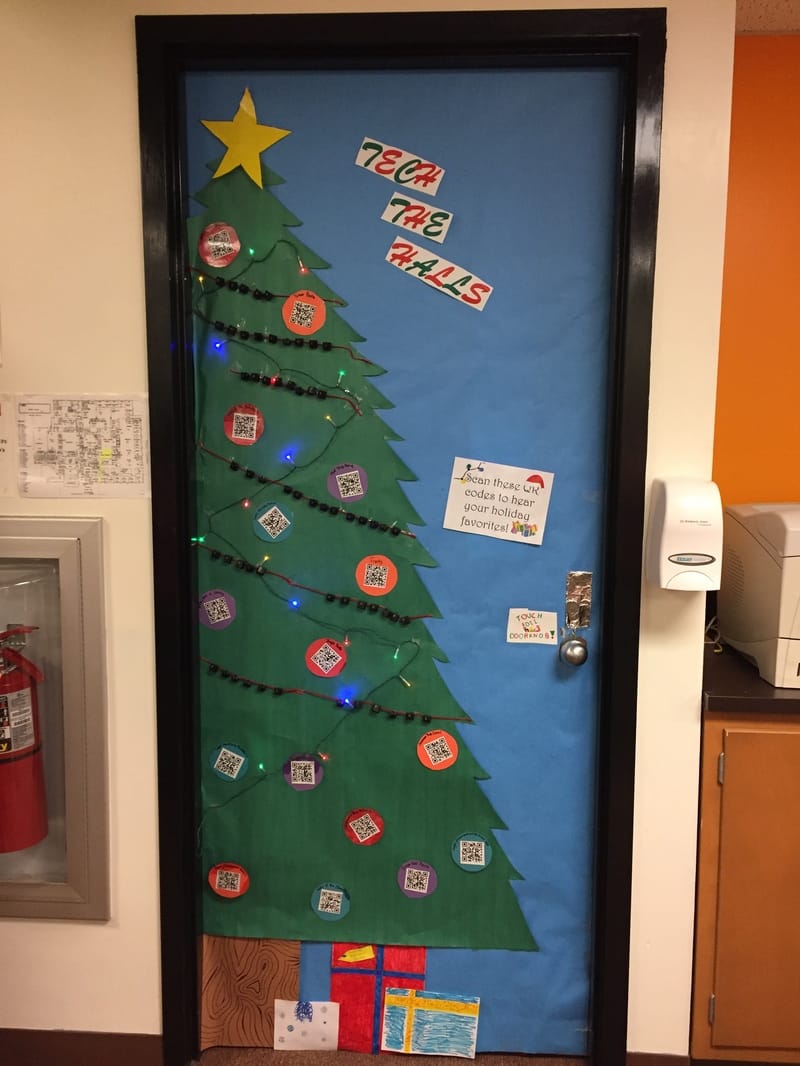 It's awesome, right? I know, it's a little overwhelming. Let me show you up close how fabulous this door really is... 1. QR CODES 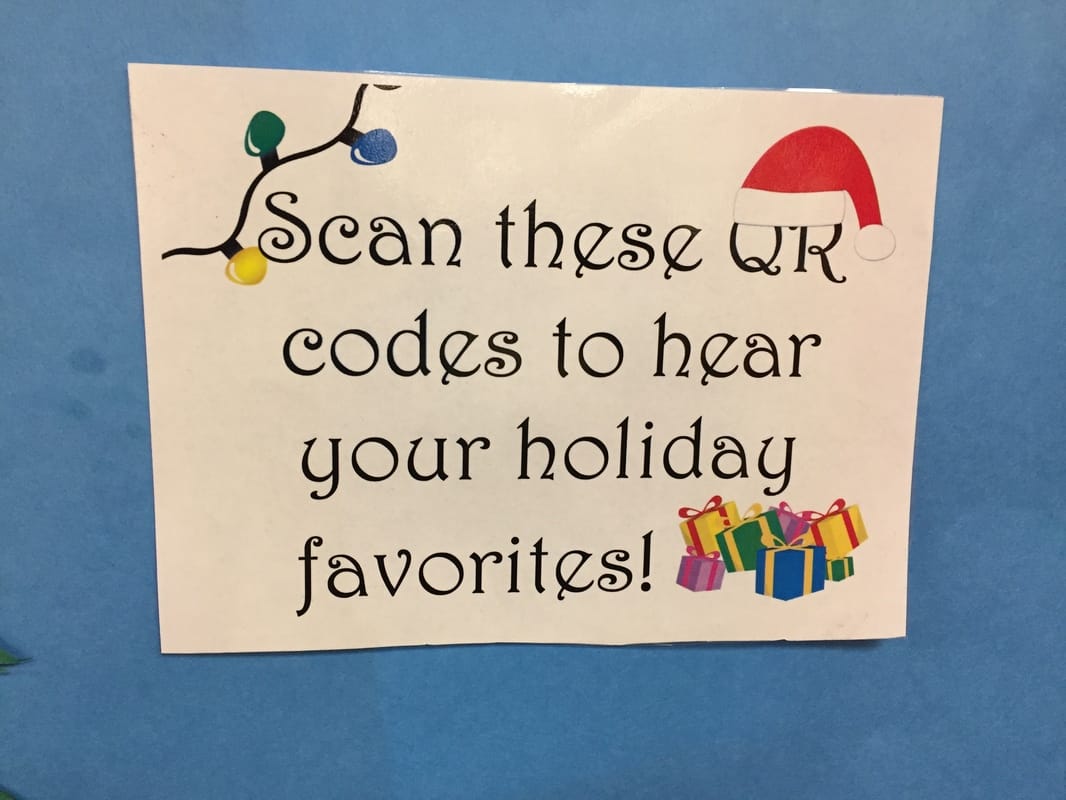 The Christmas balls that you see on the tree each contain a QR code. Each code leads the viewer to a YouTube video of a different holiday song. There are 16 total... LOOK! 2. UPCYCLED KEYBOARD KEYS 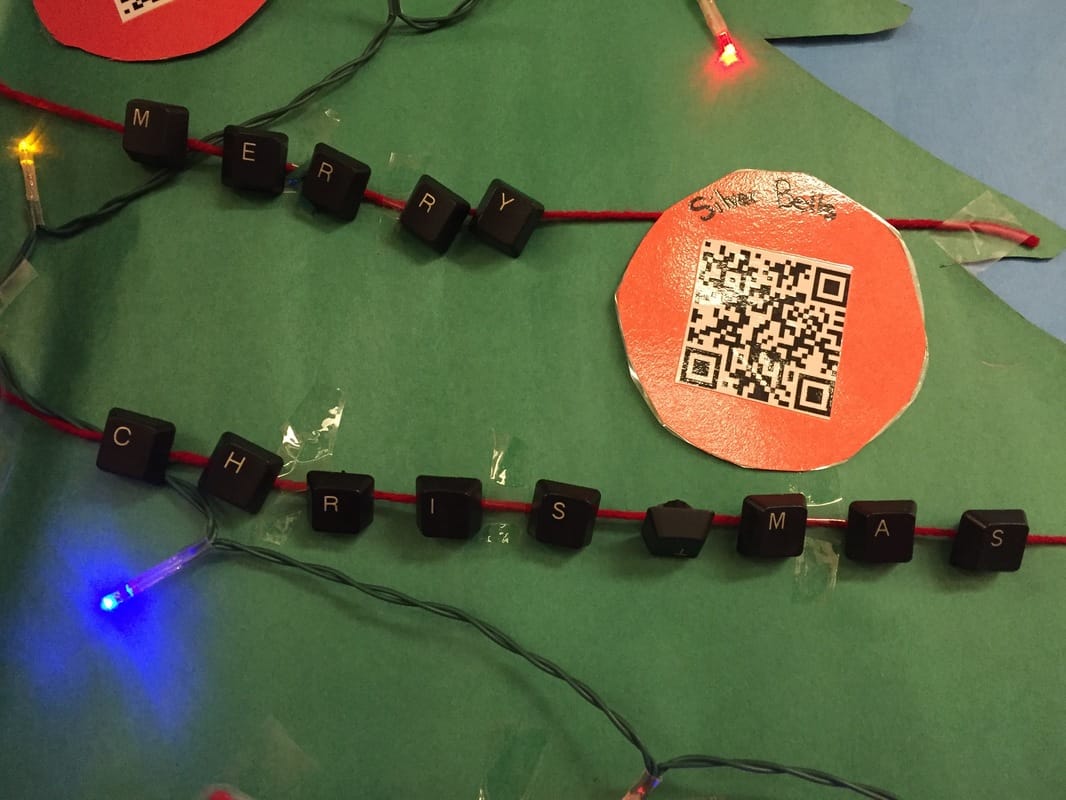 The garland on the tree is made out of old keyboard keys that I let the kids rip up and hot glue to string - and they even decided to spell out holiday words! They included: Merry Christmas, Rudolph, Santa, Joy to the World, Giving, Presents, and more! 3. INTERACTIVITY My students, being the budding programmers that they are, decided that they HAD to make the door interactive. They grabbed our Makey Makey kits (click here for a previous blog post about them) and coded a program in Scratch that allows the user to touch the doorknob and the foil above it to make the door SING. That's right... the door actually SINGS! These very creative kids ran the wires behind the door so that the user completes the circuit by touching both the doorknob and the foil above it: 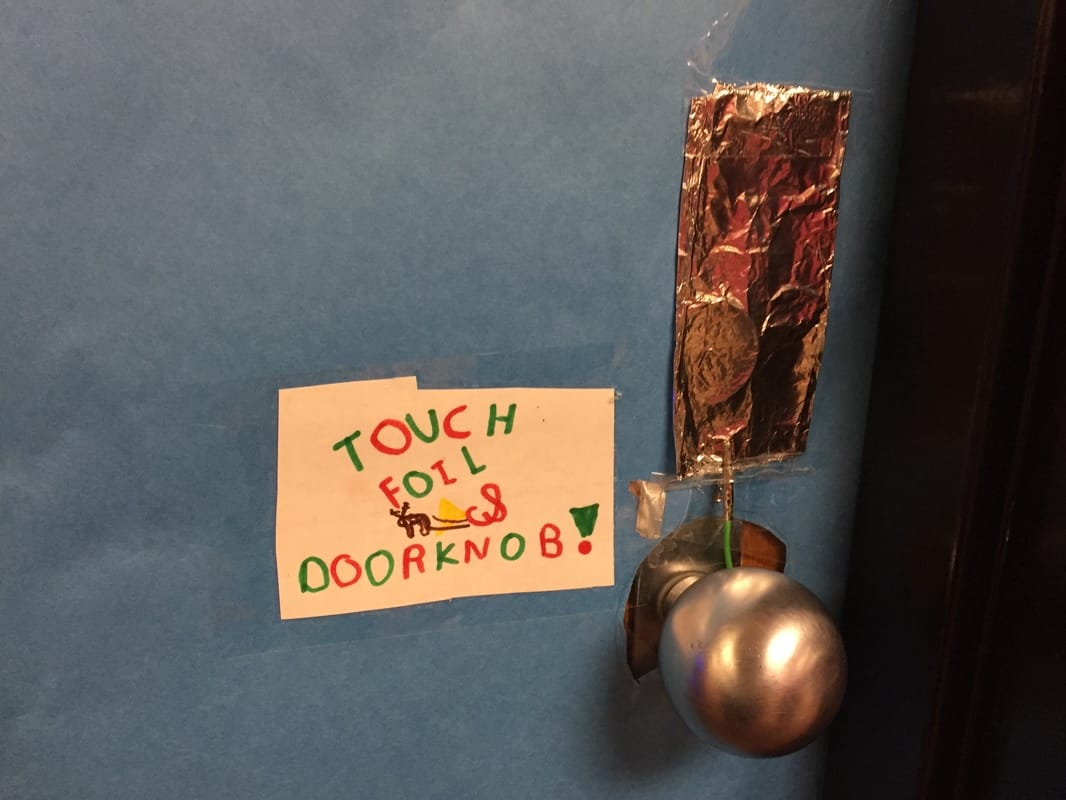 Here is a picture of the magic that runs the show (and the magicians behind it!): 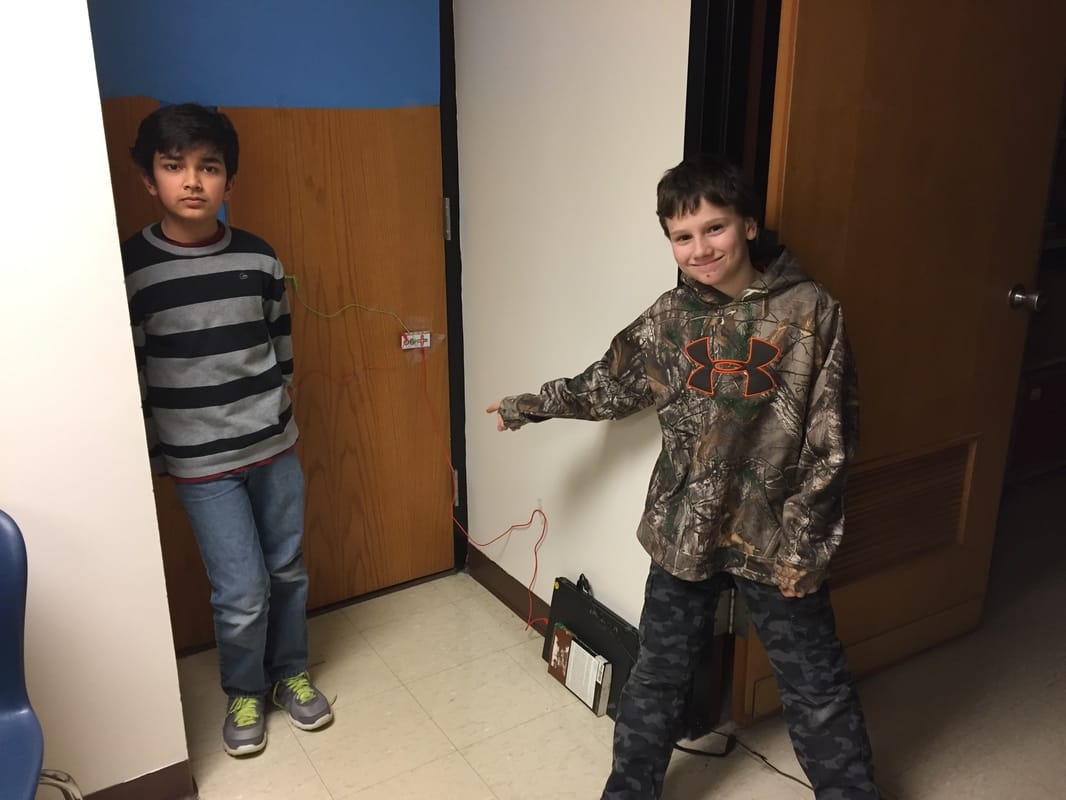 You can see the wiring on the door attached to the Makey Makey. The kids set up the laptop to not go to sleep when the lid is shut, then wrote the program to play one of three random versions of Deck the Halls when the circuit is completed: 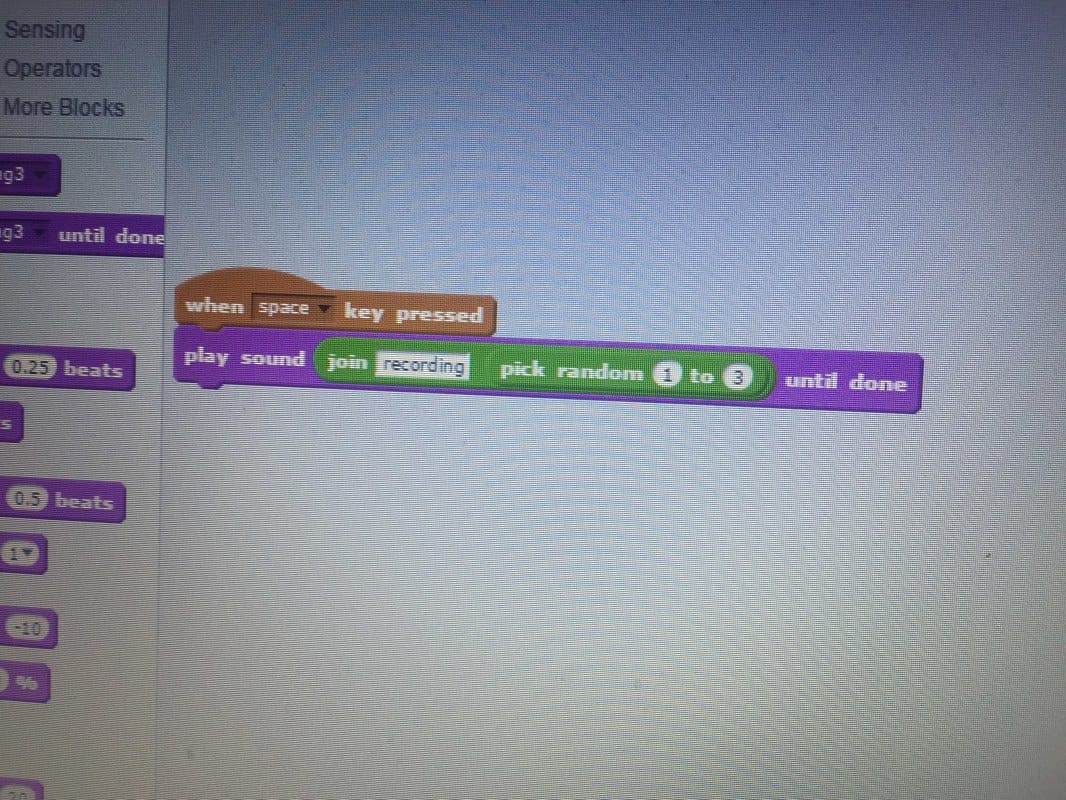 Genius, I know! I take no credit for any of this work, it was totally designed and implemented by students. Bravo to these intrepid engineers!
Interested in getting some Makey Makeys for your classroom or library? Check out their website for all kinds of ideas on how to implement them into the curriculum! Comment below on how you could use these fun tools with your students!  So the last time we talked about Twitter, I gave you a brief overview of hashtags, as well as a few to be sure to follow. And if you are anything like me, you probably found the Twitter feed a little overwhelming. Today I am going to introduce you to a couple of tools to streamline your Twitter experience!  The first tool is an website and app called Flipboard. Once you have your Twitter account, you can sign into it on Flipboard. Flipboard takes your news stream and makes it easier to read... more like a magazine. Here, look! This is the #tlchat stream on Twitter: 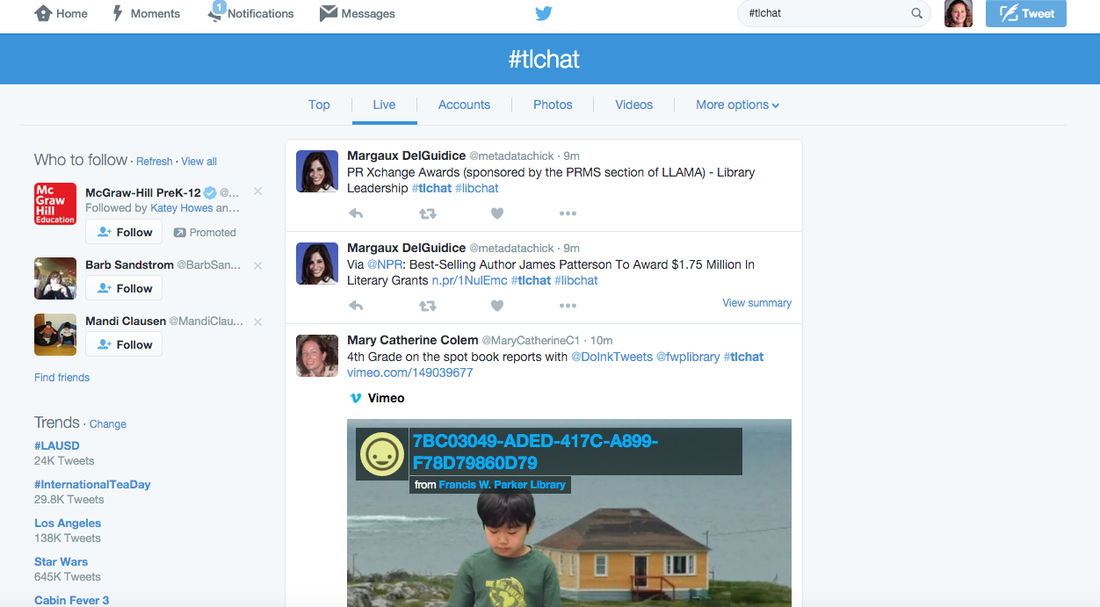 This is the same #tlchat on Flipboard's website: 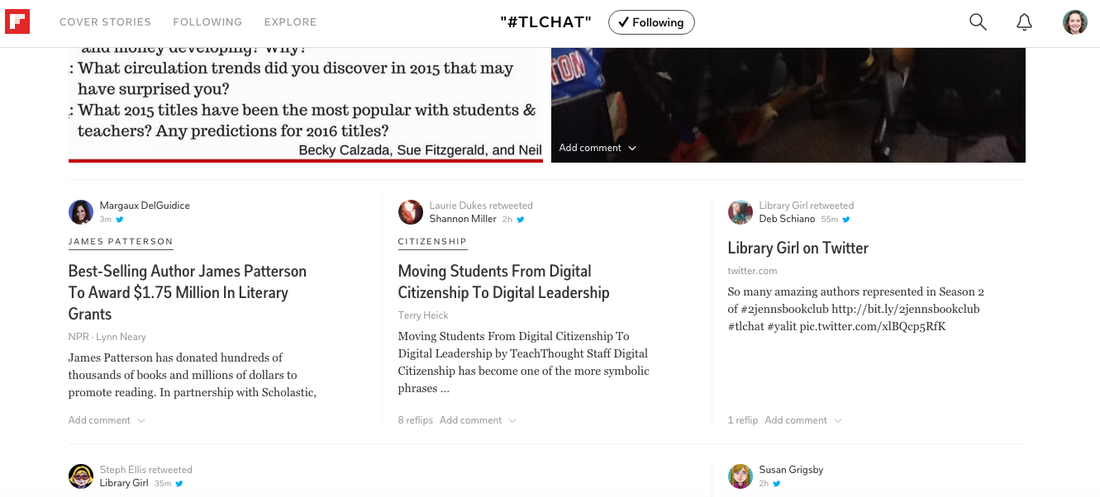 Much easier to read, right? Flipboard has an app, too! Make sure you check it out for your iOS or Android devices: Flipboard on iTunes Flipboard on GooglePlay I love the app version of Flipboard the most - it is very intuitive on touch screen devices. Instead of a 140 character tweet, you can see a preview of the article. TweetDeck If you are ready for something a little more advanced, you will want to check out TweetDeck! You can sign into it with your Twitter account information, no separate account needed. TweetDeck allows you to view several streams of Twitter data at one time. For example, I like to follow the hastags #tlchat #makered and #kidlit. I can see all the feeds at once with TweetDeck, without having to search or switch between them! Here, take a look: 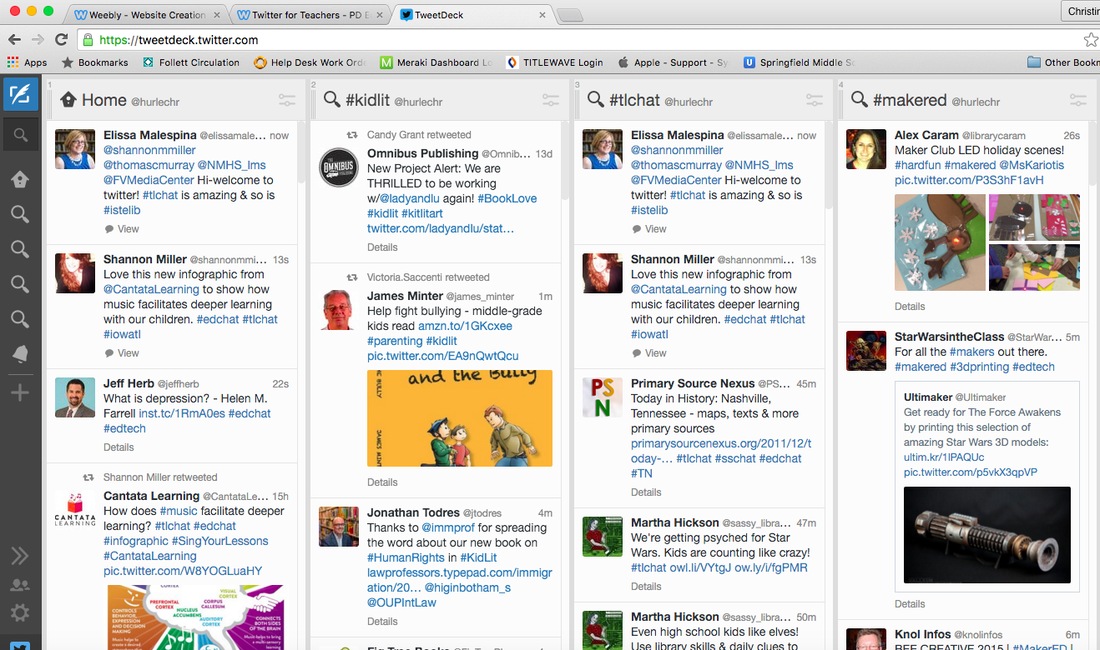 I know it seems a little overwhelming, but it really simplifies your twitter experience. TweetDeck is especially useful when you are participating in a Twitter Chat because you can follow the Tweets for the chat in one column while answering individual notifications in another. It is a multi-tasker's dream!
I like to use Flipboard when I just want to read articles that my Tweeps (Twitter Peeps, HAHA!) have published or shared, and I love TweetDeck when I am participating in a Twitter chat. So now that you have those two tools, go try them out and see if either (or both) work for you! Leave a comment below telling me about your experience with Flipboard or TweetDeck, or if you have another tool to share, tell us!  I was privileged to attend the AASL conference earlier this month and I am still just in awe of my colleagues from around the country. This is Part 2 of my reflections on the conference. Part 1 can be found here. This part will focus on the individual sessions that I attended. I'm going to group them by the two major strands: Apps and Makerspaces! AASL Best Apps for Teaching and Learning!The AASL has curated a list of the best apps for teaching and learning. This year's list is awesome, and should certainly be reviewed by teachers and administrators to see how these apps can be best used in the classroom. An interesting note... not all of these apps are free. In fact, some of them are quite costly. When asked about they aren't promoting free apps, one of the media specialists on the panel stated that librarians regularly pay $25-30 for a good book, what is stopping us from paying $1-3 for a great app? Whoa. What a great point. Particularly because when talking about purchasing in bulk, the apps become 1/2 price when you purchase over 20 copies... so a $1 app costs the same to buy 10 copies as it does to buy 20 copies. So about the apps... In the interest of brevity, I won't list them here... but you can check them out at the AASL website! But you HAVE to see them... they are awesome. Please check them out! It's worth mentioning that the previous winners are also archived on the AASL website, so you can see the best apps from 2013 and 2014, too! MakerSpaces in the Library!Makerspaces are the new trend in libraries. Before we talk about it, I'm sure some people are wondering, " What is a Makerspace?" Check out this short video: I know what you're thinking - but WAIT... A library is ALREADY a Makerspace... right? Libraries have always been places where people come together to make and create. But libraries are thought of traditionally as quiet spaces.  A world of no... just NO. Libraries should not be quiet! They should be the heart of the school, full of students learning and creating. Learning is messy. Creating is noisy. Embrace the insanity!
*Steps off soapbox* So let's talk about what these amazing librarians had to say! The first session was by Diana Redina, Media Specialist at Stewart Middle Magnet School. You'll want to check out her blog, Renovated Learning, for sure! Her presentation, Makerspaces & Libraries: How to Bring Some STEAM Into Your Program, was a hit! There were around two hundred people in the room - it was standing room only. She discussed lots of popular Makerspace ideas, including:
She shared even more than what I put here, but these were my favorite take aways. What a great session - and ironically, my Donor's Choose project for 3 Ollies was funded DURING the session! How awesome!!! The second Makerspace session I attended was entitled Full STEAM Ahead! Create Maker Spaces Using Your Library Print VBooks with an eBook Connection Using QR Codes, presented by Lisa Hathcock and David Burrow. It was also full of great resources for Makerspaces, including:
I also went into the actual AASL Makerspace area, which was super fun. There were some really cool toys in there that I have on my radar to check out in the future! My favorites were:
There were SO MANY awesome speakers and sessions at AASL15... I am still wrapping my brain around my session notes and going through files! Like the keynote speaker Heidi Hayes Jacobs said, "We should all leave here emotionally disturbed." I definitely am unsettled (in a good way) by all that I learned at AASL! More changes are coming to the SPMS Media Center, and it's going to be AMAZING! 
Thinglink is a FREE(!!) website that allows users to upload a photograph and add anchor points to it. Those anchors can include text, photos, GIFs, other websites, and more! Once your Thing is completed, you can easily share it, embed it on a website... whatever you want to do with it! Best of all, they have loads of video tutorials built into their website to teach you all you need to know about creating Things of your own!
I had a great time team-teaching this with one of our 7th grade science teachers... she handled the content and I taught the kids the technology. It was a great partnership! The kids created their ThingLink accounts with their WCPS email address, then joined our class with a class code (provided by ThingLink to teachers when you join - that way you can see your students' work and/or reset their passwords when they forget!) We started with a picture of the major systems of the human body: 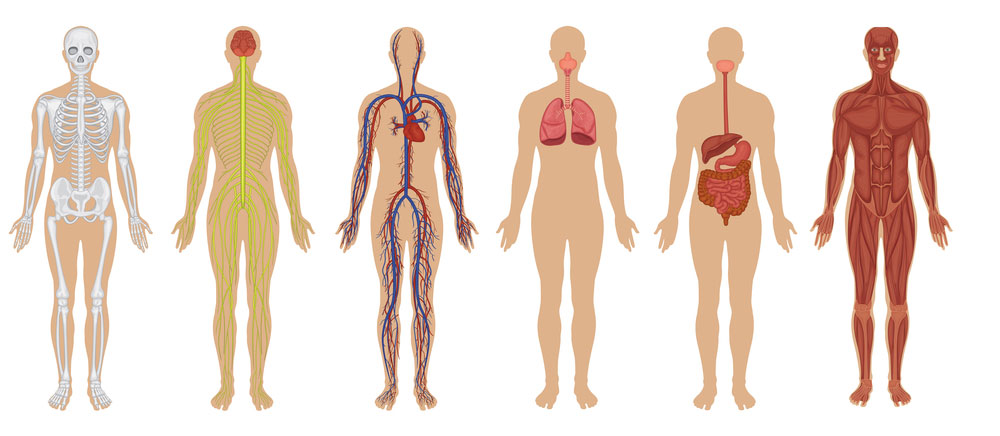
Next, the kids used WorldBook kids, student, or advanced (depending on their reading level) to research the human body. They then added bullets describing the functions of the human body.
This served as the kick-off to the human body because the students completed an overview of the six major systems of the body. They then had additional time back in science class to continue adding more detailed information about the human body. Here is a sample Thing, still in process. The students are continuing to add to their projects over the course of the marking period as they discover more and more about the human body! 
What could YOUR students do with ThingLink? Create an interactive tour of your library? Make a map of the world showing events of a certain era? Take a food pyramid and make it interactive? The possibilities are limitless!
Have a lesson idea? Share it in the comments below!  Are you looking for a fun, new way to engage your students? Enter GooseChase! This free app is available for a variety of devices, and it has an easy-to-navigate website for the teacher/administrator who is running the game. First, you'll need to go to the website and sign up: http://www.goosechase.com. Then you'll want to start a new game. Name the game and give it a description. My GooseChase scavenger hunt was for library re-orientation... the kids knew where MOST of the books were, but due to recent reorganization, some of the collection had moved to a different location! Here's what my game looks like: 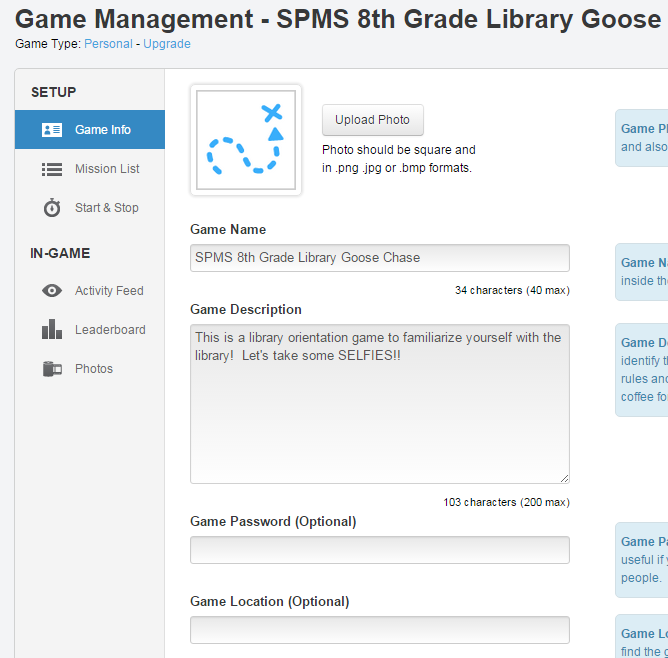 Next, you'll need to make "missions". Each mission is an activity for the kids to complete - and the possibilities are endless! Math teachers could have the kids snap a picture of a problem, science teachers could have the kids snap a picture of a model they created, ELA teachers vocabulary words... I had my students take "Shelfies" (a selfie with a book!) all around the library. Here's a sample:  Students were encouraged to explore the library as they searched for books and re-familiarized themselves with the location of the materials. The last step is to set the game time - I made mine a full week window of time that the game is open! 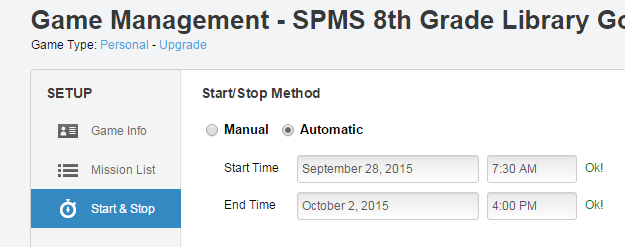 Now, what about the kids? They will need to download and install the GooseChase app on their devices... It's free! We have a BYOD initiative going on, so phones and tablets were plentiful. They will need to register with a username, password, and email address. I had my students use their information provided by our district. They then search for the game name. If you added a password, it will ask them for that, too. Then the hilarity ensues... check out some of my students' posts! 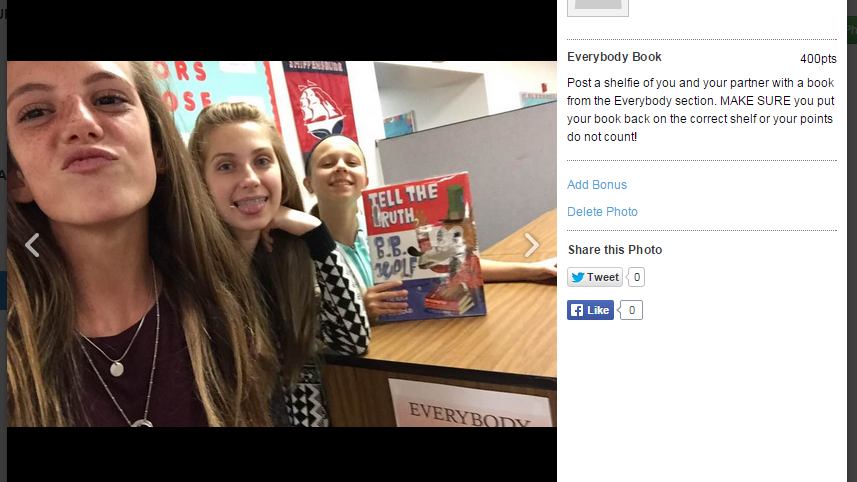 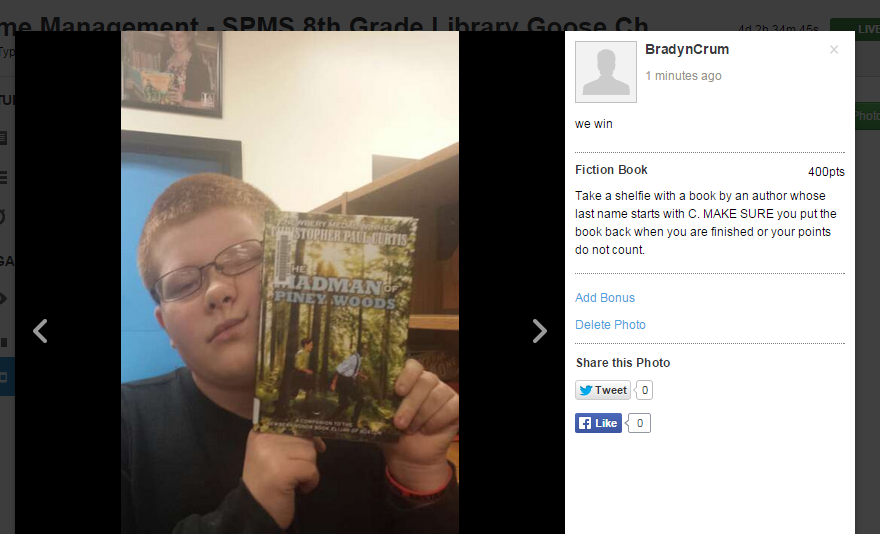 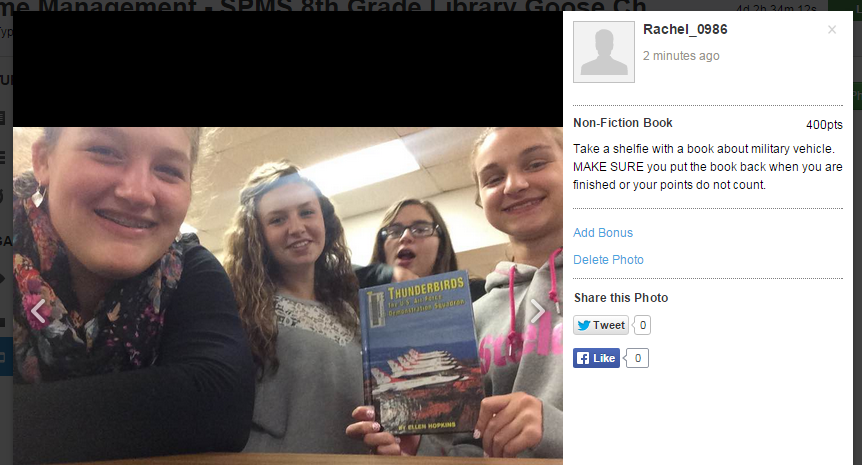 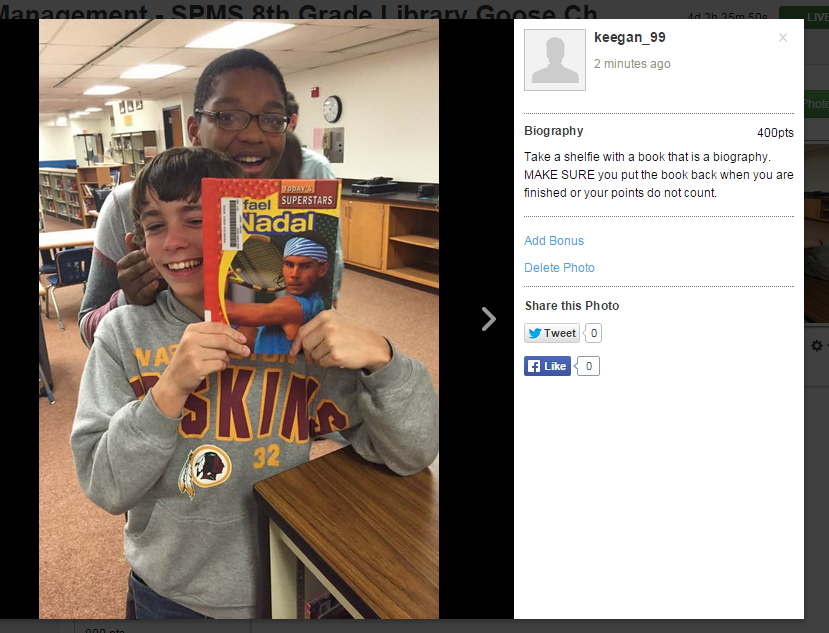 Even the surliest 8th grade boys (who are much too cool for everything) wanted to participate. It was loads of fun, and what a great way to tour the library!
As a teacher, you are able to see all of the pictures that they upload. I could definitely see it being used for assessment. Considerations:
Comment below - how could you use GooseChase in your class room? |
About the AuthorHi! Welcome to my blog! My name is Christine Hurley. This is my 17th year of teaching - I've taught Kindergarten, 4th grade, elementary media, and now I am in my 6th year of teaching middle school media! Archives
September 2020
Categories
All
|
 RSS Feed
Proudly powered by Weebly