
BreakoutEDU is a super fun, engaging way to teach or review content with your students. If you've never heard of it, let me explain... I'm sure you know what an escape room is, right? Someone locks you in a room for an hour and you solve a series of puzzles to get out of the room. Well, a BreakoutEDU box is exactly the same idea, except instead of breaking out of a room, you have to break INTO a box!
The company BreakoutEDU sells official boxes. It's $150 for one box and a one year subscription to the site. The Breakout site includes over 800 premade lessons and activites that you can use with your students. I love the idea behind BreakoutEDU, but unfortunately I cannot afford to buy 4-6 boxes that I would need per class, nor the $50 a year renewal fees to maintain access to the site. Teachers are poor! So what to do, what to do? Make my own, of course! 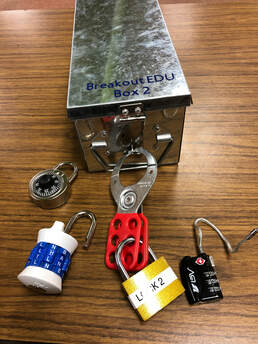
Making my own boxes was pretty simple (and WAY more cost effective!). Off to Amazon I went, searching for the following items:
I also found gold locks with keys and combo locks at the Dollar Tree... you can find quite a variety of different types of locks with a little searching! I was able to make 4 boxes for about $100, which is pretty great. I'd recommend that you have a max of 6-8 kids per box, so depending on the size of your classes and how you integrate them (as a center or as whole group), you'll need to figure out how many boxes you'll need to work for yourself. Lock Tips
I made some mistakes that ended in locks being cut off with bolt cutters... don't make the same dumb mistakes I did!
BreakoutEDU Lessons
Now, where to find the lessons? I highly recommend that you start by using a pre-made box/lesson. To build your own lesson takes a lot of time and planning. Using a pre-made box will also help you understand the mechanics of how the boxes work before you attempt to build your own!
There are numerous Facebook groups for Breakout Boxes by searching. There are ones for Librarians, English Teachers, Elementary teachers, even Breakout Espanol! Here's a sample of a FEW of the groups that are available... there are many more than what you see here! 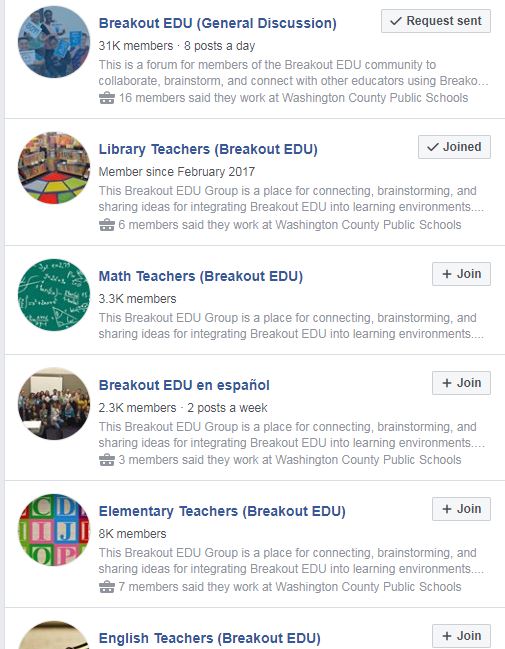
If you would decide you want to plan your own, I recommend using this planning guide to help you backwards map your locks and clues... download it here:
Other Resources
There are lots of fun resources out there for BreakoutEDU Clues... check out this list from BreakoutEDU. Don't forget to verify that all the links are unblocked for students on your network... student devices may be filtered and block the content.
SO - what BreakoutEDU boxes will you do with YOUR students? What successes (and failures!) have you had? Drop a comment below and let me know! I'll update this blog soon with pictures from a BreakoutEDU Box I did earlier this year with my 8th grade students in February. It was an amazing success!
0 Comments
 There has been a lot of discussion about "Ditching Dewey" (which is a term I hate, we still use Dewey in the library!!) recently among librarians. There are articles on both sides for and against genrefication. I debated long and hard about whether or not I should genre-fy my fiction collection. Ultimately the decision came down to doing what I believe to be best for kids... so I chose to go for it. The reason I decided to reorganize the fiction collection is simple - the number of students who came to the library and would ask for books by genre was staggering. It was a constant stream of "Where are your science fiction books?", "Do you have any fantasy books?", "I want to read about dogs... do you have any stories about dogs?", etc. When I replied that they could search using our online catalog, I was often met with resistance. Students were not interested in taking the time to search, and the overwhelming majority preferred to just browse the shelves for what catches their eye. I also knew that I had great titles that were just lost in the shelves... for example, Doll Bones by Holly Black is a REALLY creepy horror book, but my students never checked it out because it wasn't with Mary Downing Hahn or R.L. Stine. I always LOVE selling books to kids, but most times I am teaching a class when they come down to check out books, so I'm not always available to help them find what they are looking for. I knew it was time for a major overhaul... but WHERE to begin? First, I checked with another fabulous librarian in my county, who directed me to this blog post that she used to help her get started. I followed most of the same protocols listed in the blog. Phase One: Assign Genres.The first portion of the project was completely behind the scenes. I ran a report within Destiny to give me a .CSV file of all of the fiction titles in the collection. I then sorted them alphabetically by author and uploaded them to Google Sheets. After working with another librarian and my supervisor to decide on categories for genres, we came up with the following system-wide list:
I did weed the collection as I went, though it was fairly well-weeded before I began and I did not pull many books from it... perhaps another 20-30 books total came out. Most were old paperbacks that I ordered hardbacks for if the circulation warranted it. I did not choose to make a classics section, as I felt that those books, collected together in one place, would never circulate. However, if I could "hide" them in other sections they would be more likely to circulate. I also did not choose to create an LGBTQ+ section for two reasons... the first was because those books, authors, and characters are found across all genres. Normalizing LBGTQ+ relationships is a priority in my library so that all students feel safe and welcome. The second reason was to protect students who may be exploring or questioning their gender and/or sexuality; if they are not out to family, friends, teachers, or other people, they would probably not want to be "seen" browsing that section or reading a book with a rainbow flag sticker. For more of my thoughts on LGBTQ+ books and their place in the library, check out this blog post! So, how to assign genres? I manually added a genre to the books by searching sources such as Follett Titlewave, WorldCat, and crowd-sourced sites like GoodReads. You can view my spreadsheet HERE if you would like; feel free to use the genres I have assigned to my books for your own collection if it somehow helps you! If you are stuck on a book because you believe it belongs in two or more genres, you have a couple of options:
You'll also need to attend to series to make sure they all end up in the same location, particularly series like the 39 Clues books. Because they are all written by different authors, they have the ability to end up accidentally in different genres. Once the books were all assigned a genre, I sorted the spreadsheet and ordered colored spine label stickers from Demco based on the results of the spreadsheet. Here are the genres and the colors I settled on: 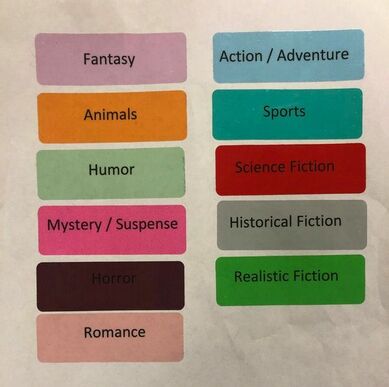 It it worth noting that I already had already used blue for my Everybody books, yellow for Foreign Language, purple for Graphic Novels, and copper for Biographies prior to beginning this project. I worked on this phase of the project for approximately 6 months off and on. I was not in a huge rush to complete it because I was getting all new shelving, so I wasn't planning on moving the entire collection and then moving it again for new shelves. I finished this part of the project just after Thanksgiving Break this year. Phase Two: STICKER ALL THE BOOKS!The 2nd phase of the project was to sticker all the books. It involved an army of student volunteers who helped me locate and sticker every book in our fiction collection. This was not a small task... it was lengthy and tedious. I had to remind myself many times that what we were doing was what's best for kids. Each book that we stickered was colored in on our spreadsheet to notate that a copy had been stickered. You may notice that some books are still white on the sheet - that means they have not yet been returned to the library since I genrefied the collection in late December/early January. I completed this project in the middle of the school year; the books were not all on the shelves when I completed the process. Once the majority of the books were done, the shelves were a rainbow parade of spine stickers: This phase took approximately one school week (5 days) to complete with the help of several student volunteers. Even now, 3 months later, I am still stickering books that were lost or overdue as they come back. This part of the project won't be done until after the students leave! Phase Three: Sorting, Adding Copy Categories and Reorganizing / Rearranging the CollectionThe final phase in the project was to sort the books, add copy categories and rearrange the collection. Sorting the books was the scariest part of the process to me. It really felt like the point of no return. It took 4 student volunteers and myself less than 45 minutes to unload and sort the entire fiction collection: We completed the sorting in the last hour of the day before winter break. I was so nervous about leaving it over break - not because I was worried about what would happen to the books, but because of the amount of work awaiting me when I returned from winter break. All I could think was "WHAT HAVE I DONE?!" I mean seriously... look at the empty shelves!! 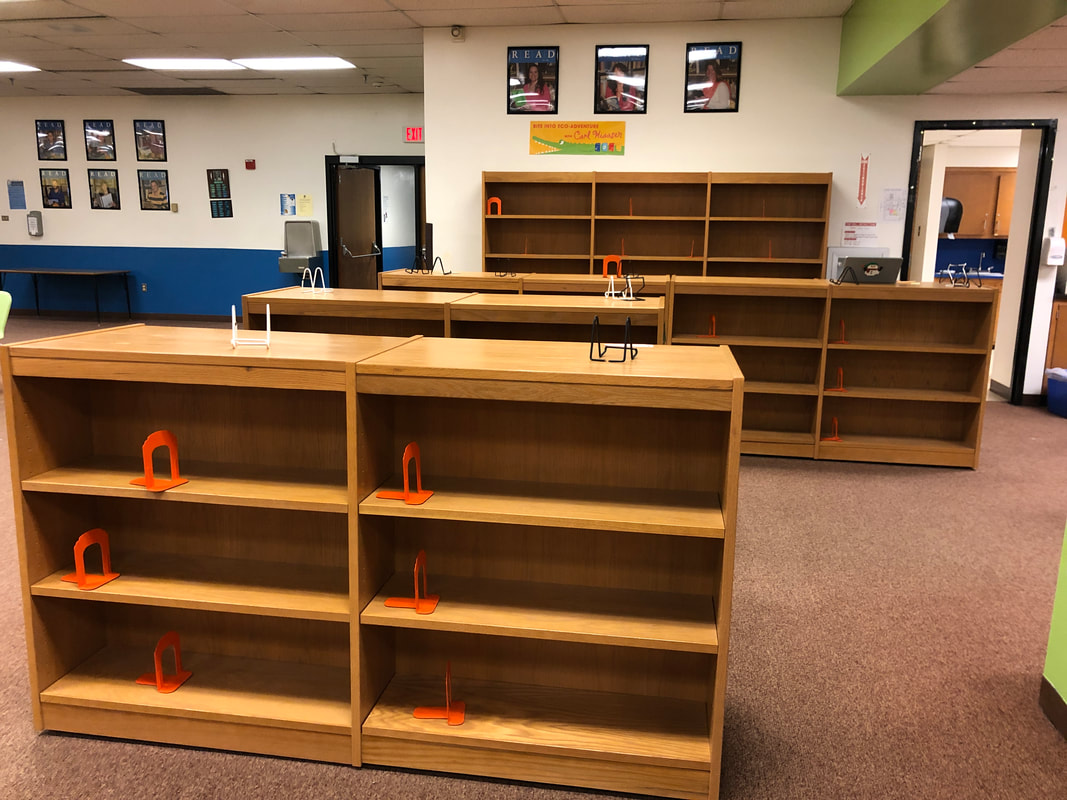 I had to close down book circulation for three days to complete the next job. I did this over the three days coming back from winter break, with permission and full support of my administration and staff. Have I mentioned that I work with the best staff ever? Because I do. #truestory. On the first day back after break, I added the Category and Sublocation in Destiny. This allows the students to see it in the search results! This was achieved by going to the Catalog Tab > Update Copies (on the left) > Individual Update Tab > Sublocation and Category to match the genre I was preparing. Then simply scan each book... See pic below for clarification. 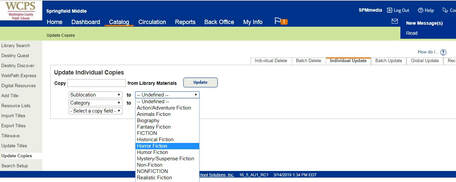 This took approximately 4 hours to scan the entire fiction collection, stopping to switch Sublocations and Categories for the 11 genres that we had chosen. After this was finished, a search in Destiny looked like this: 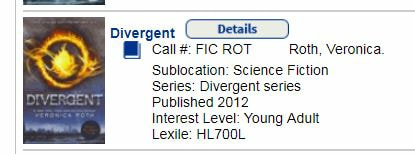 The final step was one of the hardest parts... re-shelving the entire collection. It took a solid 2.5 days with help from an amazing parent volunteer to get it finished. Even though I had counted and recounted shelves and analyzed the number of books per genre, I ended up moving some books after they had been shelved to a different part of the library. We also ended up changing a sticker color because two of the stickers were too similar to one another and they were right next to each other on the shelves; this would have resulted in too much interfiling. It probably would have only taken two days if not for that. But BEHOLD... the results of a LOT of hard work!! Phase Four: THE RESULTSWe reopened book circulation to all students and staff on Monday, January 7th. The results were immediate! Kids were excited to see the library reorganization. Some comments I heard were:
In addition to the student comments, the hard data shows the truth. From January 7th to March 13th, we were in school for 42 days. Fiction collection book circulation increased by 34.3% during those 42 days as compared to the previous 42 days of school. It WORKED!!!!! The students and staff loved the reorganization. And while it was a LOT of work, and it's not completely done, it was 100% worth it. And because I work with the BEST STAFF EVER, they threw a ribbon-cutting ceremony, complete with student speakers and refreshments! It was an unforgettable moment in my career; never have I felt so supported and appreciated as I did in that moment. It was PERFECT! 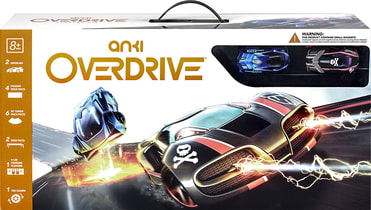 I'm always looking for new and exciting ways to engage reluctant students and increase foot traffic in the media center. I was doing some research on a super awesome robot that we have in the library, Cozmo, when I discovered that ANKI also makes a robotic race car track called Overdrive. I knew immediately that this was going to draw students to the library, particularly some of my reluctant readers who check out race car books by the armload but will engage in no other texts. Enter DonorsChoose.org. After a little more research, I wrote a grant for the ANKI base kit, two additional cars, a storage bag, some extra track pieces, and several books related to robotics, race cars, and more. The grant was funded almost right away! I love it when donors believe in what I'm doing and fund my little pet projects! When the cars arrived, the kids tore into them right away. The kids were captivated - within a few minutes, they were building tracks, downloading the app, and driving the cars. 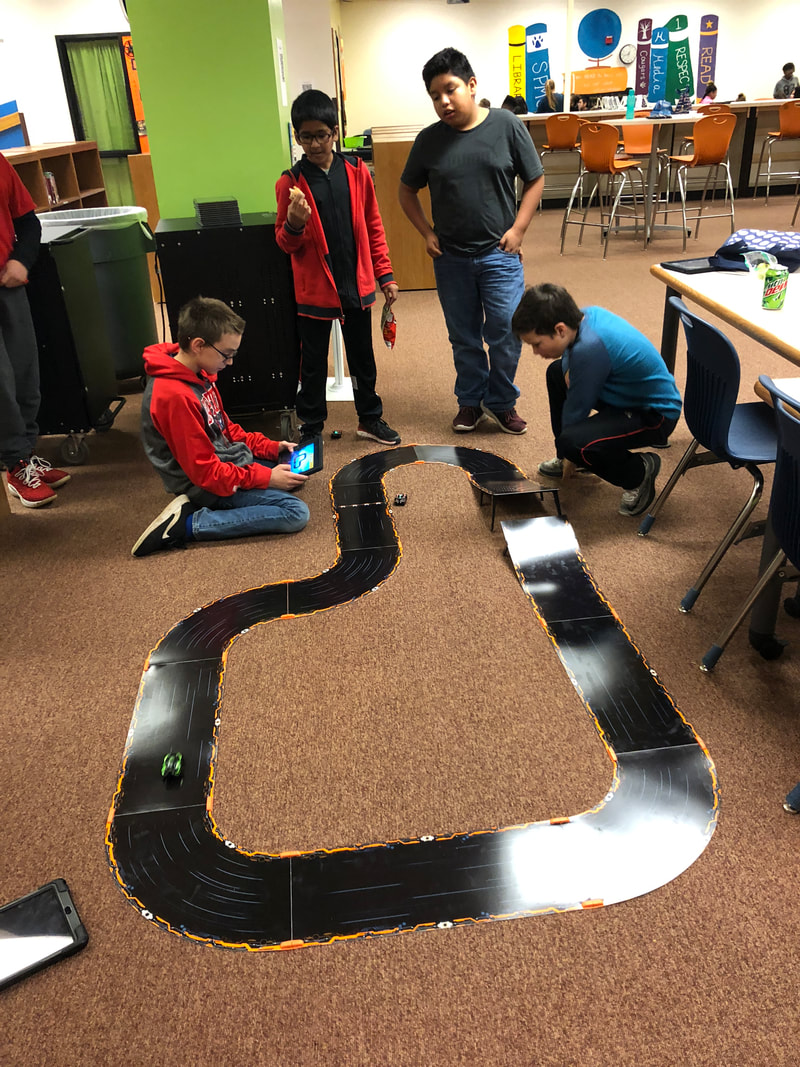 As I mentioned - the grant I wrote included several books. I processed them that morning and by that afternoon they were gone. It was a very easy sell to get the kids to take the books - they were engaging and interesting! In fact, I don't have pictures of the kids reading them because they aren't ever on the shelf. Mission accomplished! Over the next few weeks, interest in the Anki cars continued to grow. Two students brought in their own Anki base kits to donate to our collection, growing it from 4 cars to TEN! We had an incredible amount of track, too - the kids were able to make some amazing courses! The robotic Anki smart cars have certainly sparked an interest in coding, robotics, artificial intelligence, and racing in my students. What are YOU doing to increase foot traffic in your media center? Drop a comment below and let me know, I'm always looking for new ideas!
 Thanks to generous donors on Donor's Choose, we have four brand new video game rocker chairs in the library! While they've only been out for a few days, they are already loved! Flexible seating is a must in libraries today. Students and staff need a variety of furniture styles to move and meet their needs. These video game rocker chairs, though a small change, were greatly needed to make the library feel more personal and up-to-date. Here are some photos of the chairs in action! As you can see, they are VERY popular with the students! What types of seating do you have in your library? Share in a comment below!
 Coding is a critical skill that is being pushed more and more in public schools. I teach a weekly coding class during our Targeted Intervention and Enrichment period. I have both 6th and 7th graders, twice a week per class. We use a variety of coding platforms to code, including Code.org, Code Combat, Scratch 3.0, a variety of robots and more. However, once in a while we just need to unplug and do an activity that doesn't require a screen. Enter Binary Bracelets! 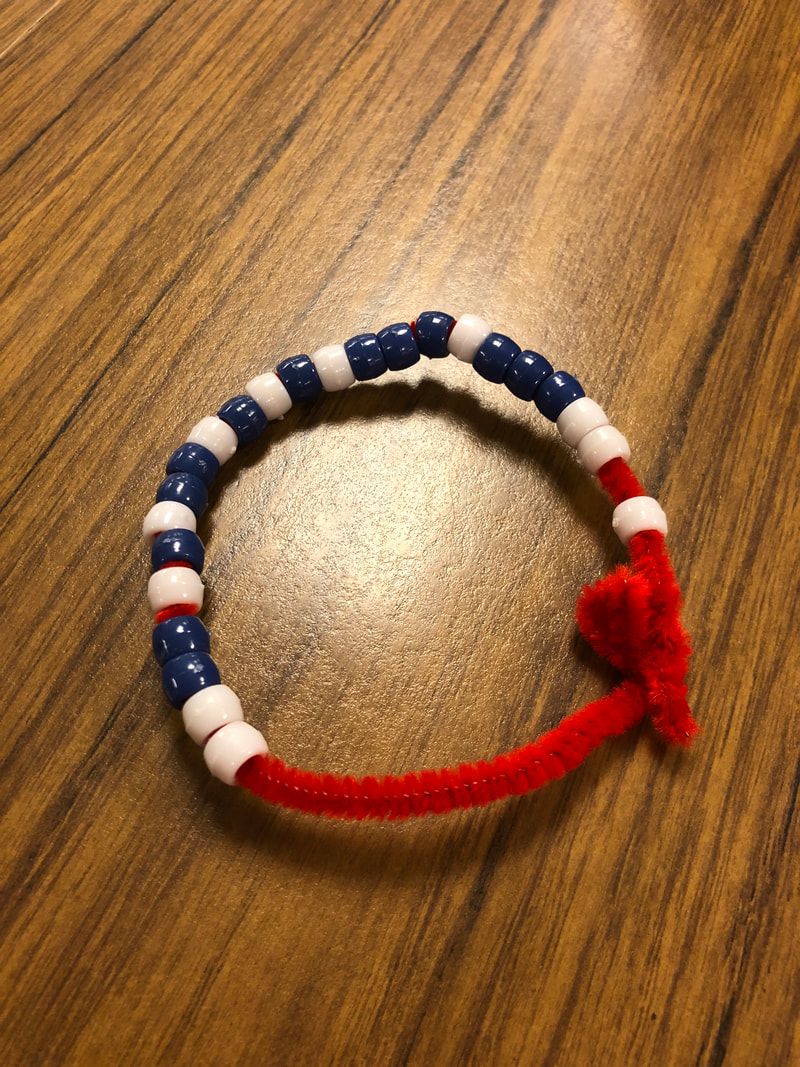 I pulled this lesson directly from Code.org. The materials are simple: chenille stems, pony beads, and a copy of the Binary Bracelet Code displayed and/or copied for students. I'd also recommend paper plates for students to sort and store beads while they work so they aren't all over the floor. Yes, that is the voice of experience speaking. For the bracelets, students will need to select 3 colors: a color to represent 0, a color to represent 1, and a color to act as a "spacer" to tell each letter apart. First, we reviewed the difference between an algorithm and a code. We explored the idea of binary code, which is "a coding system using the binary digits 0 and 1 to represent a letter, digit, or other character in a computer or other electronic device." I provided them with the materials, and they were off and "coding" the initials of their name onto their bracelets! 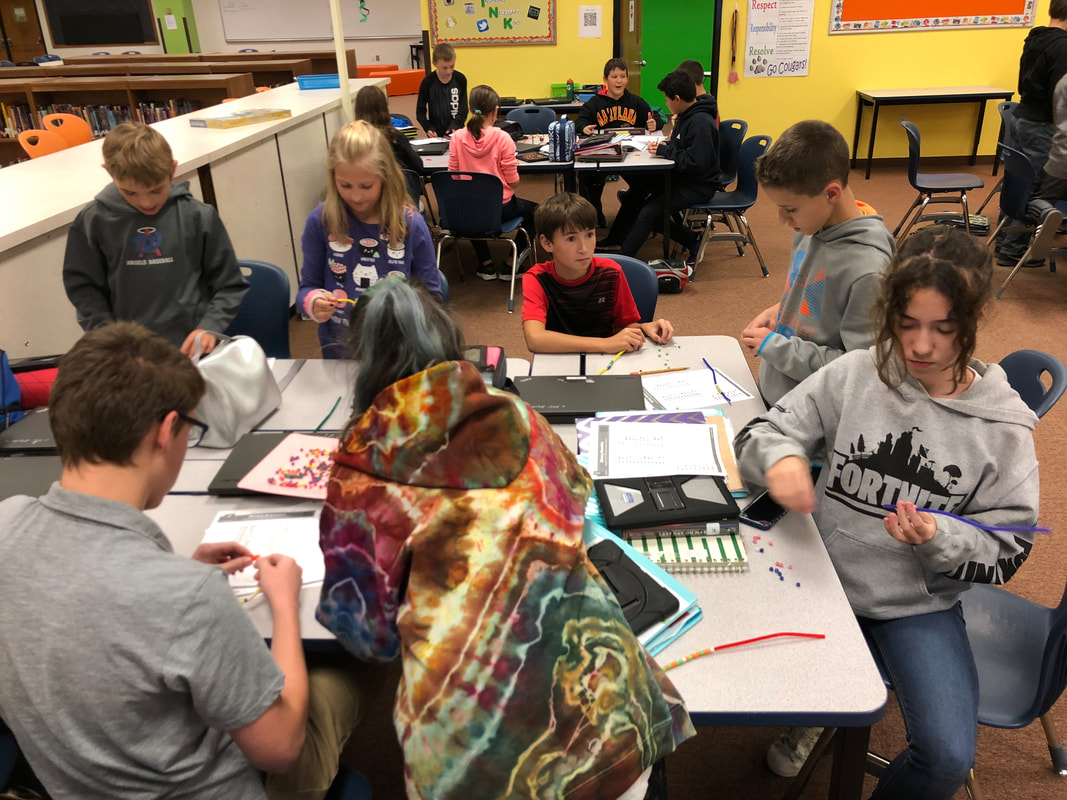 To my utter delight, they were excited to work on this project! Even better, they seemed to really understand how to make the bracelets! As a middle school teacher, you never know how students will react to a lesson. This one was a hit! Here are some shots of their finished bracelets. I was so proud of them and their hard work! 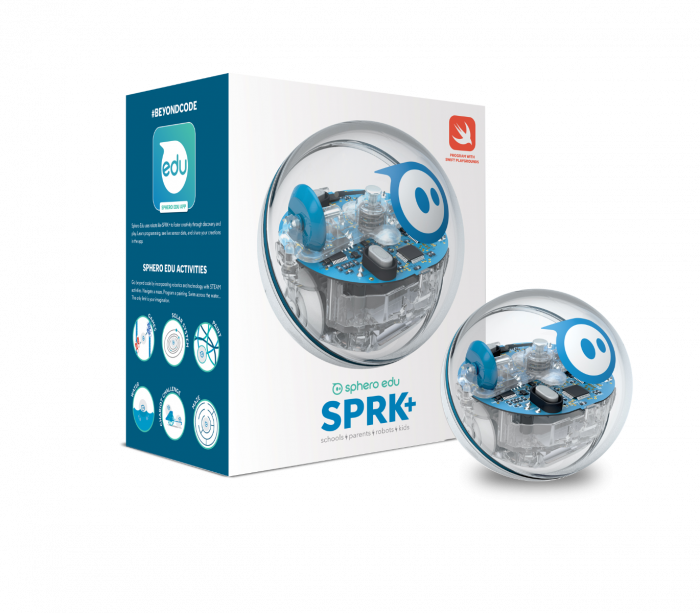 Sphero SPRK+ robots are not new to my blog... I have blogged about using them in class (and in summer school!) before. My students love them. This year I wanted to try a new approach to coding them. Thanks to inspiration from other blogs and the Sphero website, my students and I did a Sphero Mini-Golf Challenge! The goal was simple - design and build a golf course, then code your Sphero to get to the hole in the least number of movements possible. The kids had an absolute blast coming up with their golf course designs. They each had to select a theme and "hazards" that went with the theme. For example, one team created a beach theme and they created palm trees and surf boards to go with their project: 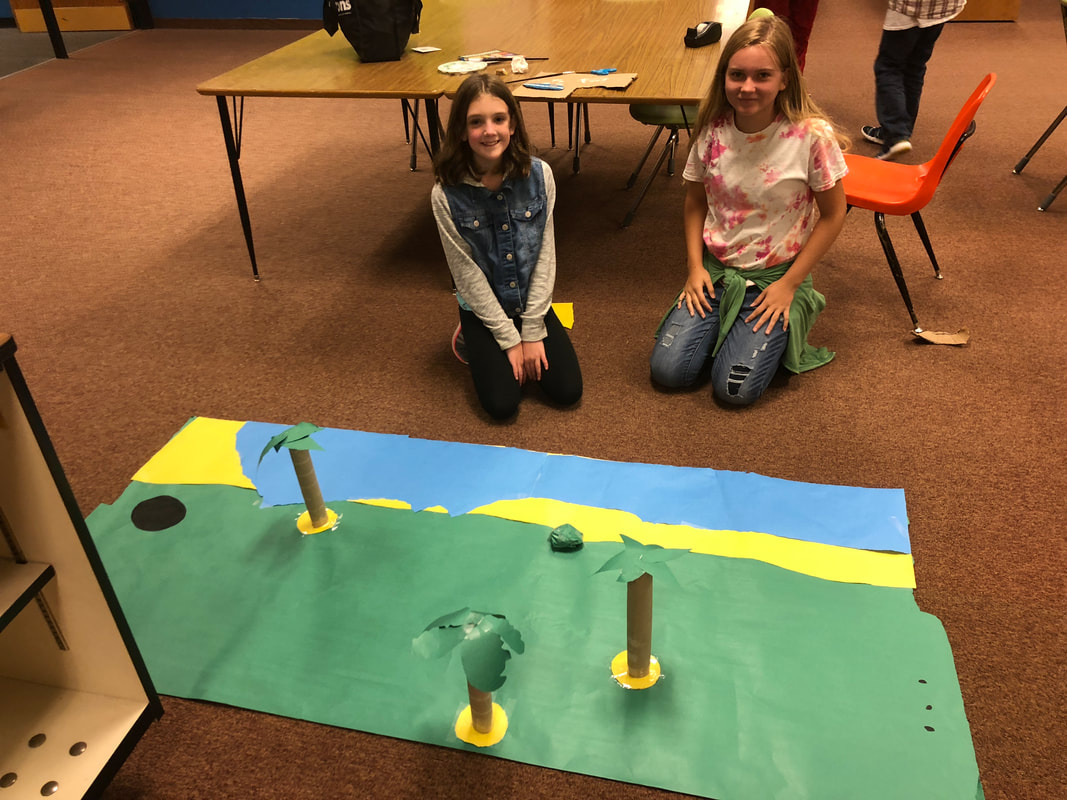 This project was fantastic - it hit all the components of the engineering and design process that we've been working through, and it really stretched their coding skills! 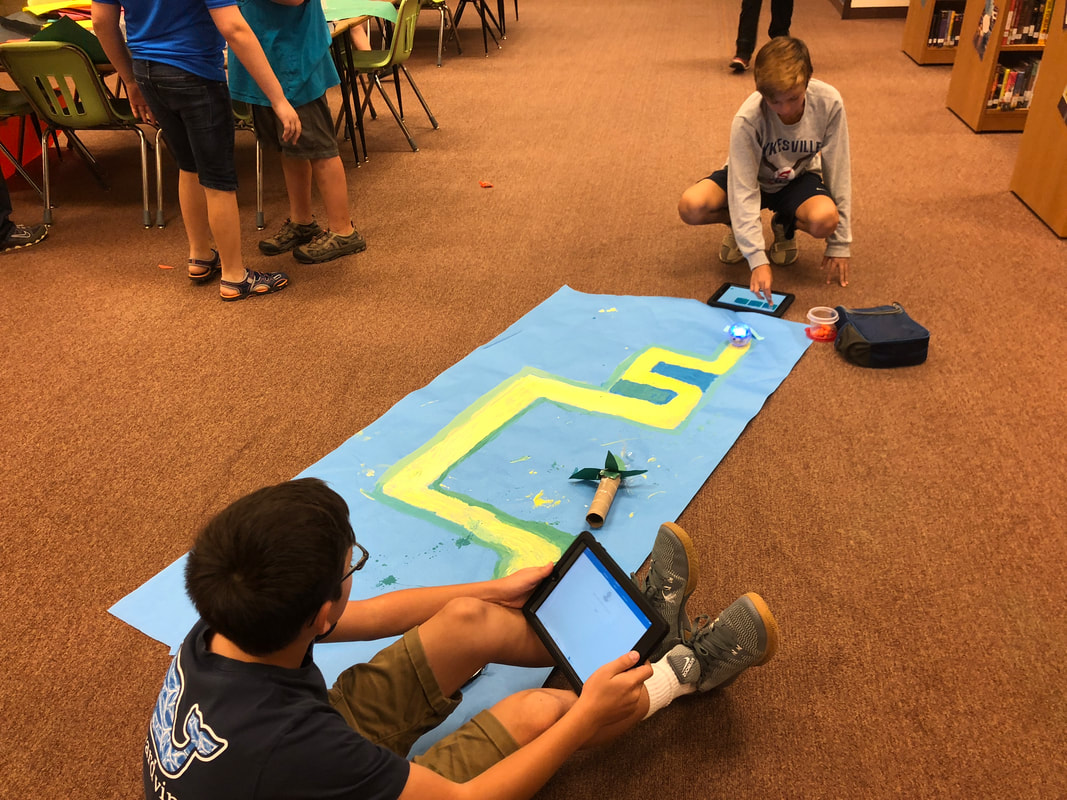 Once everyone created their mini golf course, we had one whole class period where everyone circulated around and played golf on each others' designed courses. They even kept score using these golf score cards, created by Sphero... It was amazing, and engaging! Disclaimer: I have a LOT of Spheros... we have 15 here at SPMS, due to generous donors on DonorsChoose.org. We are also a 1:1 iPad school, so my students could work in partner pairs. For this project, I would recommend groups of 4 or less to allow everyone to design, build, and code. 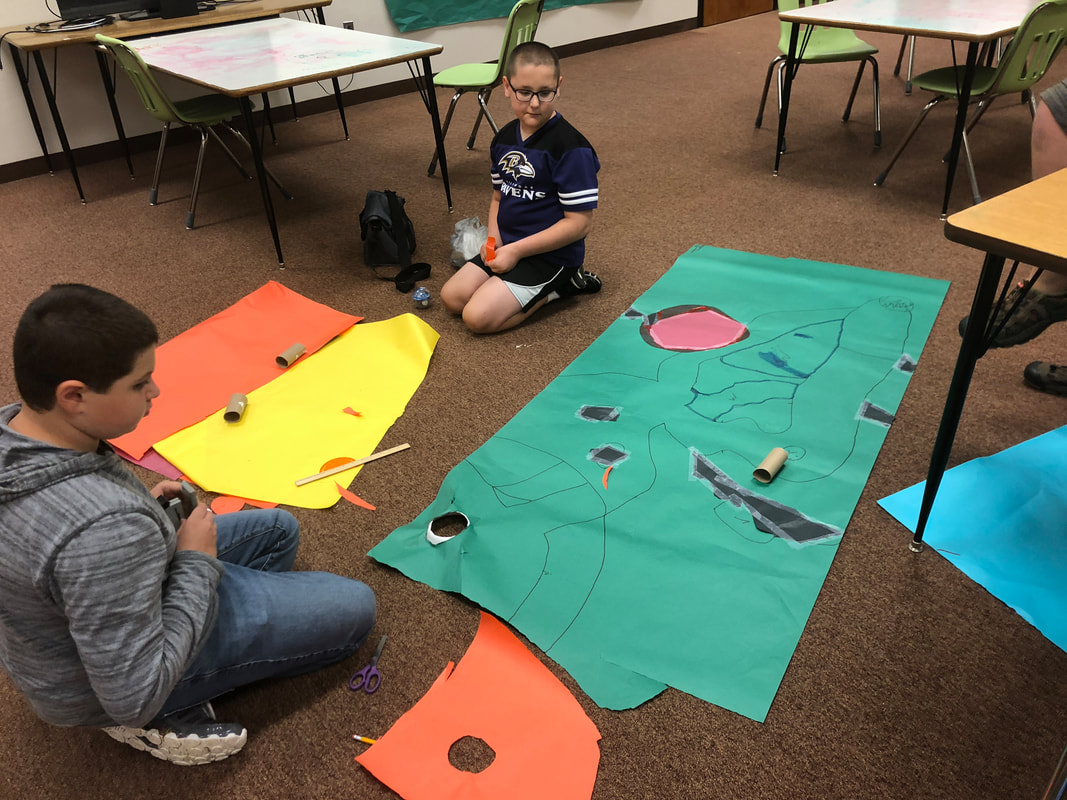 Check out this groups' success with coding... this was a tough project, but they did it! How would you integrate Sphero Robots into your instruction? Comment below and let me know!
 Do you want to take your class on a field trip but don't have the funds? There is a solution - Google Expeditions! Our friends at Google have developed a wonderful tool for education that allows you to travel anywhere in the world via virtual reality. Are you ready to travel?? What You'll Need:
Let's begin! First, you'll need to sign into the app with your Google credentials. Then you'll be asked to select "Be a Guide" or "Be an Explorer". Teachers should be guides, students should be explorers. 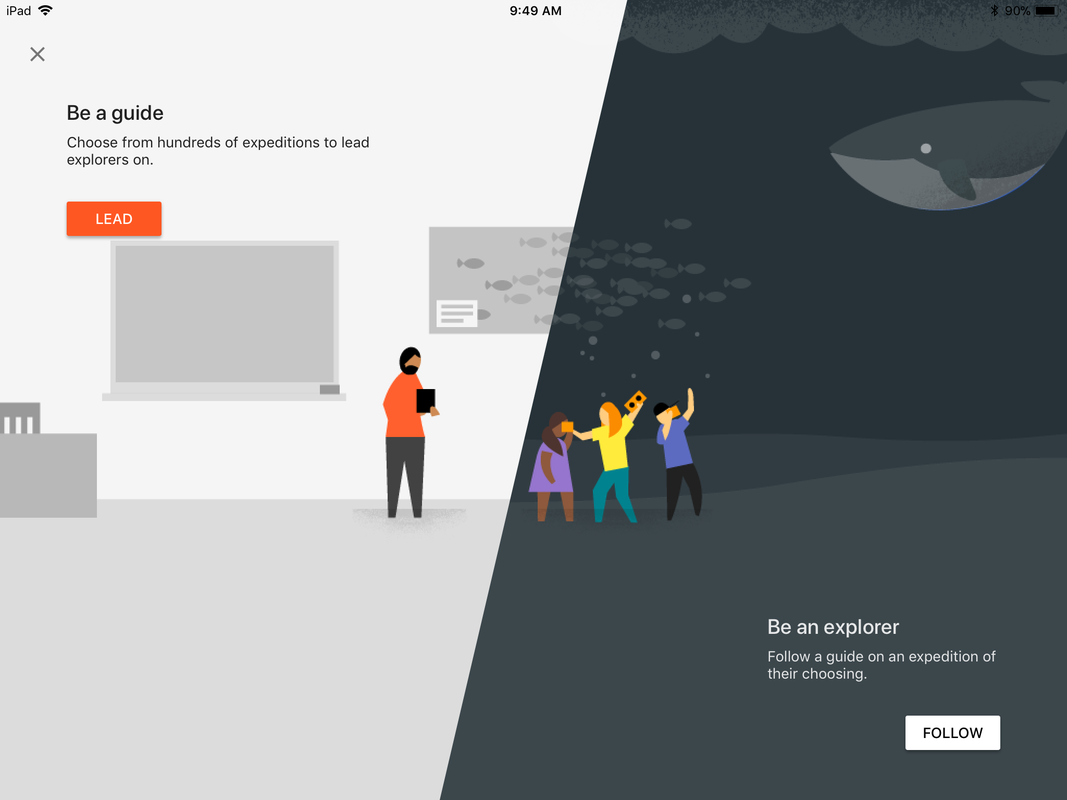 NOTE: Students can "be a guide" on their own time and explore all the awesome expeditions that are available! Guides, or teachers, will select which Expedition that they want to lead the Explorers on. For this class, the teacher selected an expedition to Mount Everest. The students had been studying Everest in her 7th grade social studies class. Students can "Join" the expedition from their devices. Once they have joined, the teacher can begin the expedition. Each expedition has a series of scenes to show students. The scenes are 360 degree photographs. Students can swipe the screen or physically turn themselves and their devices to view it. Below is the teacher screen. In this image, the teacher is showing and discussing with students the circled image. She can see that the students are looking - each smiley face represents one explorer! The teacher can even circle, highlight, and draw on the pictures to capture students' attention and highlight important details that they may miss. 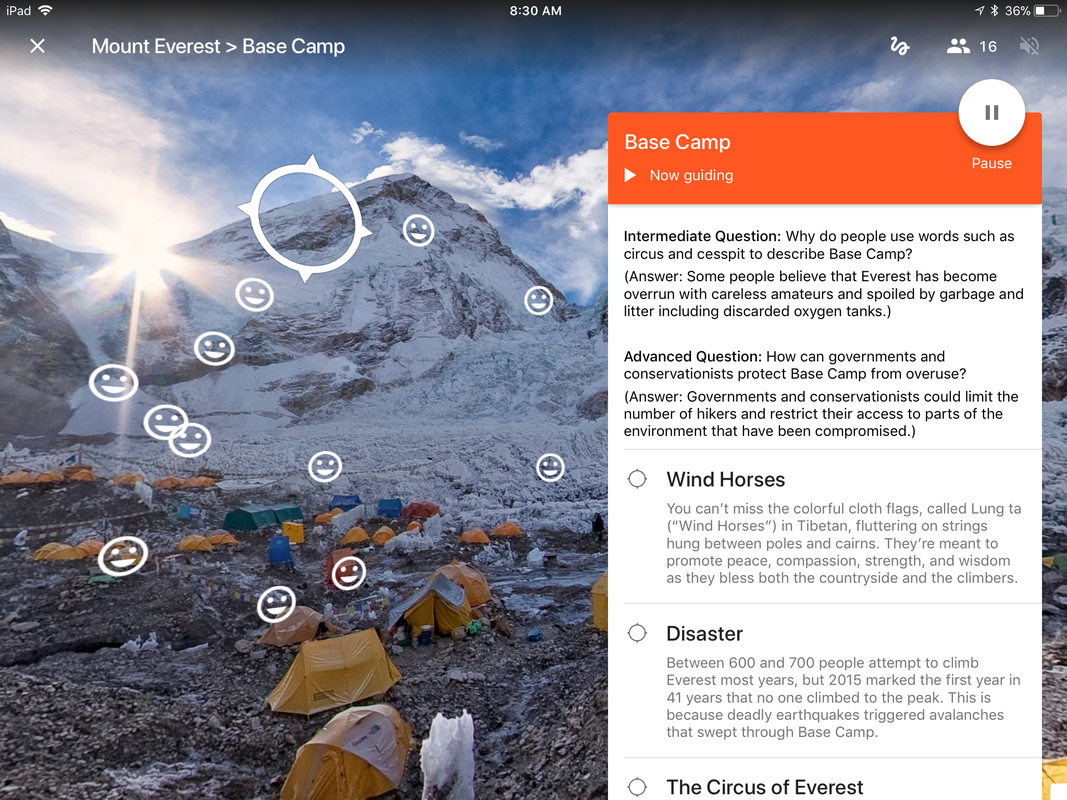 Each scene includes background information, several objects to point out, and even differentiated questions to prompt discussion among students! It's amazing! Check out this video that I took while the teacher was leading the lesson. It shows you how the iPad moves and what the students saw during the lesson on Everest. Google expeditions gave our students a whole new viewpoint on Everest. We frequently overheard "WOW!" and "This is so cool!" while the students were exploring Mount Everest. Here are a few photos of our students enjoying Google Expeditions! Expeditions isn't just for social studies... there are expeditions for almost any subject! Science, the arts, famous people... just search within the app and see what you find! Tour the International Space Station, check out a coral reef... examine a human body, view Mount Rushmore, walk among ancient ruins! The possibilities are endless!
How will you use Google Expeditions with your students? Comment below and let me know!  I'll do almost anything to "sell" a book to a reader. It doesn't matter if it's a student or adult, old friend or stranger in the grocery store - I'll try my best to be a #bookdealer and find that one perfect book for a reader. Thanks to Pinterest, I took every student at SPMS on a date with a book - several books - in February! BAHAHA! It was epic and amazing and FUN! I started with an overview of what speed dating was and how it worked... the kids were horrified at the amount of social interaction dating required:
Ahh, youth. Next, I went over the "Mrs. Hurley's 6 Rules for Dating" which (mostly) apply to both humans and books!
Then we moved into the speed dating area:  Complete with red tableclothes, LED candles, heart decorations on the tables, vases with fake roses (shout out to the Dollar Tree for all the decorations!)... I even turned down the lights to "set the mood"! But by far the worst was the music. I streamed some of the worst covers of the world's cheesiest love songs. Some of my favorites were:
To be clear, I enjoy some of these songs... but the covers were AWFUL. And I blasted them as loud as my speakers would go! The students had 3 minutes with each "date". At the end, they had to rate their dates and write some notes about the date and why they gave it the rating that they assigned it. Click HERE for my rating sheet sample - this one was for 8th grade. Feel free to copy and remake as needed. Below are pictures of some of my kids mid-date. It was SO MUCH FUN! Hands down probably one of the most loved activities I've put together for my students! The best part was setting up those "second dates"... here is just one sample email I had from students immediately after classes.  I received over 100 hold requests for books that were "dated" during this activity! One book had so many holds that I ordered 3 "emergency" copies (in addition to the two I already had) sent from Amazon and processed them the next day to put them in the collection... there were more than 15 requests just for that book!
It's important to note that not all of the books I put out were brand new. Many of these were great titles that I noticed weren't circulating. I am happy to say that all of those books are really feeling the love now! I even "sold" some of these books to staff members - some of whom weren't ELA teachers! They fell in love just by walking through and wondering what in the world was happening in the library... and they left with a hold on a book they couldn't imagine life without. YES. What books would you put out for your students? Comment below and let me know!! 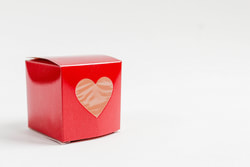 We all like to receive love letters, right? I thought February was the perfect month to ask the students and staff what they love most about the library. Check out a few of their responses: (Names removed for privacy!) What can we takeaway from all this love?
The third annual Springfield Middle School Bookmark Contest was held during the month of November, and the results are amazing! We had over 40 students enter some amazing work. We had memes, feathers, quotes, book covers - so many great pieces of art! Check out the best of the best below... these bookmarks were voted the winners! Want to run a bookmark contest at your school? Here is my original form where the students turned in the work. Feel free to download it and use it as needed.
Students had from November 1-20 to turn in their entries, then voting lasted one week. Copies of the bookmarks were posted in the library with numbers (not with names). Voting was done via a QR Code attached to Google Form. Students were allowed to vote once per
|
About the AuthorHi! Welcome to my blog! My name is Christine Hurley. This is my 17th year of teaching - I've taught Kindergarten, 4th grade, elementary media, and now I am in my 6th year of teaching middle school media! Archives
September 2020
Categories
All
|
||||
 RSS Feed
Proudly powered by Weebly