 Stop Motion animation is an amazing creative tool used to make really cool movies... think Nightmare Before Christmas, Wallace and Grommit, the Lego Movie, Coraline, Rudolph the Red Nosed Reindeer, and Shaun the Sheep. It used to be a time-intensive, tedious process that was nearly impossible for students to complete. To complete a stop-motion movie required extensive backgrounds, complex models of characters, and super expensive equipment.... NO LONGER! Using the app Stop Motion Studio (a FREE app!), students are able to easily create really awesome movies using the principles of stop motion animation! Stop Motion Studio allows the students to take photographs and adjust the frame rate of how fast they play. FUN FACT : Most stop motion animation movies are filmed at 24 frames per second (fps)... that means for every one second of movie, there are 24 pictures taken! CRAZY, right??? Watch how easy this is... and check out how I use the "onion skin" feature to see through to the last picture I took. It really helps with aligning the photos and keeping the animation steady: And here is the finished movie... Pretty neat, right? Just WAIT until you see what the students did with it... we gave them the instructions and they ran with it. I want to give you some tips that we learned through trial and error. 1. Use the "onion skin" featureOne of our 6th grade science teachers came to the library to have her kids animate the rock cycle. It was our first attempt at stop motion animation and we didn't know what we didn't know... but we went into it with a "we can totally ROCK this" (see what I did there? HA HA!) attitude. Their movies came out okay, but we both realized that had we known about the onion skin feature that they would have been even better. The backgrounds jumped around some, and the kids had a hard time remembering from class to class where they left off the previous day. Here is a sample so you can see what I mean: 2. Use an iPad stabilizerIf you use some chairs or a book stand to stabilize your iPad, it will cut down on the backgrounds jumping around and overall improve the quality of the video. 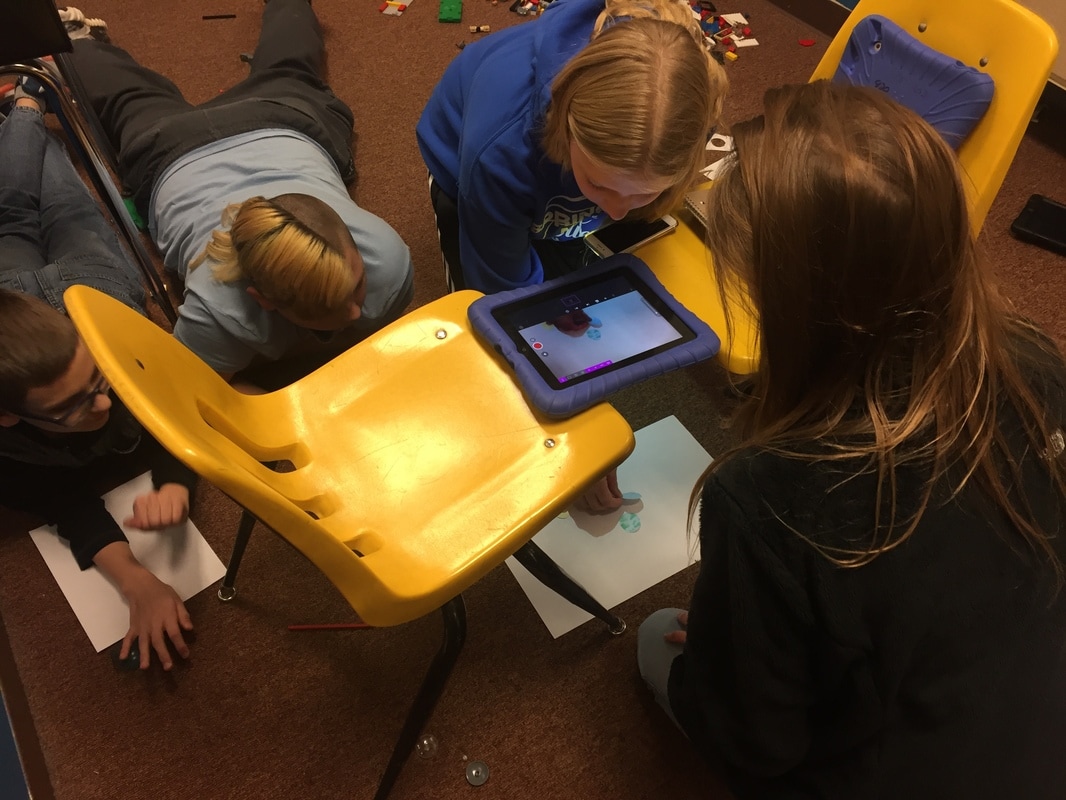 You could even build your own iPad stand out of K'NEX, like this creative student! 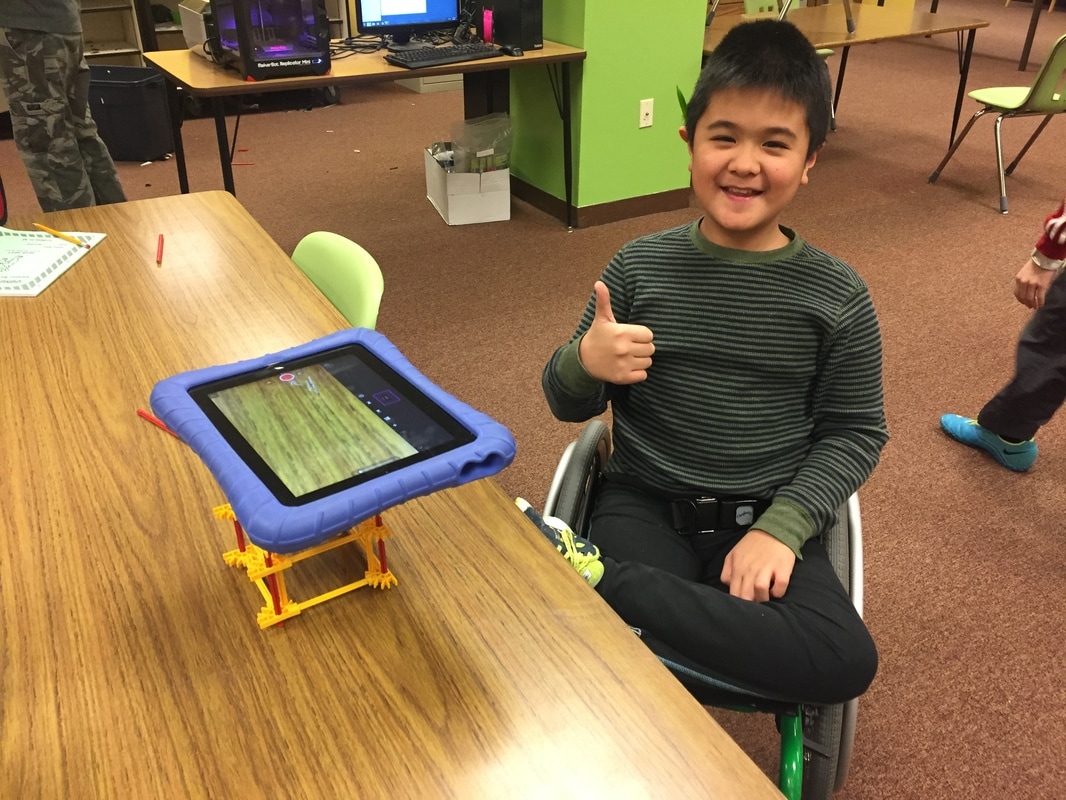 3. Take it to the next level!When the movie is finished, have your students take it to the next level by exporting it to their camera roll and then importing it into iMovie. They can add titles, sound effects, and maybe even use GarageBand to make a custom soundtrack, like these kids! We had students create models of the rock cycle; how the digestive system processes food; and moon phases, seasons, and solar eclipses. While my students' stop-motion movies are all science content based, you certainly could have students create and tell stories, illustrate a historical event, or document the creation of an art project. The possibilities are endless and are only limited by your creativity!
How will YOU use stop motion with your students? Comment below and share your idea!
0 Comments
The social committee of Springfield Middle School is hosting a holiday door decoration contest, much to my horror. I am not a crafty person (unless the idea comes from Pinterest - with step by step directions, I can create anything!). I had a brainstorm of inspiration one night though, while staring at some old equipment that needs to go to recycling.... wait for it...  Very punny, right?? Whomp whomp whoommmppp... I'm sure I saw it on a commerical somewhere. I have very few original ideas, let's be honest. This idea of "Tech The Halls" was going to include a Christmas tree with some decorations that were old CDs and mice that I had laying around. When my enrichment coding class heard that I was going to "just" put some paper and CDs on my door, they took it upon themselves to build the most epic door ever. Behold: TECH THE HALLS! 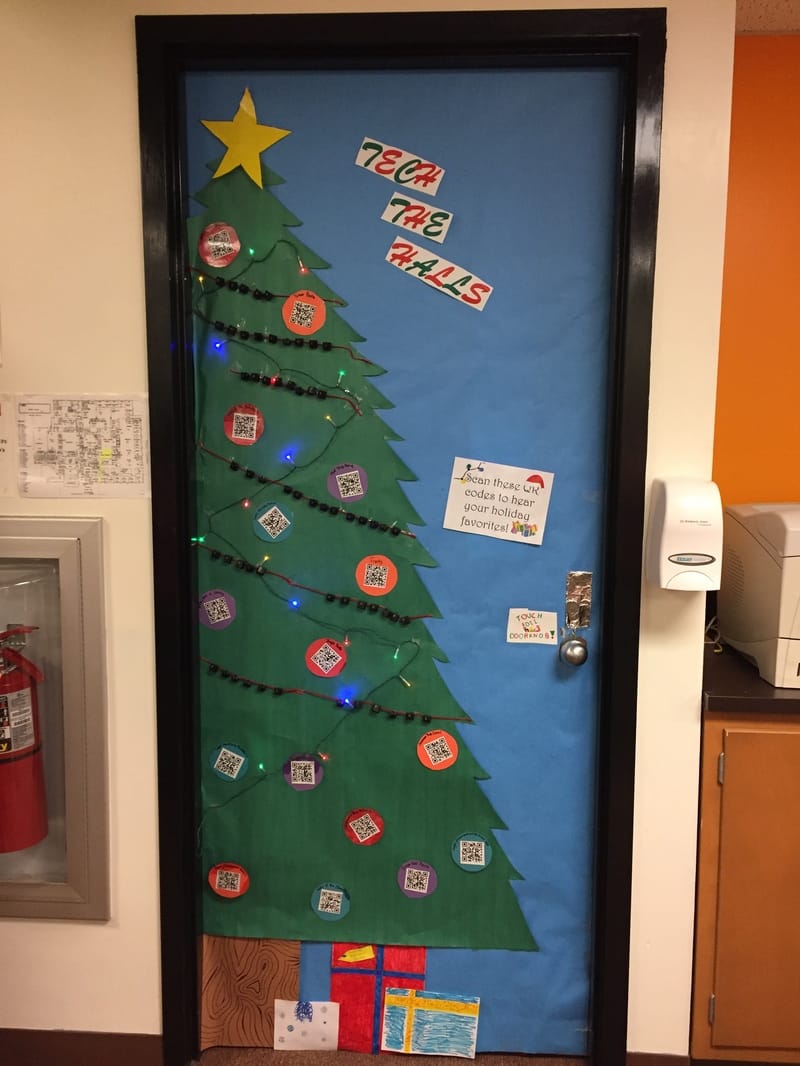 It's awesome, right? I know, it's a little overwhelming. Let me show you up close how fabulous this door really is... 1. QR CODES 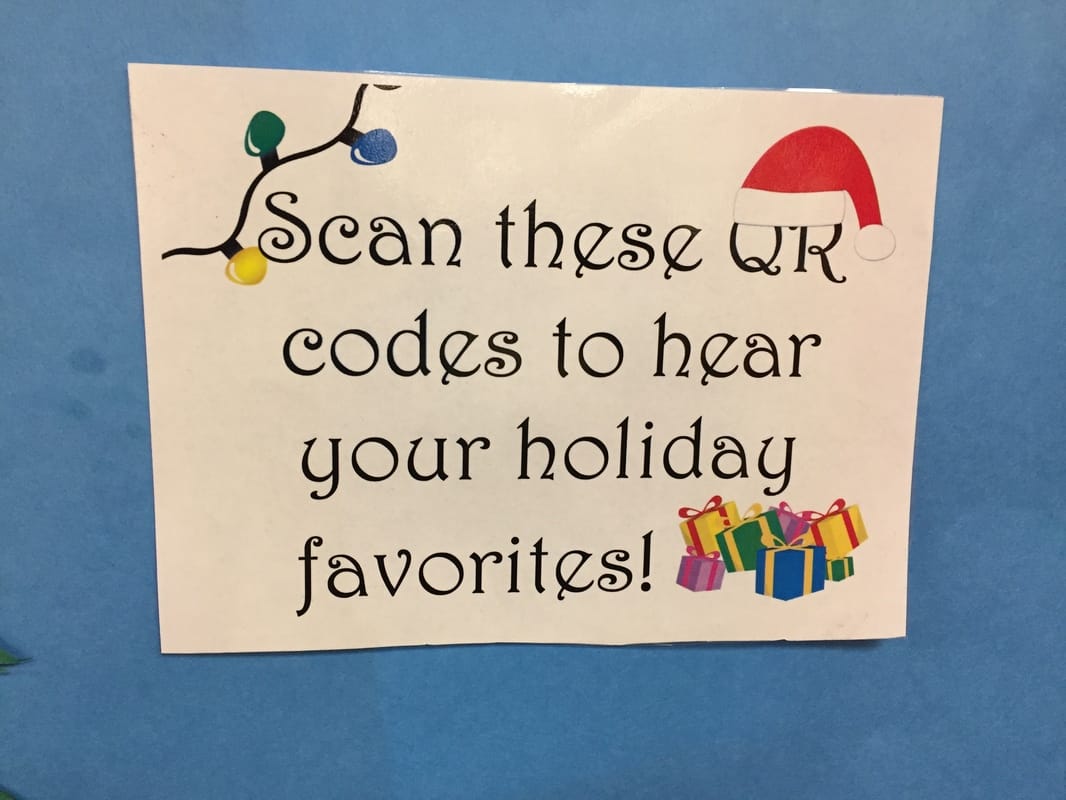 The Christmas balls that you see on the tree each contain a QR code. Each code leads the viewer to a YouTube video of a different holiday song. There are 16 total... LOOK! 2. UPCYCLED KEYBOARD KEYS 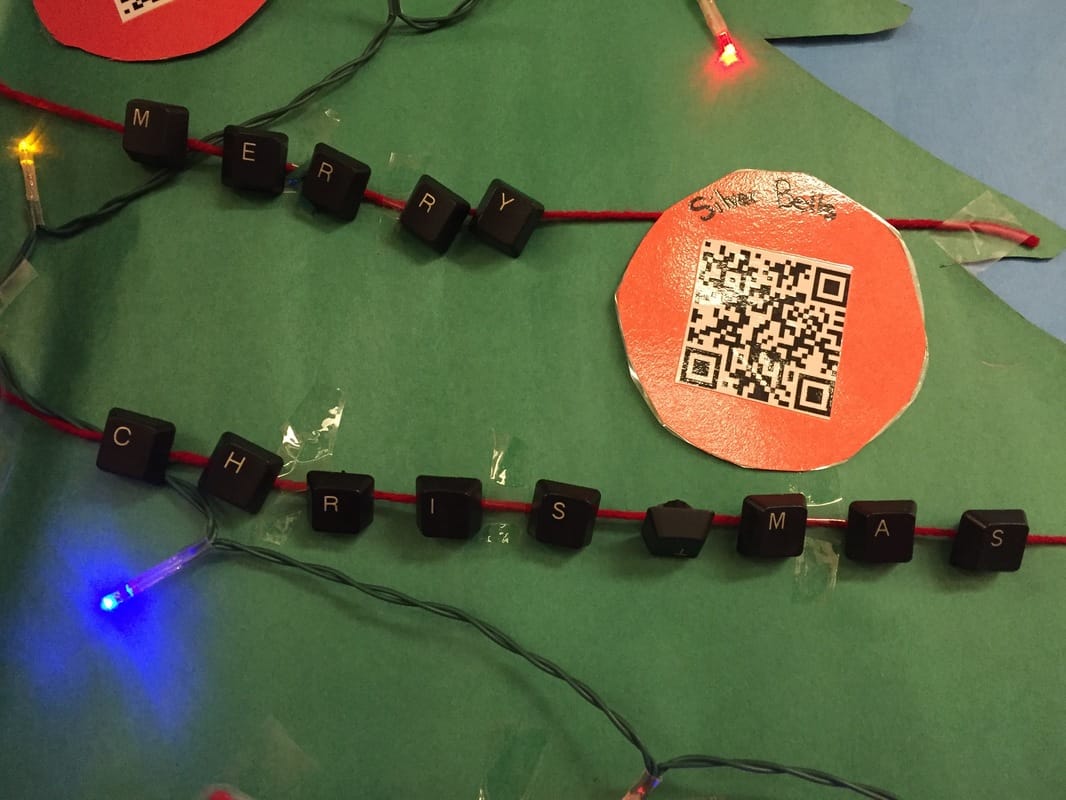 The garland on the tree is made out of old keyboard keys that I let the kids rip up and hot glue to string - and they even decided to spell out holiday words! They included: Merry Christmas, Rudolph, Santa, Joy to the World, Giving, Presents, and more! 3. INTERACTIVITY My students, being the budding programmers that they are, decided that they HAD to make the door interactive. They grabbed our Makey Makey kits (click here for a previous blog post about them) and coded a program in Scratch that allows the user to touch the doorknob and the foil above it to make the door SING. That's right... the door actually SINGS! These very creative kids ran the wires behind the door so that the user completes the circuit by touching both the doorknob and the foil above it: 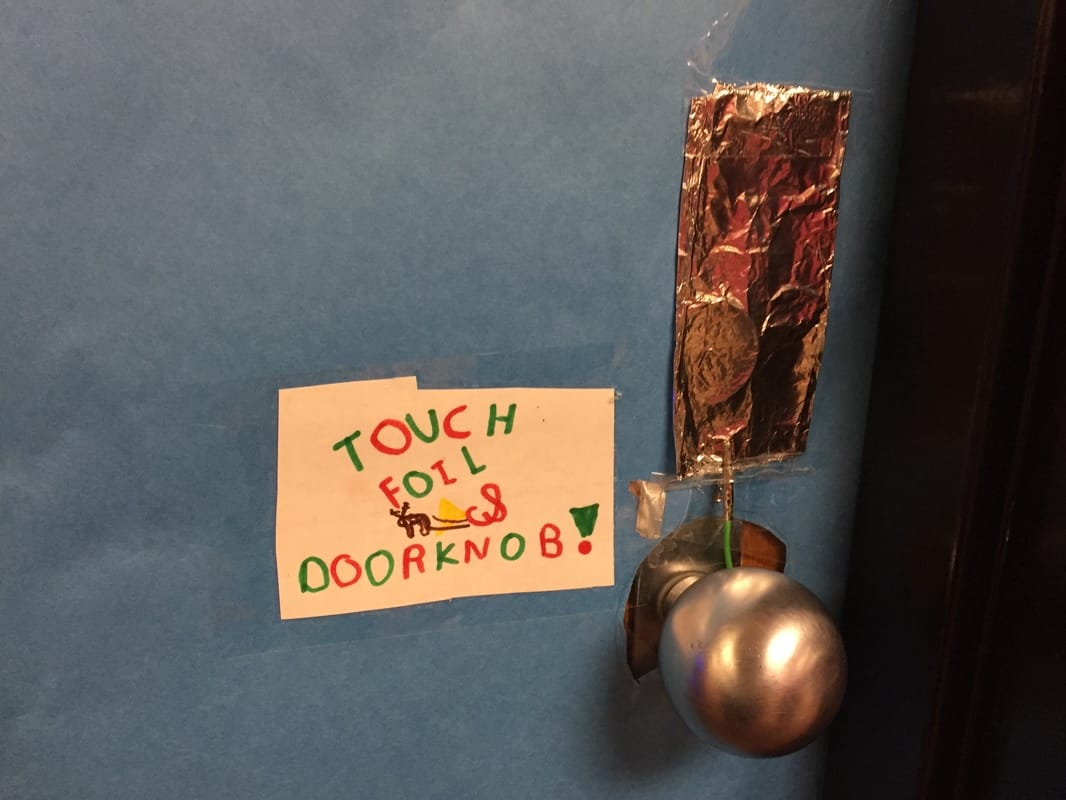 Here is a picture of the magic that runs the show (and the magicians behind it!): 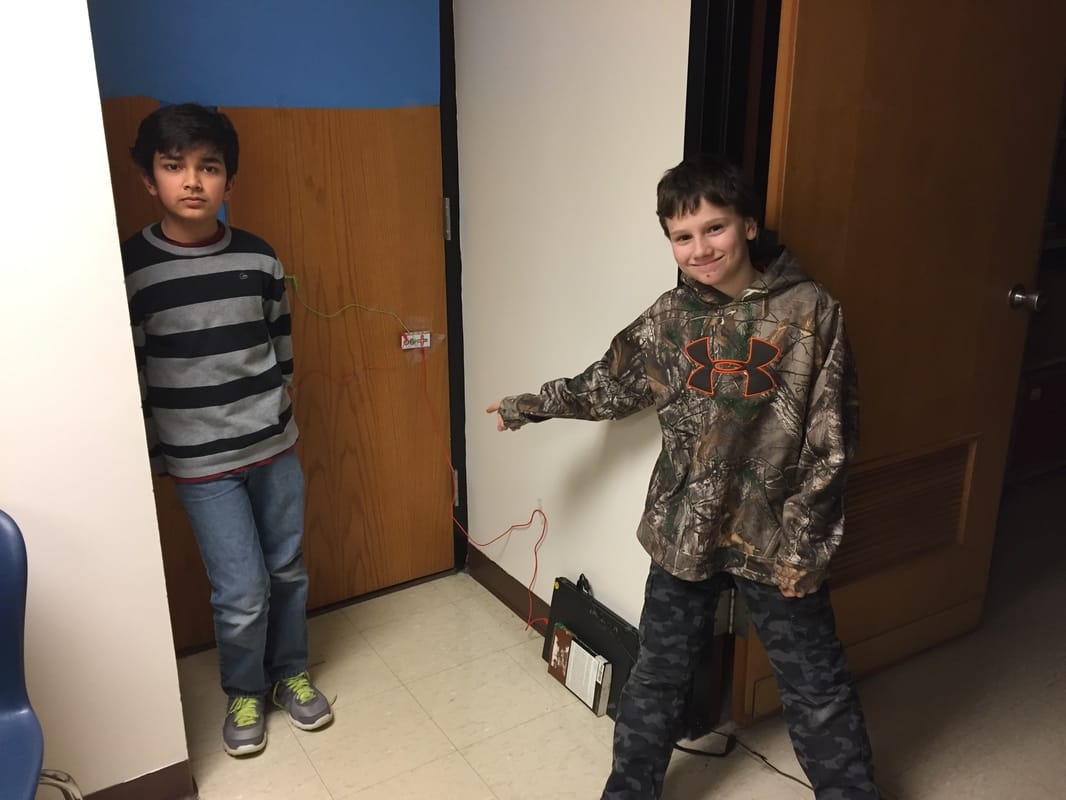 You can see the wiring on the door attached to the Makey Makey. The kids set up the laptop to not go to sleep when the lid is shut, then wrote the program to play one of three random versions of Deck the Halls when the circuit is completed:  Genius, I know! I take no credit for any of this work, it was totally designed and implemented by students. Bravo to these intrepid engineers!
Interested in getting some Makey Makeys for your classroom or library? Check out their website for all kinds of ideas on how to implement them into the curriculum! Comment below on how you could use these fun tools with your students! The library hosted our 2nd annual bookmark contest during the month of November. Students could enter their original artwork between 11/1 and 11/17. Voting opened on 11/18 and ran through 11/30. All bookmarks featured below will be printed in full-color and available for students to take. Congratulations to our winners - HERE THEY ARE! 6th Grade7th Grade8th Grade A few weeks ago, my supervisor shared a cool idea for a Makerspace on her WCPS Library Media Programs Facebook Page - it was a large piece of mosaic artwork made from stickers by the company Stick Together. These pieces of artwork are a stick-by-number mosaic. They provide the blank paper with the outlines and a lettered grid. The enclosed stickers are small, approximately 1/2" square each. I contacted the company about doing a custom photo of a cougar since our Mascot is a cougar, but the price was cost prohibitive for my budget. Instead I selected Van Gogh's Starry Night. It looks like this: 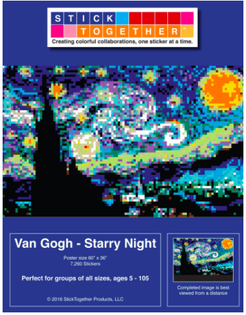 The total picture is 60" x 36" - quite large! When it arrived, I hung it up with some directions: The stickers are color coded but not marked on the sticker pages, so I added them to folders to keep them organized and cut down on sticker misuse/waste: 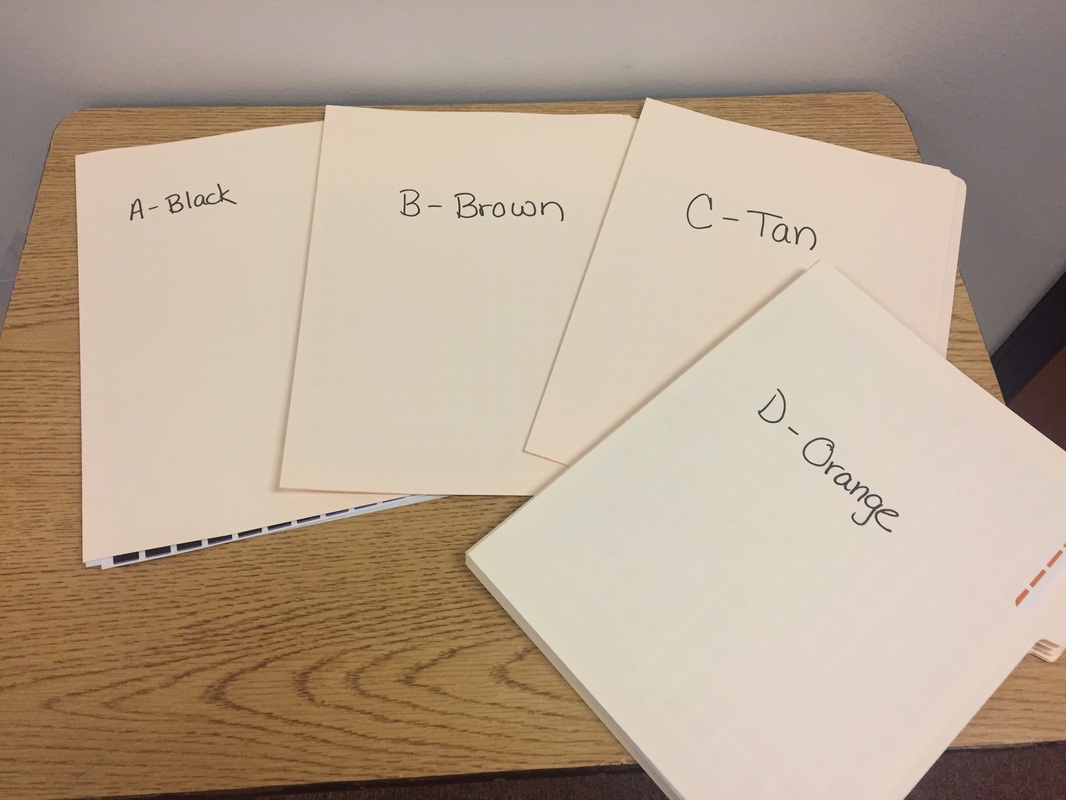 I also only put out one color at a time for students to work on. It helped keep disagreements to a minimum. We started with black because Starry Night has a LOT of black in it. Within just a few minutes, I had students wanting to sticker. They LOVED it! Over the next few weeks, many students and staff got in on the stickering action! According to the Stick Together website, it should take 5-8 hours of continuous stickering to finish a picture of this size. It took my students about 3 weeks total, and it was really fun to watch it change every day. Here's the finished piece: 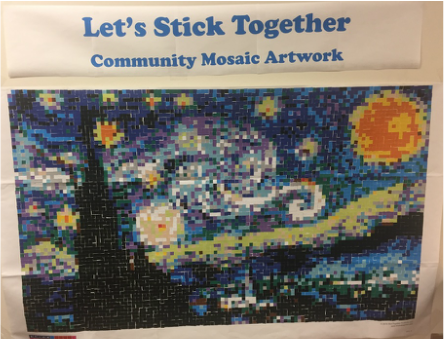 Doesn't it look AMAZING? I'm so proud of them! Now that we finished the first one, my students are asking when the next one will be hung up... I'm feeling like it might be time to order some sunflowers! Or maybe some hot air balloons!!
How would you use this in your classroom or Makerspace? Comment below! 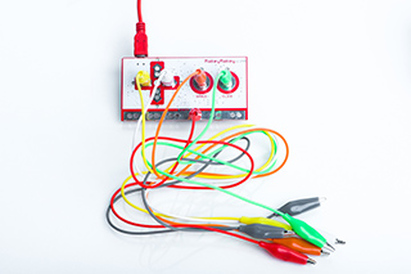 I seriously love Donor's Choose!! Generous donors funded another grant for our media center - this time for four Makey Makey kits! What is a Makey Makey? Watch this video to find out: Now that you've seen that, you REALLY want one, right?? Because they are so much FUN! It's an invention kit that allows kids to make basic gadgets and gizmos using simple alligator clips and an interface. There are tons of programs out there, including Super Mario Brothers, Pac Man, a piano program, bongos, and much more! The best part is that you can use Scratch to program your own ideas, too! We have just scratched the surface of using the Makey Makey kits, but check out some of the fun things my kids created within just a few minutes of busting the kits out: 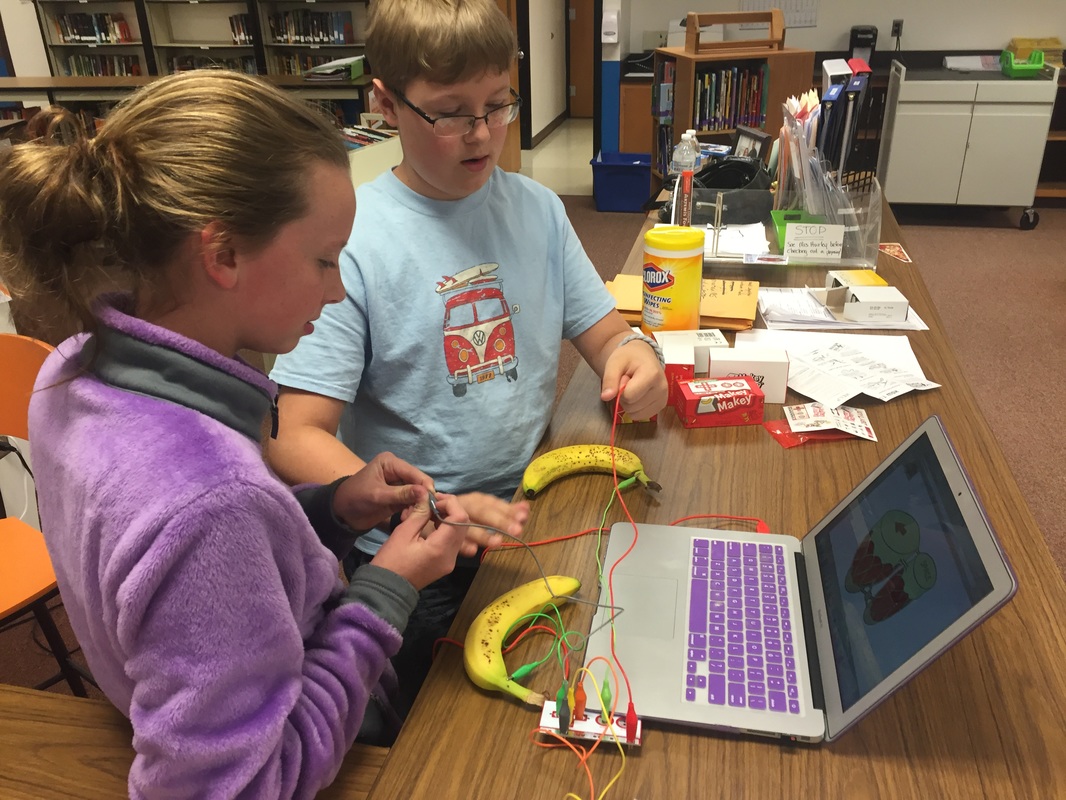 Banana bongos. For real. 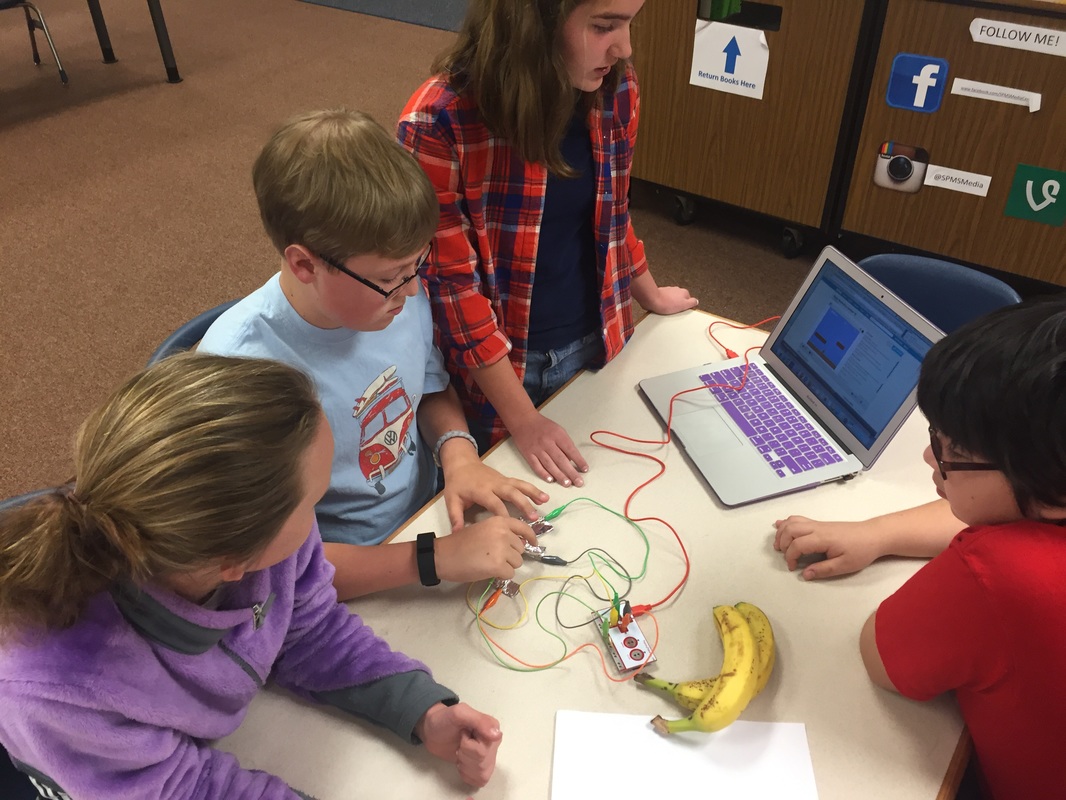 It's hard to see, but this is a remote control to play Super Mario Brothers - made out of aluminum foil! 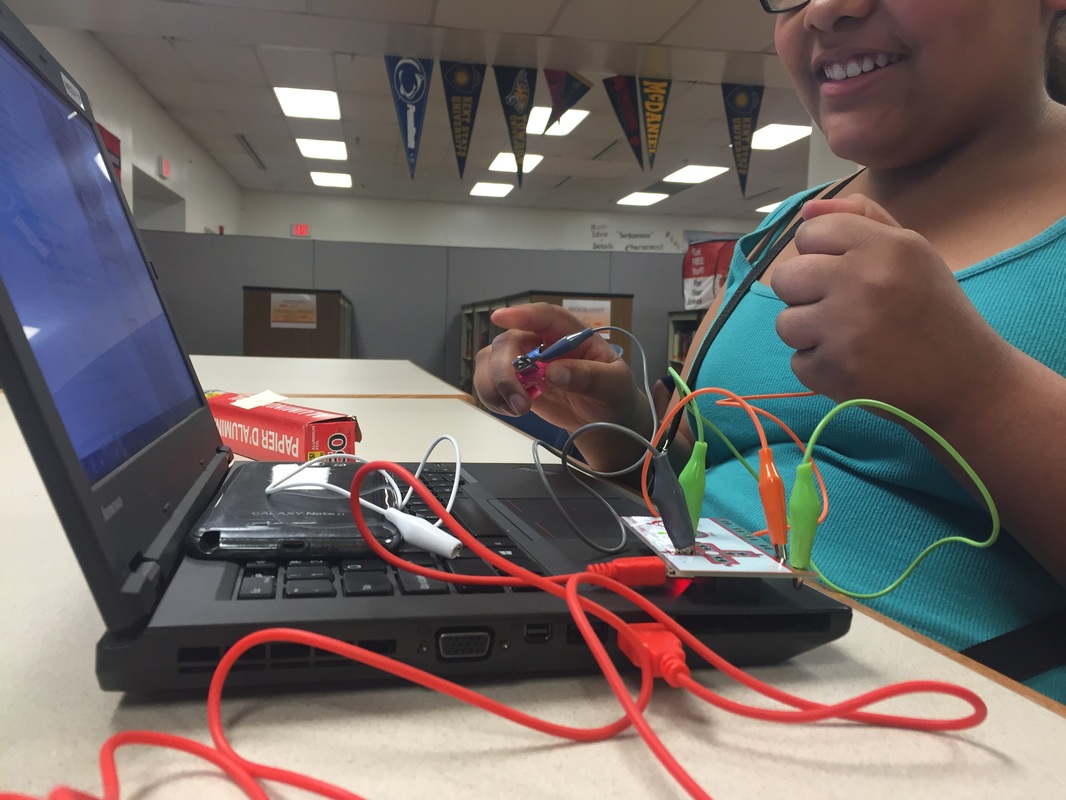 These girls were using themselves as a human synthesizer! Being the nerd that I am, I got in on the fun too - I made a water piano using some petri dishes, water, and the Makey Makey kit!
We have since experimented with playdough, other fruit, and office supplies. Pretty much anything that conducts a low-level electrical current can be used... the possibities are endless! What would YOU make-y with a Makey Makey kit? Comment below!  Webster's Dictionary defines tinkering as "to repair, adjust, or work with something in an unskilled or experimental manner". I love to tinker! Even as a kid I used to tear things apart just to see the insides, and sometimes to put them back together. The idea behind a Makerspace is to allow kids to make and explore... I had found some ideas on Pinterest about putting in a TinkerSpace in the Makerspace. The idea is to take old electronics that are headed for recycling and let the students explore them. But where would I get old equipment? Turns out one of our awesome 8th grade teachers was planning on recycling her personal computer from her house. She asked me to take the hard drive out of it, and where she could recycle it. I asked her if I could keep it for the students, and she said YES! Woohoo! The Tinkerspace was born! I set it out on the table with a box of tools (screwdrivers, wrenches, pliers) - it wasn't long before a couple of students asked me what the computer was for. When I told them, they dove right in! Within minutes they had the box opened up and were removing pieces. The best part is that they also grabbed another working laptop and were researching what the parts were called and what their functions were. It was a completely student-directed learning experience. YES. Now that the Tinkerspace is up and running, I am full of other ideas... how about old radios? Flashlights? Speakers? YES! Let's tinker!
What would YOU pull apart if you had the chance? Comment below! 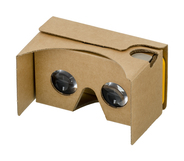 A few weeks ago, I went on a Donor's Choose posting blitz and posted a bunch of projects that I'd had floating around in my head. Just a few days later, there was a flash-funding event and several of my projects got picked up at the same time! It was amazing! One of my favorite projects included 6 Google Cardboard virtual reality headsets. If you aren't familiar with Google Cardboard, it uses a variety of apps on your smart phone to create a virtual reality experience that is totally immersive and very, very cool. Click HERE to read more about Google Cardboard direct from the source! You can get them on Amazon.com for $10-15 per headset... I bought the ones that are actually made from cardboard, but they do have plastic versions that are more durable (and more expensive). So how can Google Cardboard help us in the classroom? One of the apps that Google Cardboard supports is Google Street View. Street View is a free app that uses pictures to show the streets of famous places. Additionally, users can upload photos. It's PERFECT for virtual field trips! Upon unpacking and watching a YouTube video on how to fold them (because my spatial reasoning skills are HORRID), the first place we went was Paris, France. We walked around the Eiffel Tower, looked up and down some streets... it was amazing. With your phone in the front of the cardboard, it feels like you are standing right there! Our 7th grade ELA team is reading The Lightning Thief by Rick Riordan. In the story, Percy visits a variety of places around the world. The students are going to hop from place to place and take a virtual tour of the landmarks in the story! Our 8th grade ELA teachers have discussed looking at Anne Frank's house and Edgar Allen Poe's grave, among other places. One of our science teachers wants to use the cardboards to look at different biomes and environments... A social studies teacher is going to have her students visit the camps at Auschwitz, and another one wants to visit the pyramids. The students who use our Makerspace have toured the volcanoes in Hawai'i, the peaks of Mount Everest, the snowy tundra of Antarctica, Cinderella's castle, and more! As if that isn't enough... check out what Google is releasing soon: Google Expeditions! How amazing is that? Teachers will have the ability to interact with their students and take them on a guided tour using Google Cardboard sets. Wow. The SPMS Makerspace has 10 Google Cardboard headsets available for student and staff use - we are looking to purchase more for the future! So... where would you go with Cardboard? Comment below, I'd love to hear your ideas! Collaboration is king in schools - the days of shutting your doors and teaching just your content are long gone. Our students are are collaborating every day in classrooms as well, and that's a great thing! Very few jobs require that a person work totally alone - we need to be teaching our students how to work together. What better way to do that than with whiteboard tables? I didn't have the funding to buy new furniture (let's face it, very few of us do, right?)... so with a small investment, I made my own! 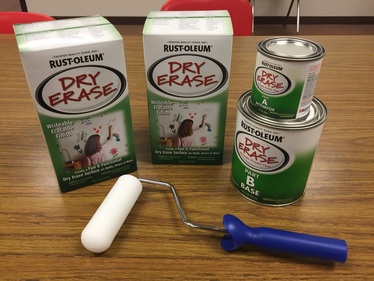 My amazing friend Dan Lindner allowed me to come visit his Makerspace at Pleasant Valley Elementary, and he had already painted several whiteboard tables in his area. He had a lot of great tips and tricks for me to make sure that the painting went well, which I will share with you here. If you know me personally, you know how much I HATE to paint, and how terrible I am at painting in general. With Dan's guidance, I was able to get these done in a few hours! Supplies:
Step 1: Tape off the edges of the tables. Use good painters tape and take your time. I didn't do this very well and it shows in my final product. Step 2: Prime all the tables. The whiteboard paint is essentially clear, so you will need at least 3 coats of primer. You'll need to let them dry for at least 30 minutes in between coats. I had 4 tables that I was painting, so it wasn't really an issue for me. I went through and painted each one, then started over, then started over again. Here goes the first coat: 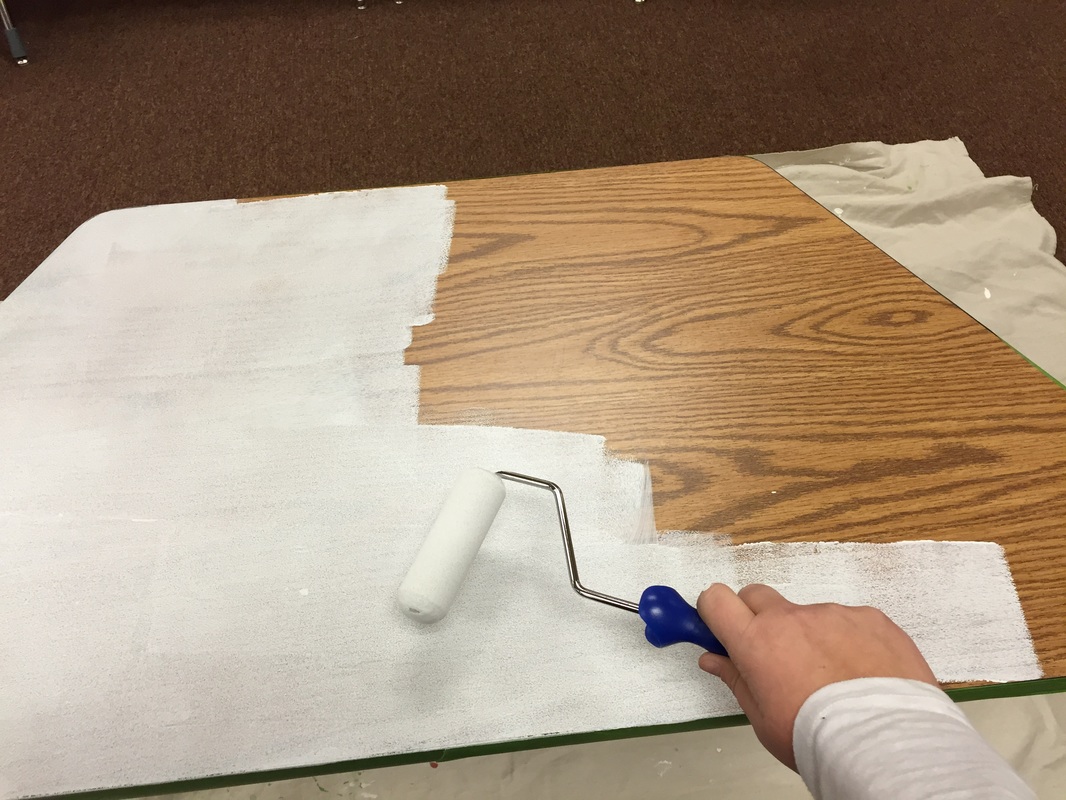 Here is the difference between one and two coats of primer: 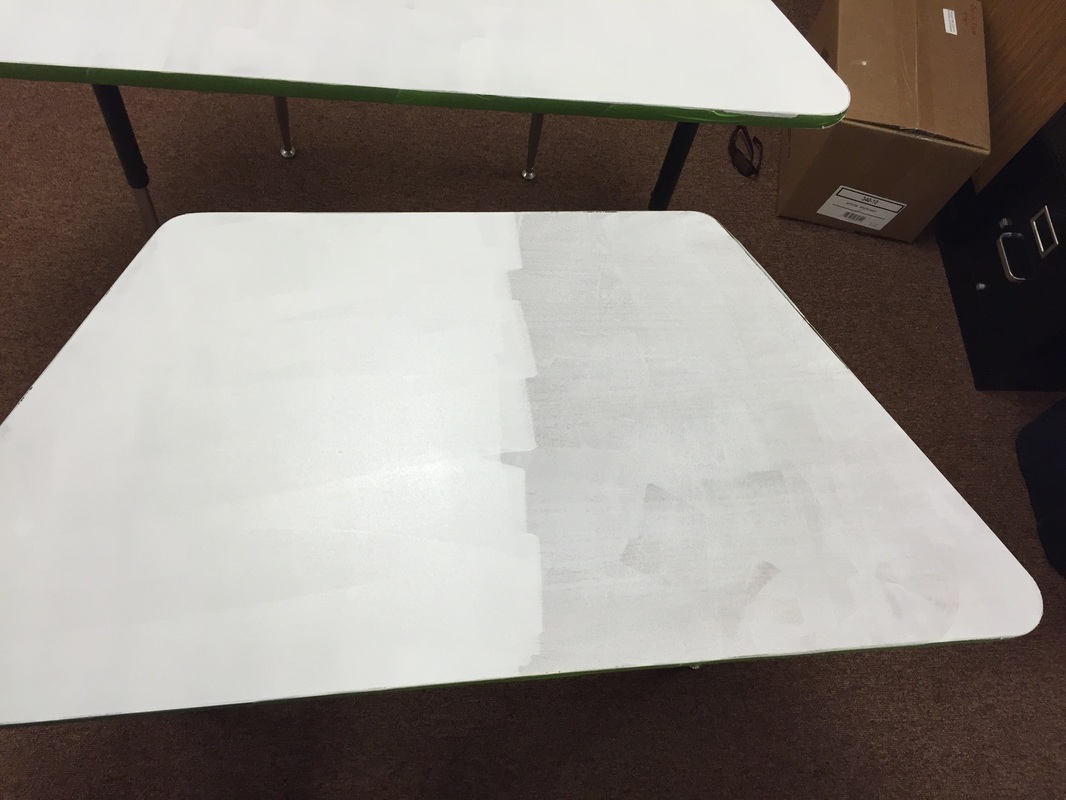 Step 3: Prepare the whiteboard paint. This is VERY important. There are two cans in the kit, A and B. Can A is the activator, Can B is the base. You will pour Can A into Can B and stir... and then you have ONE HOUR to use the can before it is no good. Other people have used it for up to two hours without issue, but you will need to be fast and you will need to not be interrupted. I would suggest that you let the primer cure for a few days and then select a date after school to do the actual whiteboard layer. Step 4: Paint the whiteboard paint. I did two coats per table, and I moved quickly. The whiteboard paint is very, very thin. A little goes a long way. I was able to do two 8 foot tables and two smaller trapezoid tables (see photo above) with one kit. Step 5: This is the hardest part... WAIT. You have to wait for the whiteboard paint to cure completely before you write on it, or you risk "ghosting" - the marker will not completely erase. I believe the kit says to wait 3 days, but we waited a week just to be sure. The kit also recommends that you do not use neon colored markers, but I did and it was totally fine. Don't be afraid to use whiteboard spray to clean your tables, and a good eraser or microfiber cloth. Here are my tables, waiting... waiting... waiting... 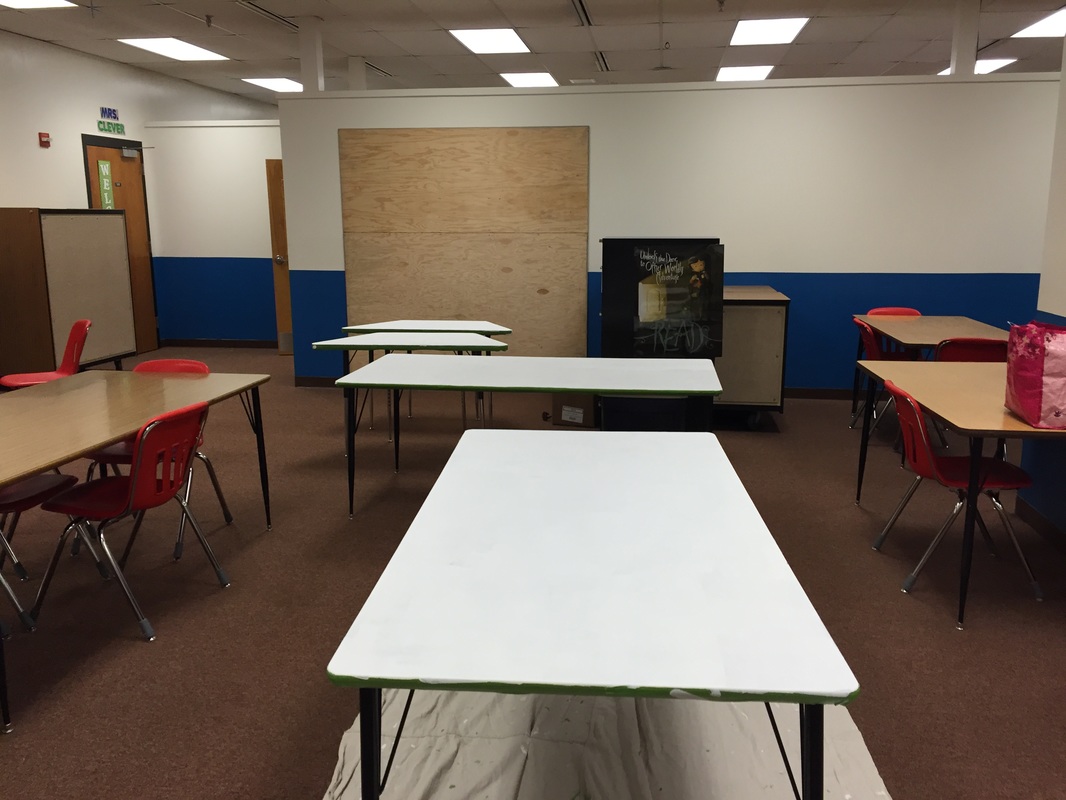 Step 6: COLLABORATE!! Now it's time to write, draw, create, and collaborate on your brand new whiteboard tables! Woohoo!! 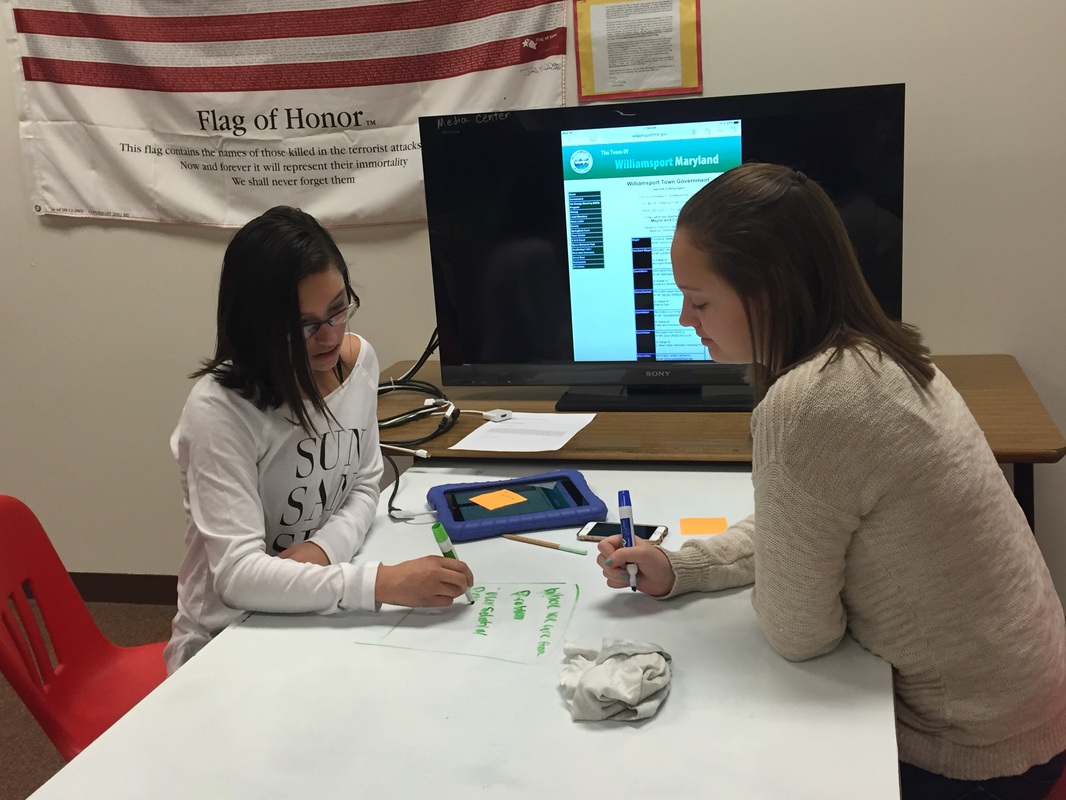 I used one of the longer tables to create my collaboration station. Check out the post on it here!
One of the newest trends in libraries is the idea of a collaboration station - a table with several chairs around it and a large display screen at the end. The idea is that your patrons can sit down around this table and connect their device(s) to the screen and share their work with each other. Oftentimes they look something like this: 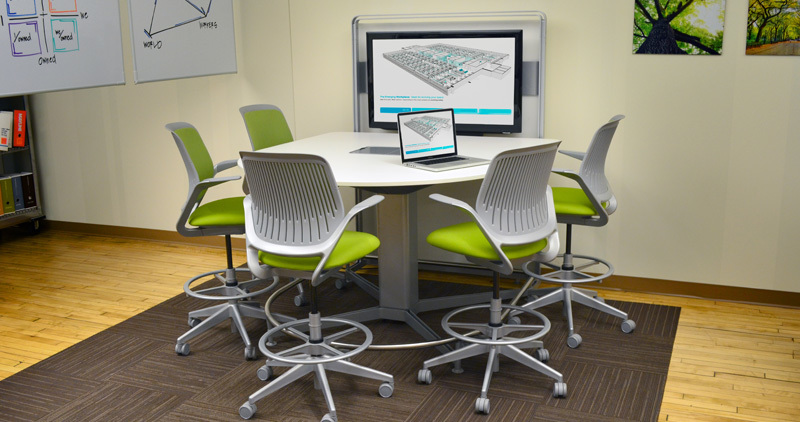 Really cool, right? Also really expensive. I mean, REALLY expensive. I love this idea, but I definitely did not have room in my budget to fund one of these tables. So... what to do? Get creative and MAKE ONE! 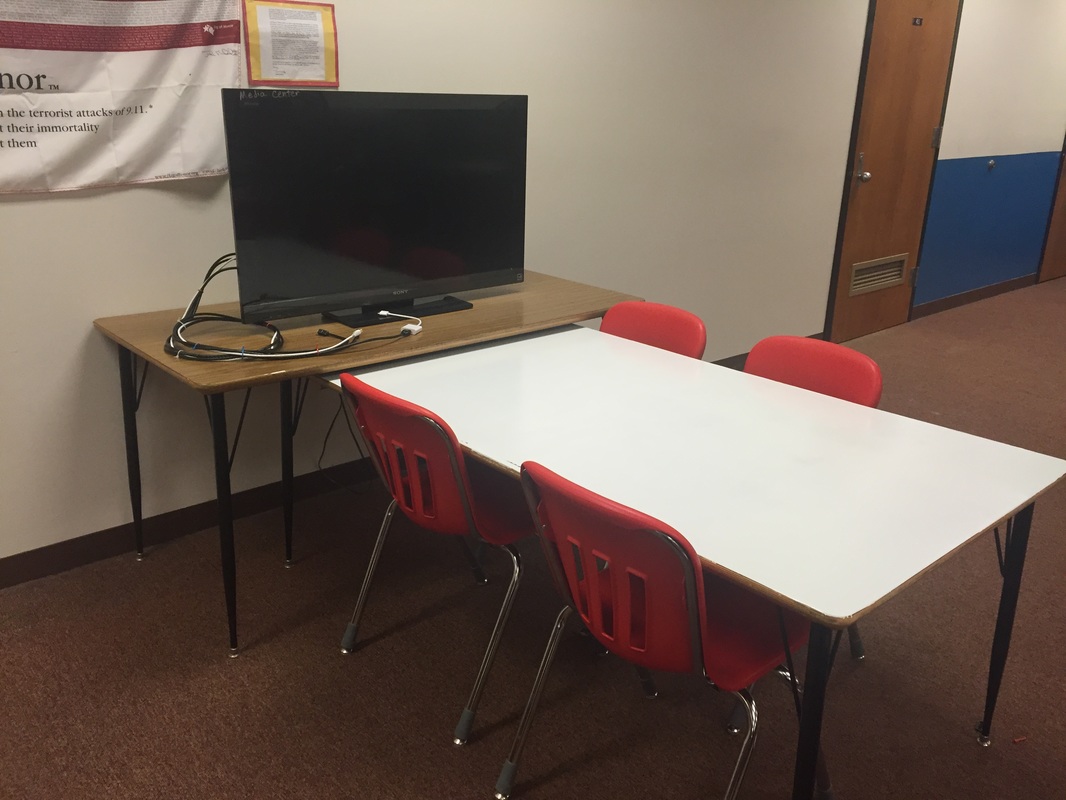 I had a TV that belongs to the media center mounted to one of those big, bulky TV carts. It wasn't being used for anything, and was taking up too much room in my storage area. I was looking at it one day wondering where to place it when the idea hit me - I would make my own collaboration station. My amazing custodial staff unbolted the TV and mounted it to an old table that I had sitting around. The table was slightly narrower than a typical table, which made it perfect for what I needed. I had recently painted several of my tables in the library with whiteboard paint (check out that blog post here!), so I simply slid that table up against the table with the TV on it to make a letter T. The TV had four HDMI inputs, making it perfect for hooking up devices. I just needed some cords and adaptors... thank you, Amazon! I purchased enough cords to connect all the different devices to the TV: HDMI Cable - the base cable that will allow you to connect devices with the TV with adapters. Also allows connection of laptops with an HDMI output, such as the IBM Lenovo laptops that my county has in abundance. I ordered 4 of these, one for each port. HDMI to Thunderbolt Adapter - to connect MacBook, MacBook Air, MacBook Pro 13 inch, MacBook Pro 15 inch, MacBook Pro 17 inch; 2. Apple Mac, Mac Pro, Mac Mini, iMac. I ordered 1 of these. HDMI to Lightning Adapter - to connect iPhone 5, 5C, 5S, 6, 6 Plus; iPad Retina Display, Mini 2, Mini 3, Air, Air 2; iPod touch 5th Generation, 6th Generation. I ordered 1 of these. HDMI to 30-pin Adapter - to connect iPad, iPad 2, iPad 3; iPhone 4, iPhone 4s; and iPod Touch. I ordered 1 of these. HDMI to Micro USB Adapter - to connect all Android devices. I ordered 1 of these. 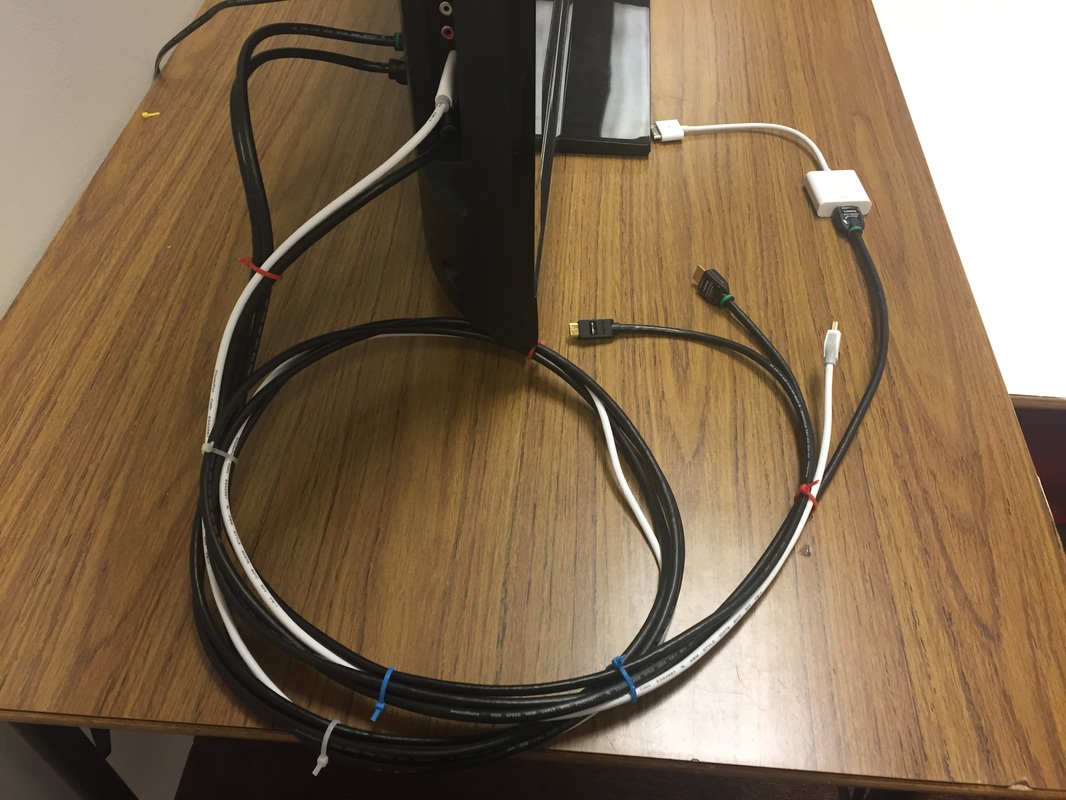 I hooked up all 4 HDMI cables and the accompanying adapters and zip tied them all together to create a neater set-up. The next thing to do was to get a student and try it out! 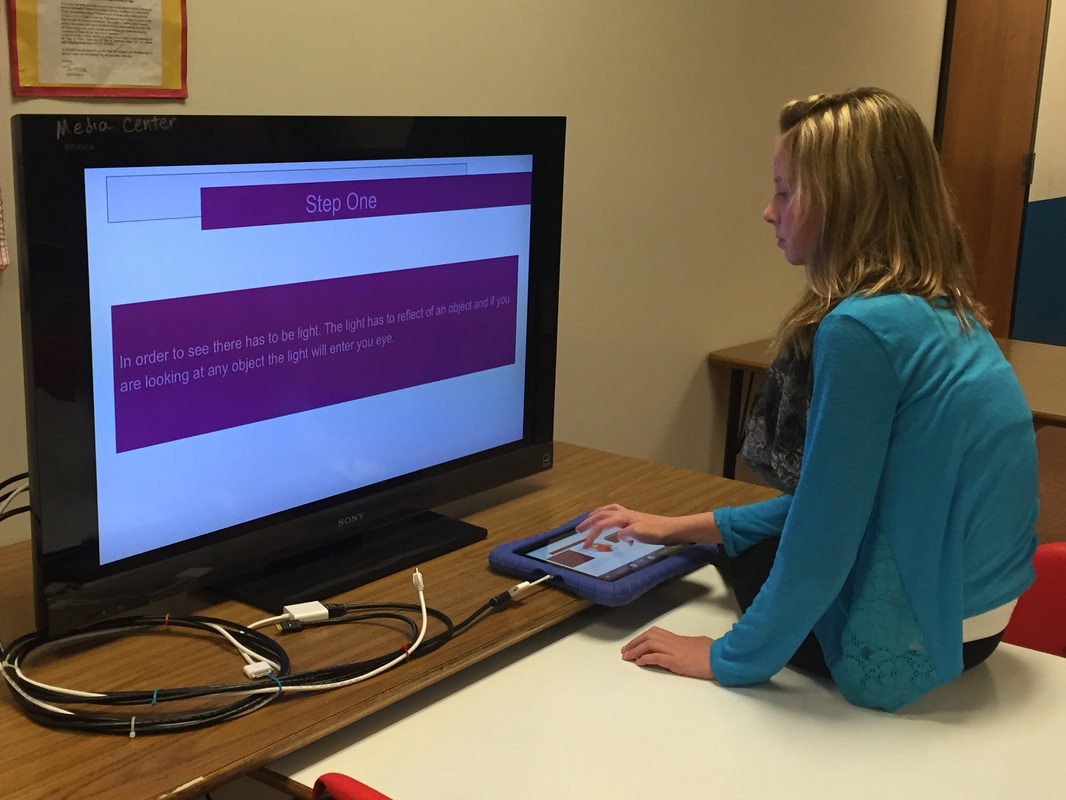 IT WORKS!!! So for about $125 in cables and whiteboard paint, using furniture I already had, I made a collaboration station. I can't wait to see how my students use it!
How could you use a collaboration station in your library? Leave a comment below!  If you have never heard of Minecraft, you surely are not a teacher or parent of kids ages 6-15 these days. They are OBSESSED with Minecraft! If you have never seen it, here's an example of a Minecraft screen: 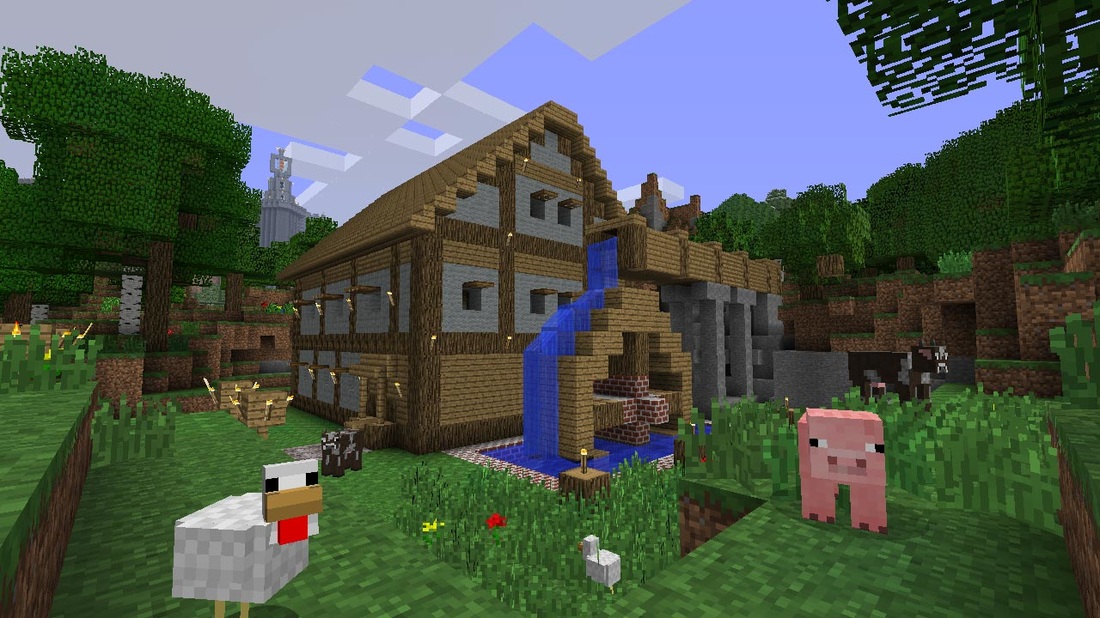 Initially I totally didn't get it. I mean, LOOK AT IT. Why would you want to play a game with 8-bit style graphics when you could play in these gorgeous 3D environments that are available to gamers today? I decided to put aside my disbelief that kids could actually want to play something that looks THAT bad and try it out... and you know what? It's ADDICTING! You have the power to create the game as you play it. How awesome is that? Unfortunately you also have the ability to be eaten by large scary spiders, drown, be mobbed by zombies, starve to death, or a myriad of grisly deaths. How can kids build and create without the "survival" aspect of Minecraft? Enter MinecraftEDU. With the educational version, teachers are allotted a lot of control over different aspects of the game. You can create assignments, give them objects or blocks, transport them from one place to another, and much more. You can even do long-distance building and use a fill tool to fill in large areas of blocks (a HUGE time-saver!) You'll need to buy the software licenses for MinecraftEDU for your school. 1 Server license (which will run the game) and however many student licenses you will need. You need one for every kid who will be accessing Minecraft at the same time. It is a "per computer" license, not per user. For example - I have Minecraft installed in our computer lab. There are 28 student computers and 1 teacher computer. I ordered 1 server license and 30 student licenses (so I could have an extra copy at home if I need to plan with it). I can have a maximum of 30 kids playing at once even though there are over 800 in my school. At the time of this blog post, MinecraftEDU costs $41.00 per server license and $18.00 per student license. 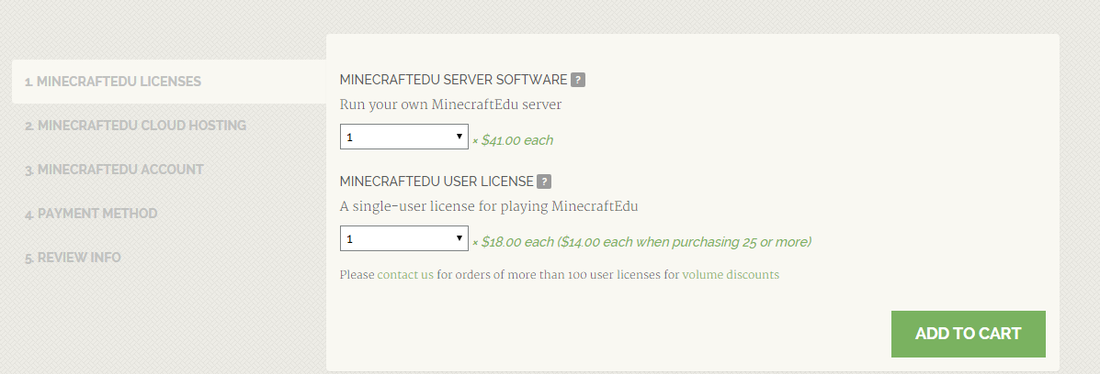 You'll need to check the current pricing. Once you purchase it, installation is easy. They make the download available to you on your MinecraftEDU account, so you just login and download the file. If you are a WCPS Teacher, you'll want to install the program on the generic student account for your school. If you install it on a specific student's account, it will not be accessible for all students who access that computer, just that one. Email me if you need more explanation! You'll also need to install the server on one teacher machine. I recommend a MacBook Air if you have one as the Macbooks can handle the processing with ease. PCs will do fine, but may lag a little. You'll use the teacher computer to host the server, or game, for all the students to login to. It's what enables all the kids to login to the same world. Once you have it all installed, fire up the server and get some kids together. They will know more than you, I promise. And that's ok... just go with it! I recommend starting with the tutorial world. It will teach you how to move around and get you familiarized with the controls. Here is a "Cheat Sheet" of the controls if it helps! Feel free to use it with your students.
Here are some of our students using Minecraft in the library... I'm excited to see how this develops at SPMS! If you need help purchasing or installing, or just want to talk about Minecraft, feel free to email or tweet me! If you are looking for lesson ideas, please check back soon - can't wait to see what our teachers here do with MinecraftEDU!! |
About the AuthorHi! Welcome to my blog! My name is Christine Hurley. This is my 17th year of teaching - I've taught Kindergarten, 4th grade, elementary media, and now I am in my 6th year of teaching middle school media! Archives
September 2020
Categories
All
|
||
 RSS Feed
Proudly powered by Weebly